1100 For a Buddy of Mine


Brian B Atlanta

TVWBB Gold Member
So a month ago one of my best friends stops by the house to have a beer. He has a 4 year old Stok Gasser falling apart went to find some parts for it of course none so I said to him I got an Weber under the deck never restored it and by the way talk about a procrastinator I posted a thread on that grill October 28, 2018. I had done a Silver C and that became my daily driver lost interest decided not going to be a flipper and deal with craigslist or whatever decided if someone wants me to build a grill for them with some input all in for that. Pretty much why until a couple of weeks ago had not posted in awhile, I was here just not logged in but now the juices started flowing again

I got that grill for free wanted the Redhead lid for the Silver C which had the dreaded Black Fade which he will end up with. So my price to do that grill is 4 bottles of Josh Cab which we will share of course and obviously material cost paint stainless bolts whatever. I think I can get him into this for around $100.00 bucks with a set of my used
Q stainless rod grates which he has no problem with. The story with the grates was when a bunch of us jumped on them for $30 bucks my set had a slightly bent rod all the way to the right, I sent them a picture and they sent me a new set no charge. I just used the damaged ones which were fine by the way in the Silver C kept the new ones.

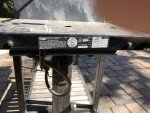
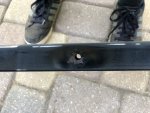
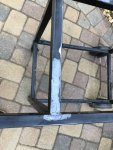
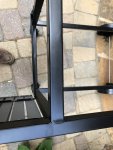
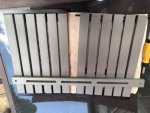
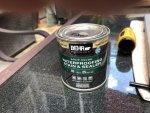
The intent for this resto is to get the guy a decent grill not perfect already told him a light wire brushing inside of the firebox and the end caps. Firebox and lids on the outside will need to be taken down to bare metal and the decision he made was to keep the original wood so I sent him home with the z bars and wood with my Famowood filler as there were a lot of divots and whatever which needed to be filled and he needed to pick out a solid stain and do the wood.

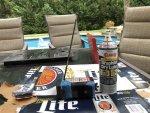
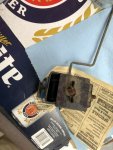
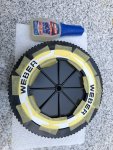
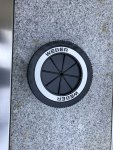
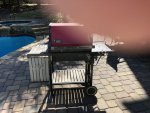
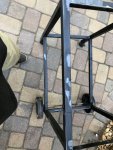
So this is what we started with will post more pics tomorrow.
 

Attachments

  • IMG_0754.JPG
    IMG_0754.JPG
    155.7 KB · Views: 46
  • IMG_0768.JPG
    IMG_0768.JPG
    151.8 KB · Views: 45
JB Weld after my orbital sander with 220 to get rid of the moon rust craters. No need to put it on as thick as I did was trying to cheat with one coat not going to happen think sheet rock mud one coat not going to do it needed a very thin second coat. 220 then 320 then 400 wet you should have no scratches before you paint. The firebox nut inside the firebox had disintegrated all I had to do was pull out the bolt so the firebox had been separated by a bit from the frame as the picture below shows just some lite surface rust. Picture of the frame after the JB fix.
 

Attachments

  • IMG_1074.JPG
    IMG_1074.JPG
    205.6 KB · Views: 26
  • IMG_1076.JPG
    IMG_1076.JPG
    105.5 KB · Views: 29
  • IMG_1077.JPG
    IMG_1077.JPG
    172.8 KB · Views: 30
  • IMG_1104.JPG
    IMG_1104.JPG
    142.3 KB · Views: 29
He finished the wood in a week this is a waterborne product which I have used before but it was a semi this is solid. You could do this on a weekend do the bottom of the slats he did 2 coats first coat 4 hours hit it again wait a day flip the boards 2 coats the next day. This was pewter I really think he did a good job love the color this is a sample can from HD which they will tint to your color that they offer. Total cost 4 bucks and change for 8 oz which was enough to coat all the slats with 2 coats and the handle with 3. He forgot the ends I did those still have enough left to touch anything up down the road.

Edit: I used Dave's penny method for the spacing on mine since this was original wood it was 5 pennies between the slats. Shout out to Dave for coming up with this idea.
 

Attachments

  • IMG_1099.JPG
    IMG_1099.JPG
    138.5 KB · Views: 36
  • IMG_1100.JPG
    IMG_1100.JPG
    192.2 KB · Views: 36
Last edited:
I am not a big fan of the solid opaque stanins, but that looks great.
Glad to see you get back up on the horse and in the saddle.
 
Bruce you have to go solid on this old wood when you use wood filler. Remember he wanted to save the wood and that is the most fun about this project I wanted no input on the stain color sent him off to home depot and I said to him cause we are good friends, I want no part of picking out the stain and if you screw it up its your problem. :)
 
Yep, I understand the need for the opaque stain for that situation. I also understand having him pick out the stain.
 
So the rust on the spring on the tank scale I masked the top off using Frogtape Fresh paint and the other piece you can see sprayed it underneath with the PB graphite. That gets one side of the spring, then pulled the tape off the top stuffed news paper in the bottom then sprayed the other side pretty sure I got almost all of it. One side of the tank scale there are some small holes which I did not see and this stuff goes everywhere actually came out a bit on those holes but you don't see that side. Where nitrate gloves or whatever get it on you hands a pain to get off.
 

Attachments

  • IMG_1096.JPG
    IMG_1096.JPG
    189.8 KB · Views: 31
  • IMG_1097.JPG
    IMG_1097.JPG
    149.3 KB · Views: 30
I have used the electrolysis method to deal with rust on the tank scales, including the springs. Seems to work pretty well.
 
The wheels did something different this time on the front wheel insert only. On the back just sprayed the whitewalls obviously removing the whitewalls from the wheel with rusto 2x blossom white and the wheel with semi gloss rusto black 2 coats of satin clear you can knock these off in an hour as you shoot the black wait 10 minutes hit it again wait another 10 minutes one more coat if you wish then satin clear after 10 minutes then another coat of clear. Wait a few days then you can use the loctite to get those inserts to lay flat. Thin coat around the outer and inner edge you don't want to get to close and let that glue bleed out. Do not press down when taping in the middle of the letters because of bleed out, when you are done when you put the wheels to your eye there will be the glue you can see between the letters you will never see this when on the frame.

Okay the front insert probably need someone like Bruce who has tons of these inserts to try a different method than I used but I know my method works I had a disaster with my Silver C had sprayed the plastic end caps with a nice gray then clear coat. The cover in the heat stuck to those caps so I used Goof Off Professional and got it all off it was painful and curse words would be an understatement.

So that chalky crap on the inserts, I figured I could get it off and get to the plastic which is actually a grey color like the back of the insert. Goof off with a cotton rag let it sit for a few minutes. Softens up used my thumbnail to scrape to get off as much as I could this stuff does not bother me but it could bother you so be careful keep that Goof Off at arms length the fumes even outside which is where I did it is very strong. Then I took magic eraser with the goof off supporting with my fingers around the insert on the back and be careful around the letters gentle start rubbing the key is keep moving the eraser to a clean piece otherwise you just rub the paint back on. Then in between I take a cotton rag with the goof off and rub it down. There was some stubborn paint that I could not get off but it was thinned enough when I took some 400 wet it came off again my fingers always behind and careful around the letters.

The different method take a crappy insert get a dog bowl for a few dollars at Walmart that is wide enough for the insert to lay flat soak it in Goof Off for a few hours it would not take much since those inserts are thin thinking it would be way easier to get that paint off with the eraser and cotton rags.
 

Attachments

  • IMG_1086.JPG
    IMG_1086.JPG
    214.2 KB · Views: 27
  • IMG_1087.JPG
    IMG_1087.JPG
    261.7 KB · Views: 26
Bruce I am sitting here LMAO I love how he talks about risk of explosion made me think of your video on the dye when you light up the stove with the Acetone. And then you keep motoring on like its no big deal the stove is black and the wife is gone for the day. :)

The Midwest Event is going to be fun.
 
Yah, the Midwest meet will be a good time. Should I bring the dye and turkey fryer???

t0sG1c6.jpg
 
Brian,
The video that Bruce posted is one of the youtube videos that I used for my setup. I haven't posted any threads on this, though. Here is a pic of my setup. The large tub is for a frame project. I had a friend sandblast the frame and then I am treating the inside with electrolysis to get rid of the inside rust. I had to do the frame pieces one side at a time because I couldn't find a tub big enough. The smaller one in the background is one that I use for smaller pieces. I have done tank scales, Z bars, slide rails....results are pretty good, and obviously it is helpful for rust removal in places that are hard to get to with a brush.IMG_1199.JPG

IMG_1200.JPG
 
Yah, Rick, you are really going all out. What are you doing to keep it from coming back?
 
Yah, Rick, you are really going all out. What are you doing to keep it from coming back?
For the frame, after the electrolysis, I ran some steel wool down each piece, attached to my power drill, then I shot some Eastwood Internal frame coating inside the pieces not in contact with the firebox...for those in direct contact with the firebox, I shot Rustoleum flat black high heat paint to coat the inside.


Back
Top