You are using an out of date browser. It may not display this or other websites correctly.
You should upgrade or use an alternative browser.
You should upgrade or use an alternative browser.
1100 For a Buddy of Mine
- Thread starter Brian B Atlanta
- Start date
I have a vintage 1100 Genesis that I was fortunate enough to find one including the manual and cover in almost new condition. Never run out of gas. Also curious if I'm the only vegan on this site? what do vegans grill? Beyond burgers & sausages, portobellos, just to name a few. This is a great forum!!! cheers, Greg, Tucson AZ
Brian B Atlanta
TVWBB Gold Member
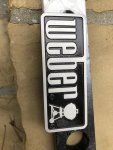
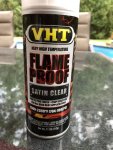
So I had painted this over a year ago with Krylon High Heat Max never got around to sanding it down but did today. This board you see has holes for the various bolts I spray think the bolts that go in the handle. Also has a bolt pattern for the emblem so I can push it in flat to the wood then I use an orbital sander use 100 then go to 220 done sprayed with 3 light coats of high heat satin pretty sure it was Bruce who came up with the idea of the high heat clear.
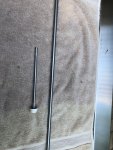
I did Ralph's trick on the axle, started with 60 grit wish I had 50 worked about 25 minutes to get it where it needed to be then 100, 150, 220, 320 finally 400. For sure you will need to use clear like he did as I had let it set in the basement after sanding for a few days and you can see the rust was instant. No problem just loaded it in the drill spun some 400 on it for a few minutes done cleaned it off and then hit it with some 3 light coats of gloss clear. If you put the axle up to your eye you will still see some pitting but you will never notice it on the frame the finished picture is crap will pull it out into the sunlight tomorrow but the result is pretty amazing looks like new. So if you are going to do this after your done clean it and hit it with the clear right away.
I assume Ralph is like me have almost because the amount of projects I do any I have any grit you can think off. This sandpaper is not cheap unless you have all these grits this to me is not very cost effective better off just buying a new stainless axle from MC. But if you do it really looks as good as new.
Attachments

Brian B Atlanta
TVWBB Gold Member
Rick I figured as much unless you have all the stuff I have not worth the effort. For this project maybe $3 dollars if that for the sandpaper since I buy in bulk already have the clear which I use for other projects but he is paying for that as I am using that on the z bars not wasting high heat paint on those black semi gloss with satin clear. I will have to see if Fastenal carries that for the future projects turns out I have one local maybe 10 minutes down the street. Mc would be an hour drive and of course I assume that price is not including sales tax and shippingCorrosion-Resistant 316/316L Stainless Steel Rod, 3/8" Diameter
$11.28
24 inches
McMaster-Carr
I am retired so I don't count my labor it helps to keep me busy along with other projects. For this project what I did is fine he really would have no clue what 316 stainless is nor would he care. He just wants a grill that looks okay and works and does not fall apart in 4 years.
Rick W
TVWBB Super Fan
Rick I figured as much unless you have all the stuff I have not worth the effort. For this project maybe $3 dollars if that for the sandpaper since I buy in bulk already have the clear which I use for other projects but he is paying for that as I am using that on the z bars not wasting high heat paint on those black semi gloss with satin clear. I will have to see if Fastenal carries that for the future projects turns out I have one local maybe 10 minutes down the street. Mc would be an hour drive and of course I assume that price is not including sales tax and shipping
I am retired so I don't count my labor it helps to keep me busy along with other projects. For this project what I did is fine he really would have no clue what 316 stainless is nor would he care. He just wants a grill that looks okay and works and does not fall apart in 4 years.
To each his own, I pick and choose my battles. The new SS axel from MC is just an easy time saver for me. But I am interested in your wheel rehab that you posted. What is the layer of chalk like stuff that you are removing from the white walls with the goof off, and what does the final product look like when you have done this prior to painting?
Brian B Atlanta
TVWBB Gold Member
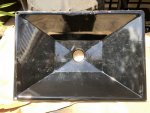
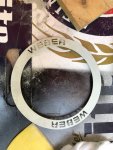
So Rick when you pull out the insert from the wheel the back is a smooth light colored grey. They used some kind of paint or whatever on the front which degrades I called it chalk like stuff so I was able to remove that so it was the same texture as the back nice and smooth which takes the paint very nicely. Here is a picture not a great one as I was working it on the left of the insert is the old paint or whatever on the right you can see maybe that is smoother and the texture was slowly coming up. I wish I had a better picture.
Attachments
Brian B Atlanta
TVWBB Gold Member
Rick that is the first time I have done a wheel with the goof off but I used it on some knobs before so I can't speak to paint thinner/stripper. I tend to stay with what works when I have had success.I guess any paint thinner/ stripper would work?
Brian B Atlanta
TVWBB Gold Member
So will have a bunch of pics coming done except for grinding down the outside of the firebox started today which is beyond pain full as anyone knows. The Silver C had the original texture in place so did nothing but wipe down the outside with Acetone. The 1000 had to be taken down to metal so its been a few years since I had to do this and really forgot how much effort it is at least on this one. I just cleaned up the inside a bit he already knows what it will look like after a few cooks.
I will never and I mean never do the grinding again soda blasting or whatever it is and looking for what others have done not sure soda blasting is correct but feel free to chime in. Especially anyone from ATL who has done this.
I have another customer who wants me to do a grill for them so on the search for another redhead cause they have seen the 2 I have done and love the look. I have already told them the starting point is $70 bucks which I hope would take care of the soda blasting. Told them to budget $300 plus a few bottles of Josh's Cab they are good with that. They want a Silver C as they want the burner and as we all know a lot cheaper to restore.
Brian B Atlanta
TVWBB Gold Member
Thanks so sand blasting or media blasting is what I am looking for then.
Brian B Atlanta
TVWBB Gold Member
I will Bruce hopefully someone in the ATL knows of a place but I will start doing some searching.
Kyle in Woodstock
TVWBB Guru
I've been looking.... unsuccessfully. The few shops that I found a couple said their cabinet was too small and the other said they were too busy to do grills....I will Bruce hopefully someone in the ATL knows of a place but I will start doing some searching.
Jeff MA
TVWBB All-Star
I will never and I mean never do the grinding again soda blasting or whatever it is and looking for what others have done not sure soda blasting is correct but feel free to chime in. Especially anyone from ATL who has done this.
Brian,
I have yet to grind any of my Cook Boxes but rather do a Dawn Power Dissolver followed by a pressure washer. Granted, it does not look quite as nice but your're not going after show quality here...just a clean cooking surface.
The flippers here are going after the buyer seeking a spotless surface, and that would certainly aide in the purchase but that is not what you are after for your friend.
I tried several "blasters" in the past and either they were too busy or didn't want the small job of several small pieces as there was not much money to be made so they blew me off.
You might want to give the recently discussed carbon off a go as it seems promising.
I might grab a can of the gel and try it against the Dawn PD in a head to head test.
Jeff
Bruce
TVWBB 2-Star Olympian
I agree. If you are just doing a personal grill, heck, I would scrape it out, maybe hit it with some oven cleaner and a SS Kitchen steel wool pad for 15 minutes and then rinse it out good (or power washer) and then put it all back together, fire it up for 20-30 minutes on high and get ready to grill that 1.5 lb ribeye.
But, buyers love that "new" look. But even then, you can just lower your price accordingly and just do the good cleaning method for that.
But, buyers love that "new" look. But even then, you can just lower your price accordingly and just do the good cleaning method for that.
Brian B Atlanta
TVWBB Gold Member
I did not spend much time in the inside the outside has been slow work but getting there. On the inside lightly hit it with the brush sprayed some Sams inside took a chisel like tool to gently remove any build up in the corners and where the bar grooves are rinsed and done. Hopefully finish the outside of the box today and ready for paint.
I guess the media blasting idea is out the window, Kyle thanks for chiming in figured you had looked into it.
I guess the media blasting idea is out the window, Kyle thanks for chiming in figured you had looked into it.
Brian B Atlanta
TVWBB Gold Member
So just waiting to let the firebox cure for a few days after painting and not happy a lot of marks even though I ground the heck out of it but it is what it is then I am going to going to put the firebox in the frame at my house with the the burners installed basically everything put together but the wood with the z bars, flavorizer bars, grates will go separate along with the hood do that at his house a few streets away. We should be able to stand it up in his Rav without the hood.
Here is a couple of things I did detail wise. I will post a picture of the final grill when we get it to his deck but questions for all. He is taking my Q stainless bar grates, I will do a burn off but I would really like to get them grease free no problem with the discolor cause they have been used. So simple green rubbed down with #0000 then rinsed off I also have the Sam's stuff which have not used a lot is that is simple as spraying them down and hitting them with the hose after they set a bit? Or would the grates still need steel wool to get them really clean.
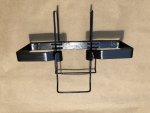
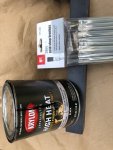
I used the Krylon from the can with some cheap brushes from HF under 3 bucks for 36 toss them away after using for 2 coats on the rust. The lower bracket for the small drip tray had a lot of rust but good now, same with the large drip pan. I use my flat file to on that rust as well as the l brackets on the manifold to shape them accordingly. This paint is great but it dries fast and needs to cure for a few day move quick load the brush and don't go back over the paint assume 2 coats and this stuff clumps bad at the bottom so quite a bit of stirring to get it mixed.
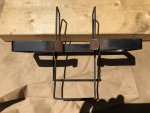
Everything that had rust on the manifold was treated as well as the small and large drip trays.
Here is a couple of things I did detail wise. I will post a picture of the final grill when we get it to his deck but questions for all. He is taking my Q stainless bar grates, I will do a burn off but I would really like to get them grease free no problem with the discolor cause they have been used. So simple green rubbed down with #0000 then rinsed off I also have the Sam's stuff which have not used a lot is that is simple as spraying them down and hitting them with the hose after they set a bit? Or would the grates still need steel wool to get them really clean.
I used the Krylon from the can with some cheap brushes from HF under 3 bucks for 36 toss them away after using for 2 coats on the rust. The lower bracket for the small drip tray had a lot of rust but good now, same with the large drip pan. I use my flat file to on that rust as well as the l brackets on the manifold to shape them accordingly. This paint is great but it dries fast and needs to cure for a few day move quick load the brush and don't go back over the paint assume 2 coats and this stuff clumps bad at the bottom so quite a bit of stirring to get it mixed.
Everything that had rust on the manifold was treated as well as the small and large drip trays.
Attachments