You are using an out of date browser. It may not display this or other websites correctly.
You should upgrade or use an alternative browser.
You should upgrade or use an alternative browser.
The "Duchess Cooker" - An All aluminum kettle made by maker of PK Grills
- Thread starter Jon Tofte
- Start date
Michael Richards
TVWBB Emerald Member
That looks incredible and you are right another 50 years here we come. Time to break in your "new' grill.Finally Finished Restoring My PK "One-Vent" Grill
I am happy to say that I finally got the time - and the last materials - to give my 50 year old PK One Vent grill a new lease on life. This PK looks like the "Original" but it is a little bit smaller. That required a custom made stainless replacement grate. See above regarding the excellent workmanship that Mark Baron of KillaGrilla did for me.
I also have started working with a local business who does sand blasting and powder coating. I have used him to sand blast a number of Weber gas grills, but this was my first try with powder coating. He used high heat silver - like it was originally - and he even bettered my wire-brushed inside by sand blasting that. I would say that my cool, old PK is ready for another 50 year run!
BEFORE (pictures by the guy who sold it):
View attachment 32911
View attachment 32913
AFTER
View attachment 32914
View attachment 32915
View attachment 32916
View attachment 32917
View attachment 32918
View attachment 32920
During the heart of the pandemic when we were truly sheltering in place there was a used pk original for sale over an hour away in Baltimore in great shape for $100. I wanted to go get it, but come not justify it. Seeing your makes me regret, just a little bit, not taking the unnecessary risk and going to get it.
Richard in NS
TVWBB Wizard
Jon, that looks amazing! Great Job and have many Great cooks! 
Lynn Dollar
TVWBB Emerald Member
Man, you really spruced up that grill.
Anyone know about the PK Hibachi ?
Anyone know about the PK Hibachi ?
Tony-Chicago
TVWBB Wizard
I see an easter egg for the next restoration
So when can we help with the "faster than sound" ...
So when can we help with the "faster than sound" ...
Joe Anshien
TVWBB Honor Circle
Suburb job. Is this to be a "museum piece" or cooker? Just curious.
Jon Tofte
TVWBB 1-Star Olympian
I have seen pictures of it. Has a nice look to it and with some extras you can actually have TWO cookers!Man, you really spruced up that grill.
Anyone know about the PK Hibachi ?

PKGO w/ FlipKit
The PKGO with FlipKit converts into two hibachi grills for double the cooking space. Features include cast aluminum body, two-zone airflow, and easy transport.
 www.pkgrills.com
Looks like you can also just buy a single "hibachi" half

PKGO Hibachi
Take the PKGO Hibachi anywhere. With a cast aluminum capsule, two-zone airflow, and a multifunction lid, it’s the portable charcoal grill built to last.
 www.pkgrills.com
Jon Tofte
TVWBB 1-Star Olympian
Joe,Suburb job. Is this to be a "museum piece" or cooker? Just curious.
I definitely plan to grill and barbecue with this one. I admit after over a year of trying to get it to this point it will be a little hard to start that first fire inside of it. But that is what it is for! I will take a few more pictures and maybe sit and look at it for a little while, but sometime this summer it gets its maiden voyage (at least in this restored condition!).
KellyCaudle
TVWBB Member
Wow! well done! those grates are perfect too. I wish I could find find one of those. Happy grilling to you and you descendants!Finally Finished Restoring My PK "One-Vent" Grill
I am happy to say that I finally got the time - and the last materials - to give my 50 year old PK One Vent grill a new lease on life. This PK looks like the "Original" but it is a little bit smaller. That required a custom made stainless replacement grate. See above regarding the excellent workmanship that Mark Baron of KillaGrilla did for me.
I also have started working with a local business who does sand blasting and powder coating. I have used him to sand blast a number of Weber gas grills, but this was my first try with powder coating. He used high heat silver - like it was originally - and he even bettered my wire-brushed inside by sand blasting that. I would say that my cool, old PK is ready for another 50 year run!
BEFORE (pictures by the guy who sold it):
View attachment 32911
View attachment 32913
AFTER
View attachment 32914
View attachment 32915
View attachment 32916
View attachment 32917
View attachment 32918
View attachment 32920
Jon Tofte
TVWBB 1-Star Olympian
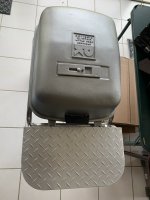
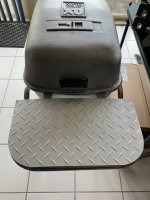
I added one non-original thing to my 50-year old PK. It didn't come with any kind of tray, but guys in our maintenance shop cut one out of aluminum for me. It just slides on and off. It is painted because the original aluminum was white of all things. I don't expect it to last, but eventually I would like to make something out of a cutting board that will stay put and yet not alter the original design in any way.


At least I will be have a place for the plate of food!


At least I will be have a place for the plate of food!
KellyCaudle
TVWBB Member
And your beer!I added one non-original thing to my 50-year old PK. It didn't come with any kind of tray, but guys in our maintenance shop cut one out of aluminum for me. It just slides on and off. It is painted because the original aluminum was white of all things. I don't expect it to last, but eventually I would like to make something out of a cutting board that will stay put and yet not alter the original design in any way.
View attachment 33378
View attachment 33379
At least I will be have a place for the plate of food!
Hey Mike I have a duchess cooker that I'm considering selling, It doesn't have the grates or the bottom vents (I saw a guy on Facebook's pk fanaticsIf any knows of one or is wanting to sell let me know. I’m ready.
page who made them and is selling them) and the cart is complete. I have to dig it out of my storage to get pics for you. Are you local to NJ
Mike - LA
TVWBB Super Fan
Jon what did you do to restore the wheels?Finally Finished Restoring My PK "One-Vent" Grill
I am happy to say that I finally got the time - and the last materials - to give my 50 year old PK One Vent grill a new lease on life. This PK looks like the "Original" but it is a little bit smaller. That required a custom made stainless replacement grate. See above regarding the excellent workmanship that Mark Baron of KillaGrilla did for me.
I also have started working with a local business who does sand blasting and powder coating. I have used him to sand blast a number of Weber gas grills, but this was my first try with powder coating. He used high heat silver - like it was originally - and he even bettered my wire-brushed inside by sand blasting that. I would say that my cool, old PK is ready for another 50 year run!
BEFORE (pictures by the guy who sold it):
View attachment 32911
View attachment 32913
AFTER
View attachment 32914
View attachment 32915
View attachment 32916
View attachment 32917
View attachment 32918
View attachment 32920
Jon Tofte
TVWBB 1-Star Olympian
Pretty much just cleaned them and probably used some of that 303 UV stuff. That picture in relatively low light makes them look better than they do in sunlight. I thought about repainting the red but decided I couldn't make it look convincing. The one thing I did do is use some black silicone to fill the crack in one of the rubber tires. I used a toothpick to try and mimic the tread. It's not perfect but hopefully will keep the tire from crumbling off.Jon what did you do to restore the wheels?
Darren Lebner
TVWBB All-Star
That aluminum tray can double-function as a griddle. Now you wanna pimp your grill some more!
