Jon Tofte
TVWBB 1-Star Olympian
Ever prone to rabbit trails and grills that need a museum that I don't have, when I saw this pretty rare Broilmaster "double grill" I just had to figure out a way to get it.
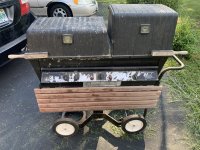
This unusual set-up was made by Broilmaster for a while. This one is the slightly later model with front controls, whereas the first model had the controls on the post. The theory behind this contraption is that you have a regular grill on the left (complete with rotisserie brackets) while the right serves as an outdoor "oven" or for low and slow BBQ:
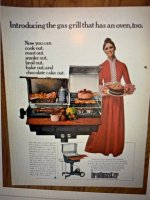
We hadn't even closed on our house when I made arrangements to pre-pay and have the seller hold it until I could come and get it. It was listed on FB Marketplace by the owner's daughter. She said he was happy to hear that I was going to restore it and therefore was willing to hold it under those terms. I picked it up and have stored it since then as I tried to get moved in, established in my new remote working jobs and, most of all, get a shop set up.
The oven side features a unique "half burner" and was in pretty good shape for a grill pushing 40 years old. However, the original cast iron grates (on both sides, actually, were mostly a lost cause. The oven side was supposed to have additional shelves. I found some for sale that are stainless but somewhat thin. Should be fine for this type of use. The cast iron is a problem, because this grill has the "2" body style that Broilmaster no longer supports. It doesn't use the high "waterfall" design, but it does have a slight ridge. So cutting down plain flat grates is not going to result in a level grilling surface - at least without modifications.
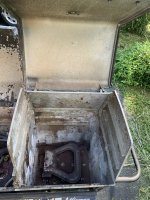
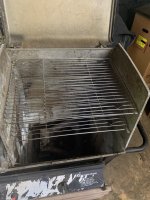
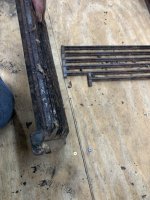
So, after picking it up and buying the stainless oven trays (test fitted above) I have had to leave this gem sitting stored in my never finished shop. My shop still needs a lot of attention, but I have started doing a little bit. I am assembling parts to take to the sandblaster, including the firebox and endcaps from my Genesis Jr. project. I really wanted to include the lids and huge body from this Broilmaster, so I decided to start disassembling it. Not a super easy task.
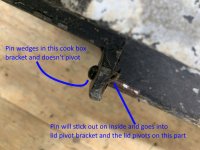
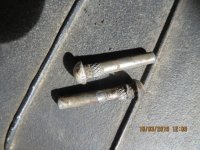
Like some Weber's this Broilmaster has issues with the hinges. Two out of four were frozen in completely, and one of these had actually broke itself - thankfully not the cast aluminum hood or firebox.
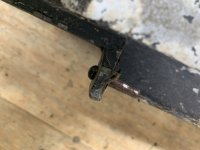
It is pretty nerve wracking working on removing these pins. I keep hearing Larry warning about shattered aluminum. If that happens, this project is toast since for something as rare as this, you don't just "wait for a donor grill." I have applied plenty of PB Blaster and might try the heat trick. Otherwise, a cut-off wheel and some very careful drilling. As in a Weber restore, I plan to use never-seize on the replacement pins, but I also want to be sure not to use ones that are so extremely tight.
In Weber restores I have noticed this problem is much more common in 300 series Genesis grills then in the older "classic" Genesis grills. I wonder if the heavier, larger hood in the 300 series required tighter tolerances to prevent sloppy openings and closings.
TO BE CONTINUED

This unusual set-up was made by Broilmaster for a while. This one is the slightly later model with front controls, whereas the first model had the controls on the post. The theory behind this contraption is that you have a regular grill on the left (complete with rotisserie brackets) while the right serves as an outdoor "oven" or for low and slow BBQ:

We hadn't even closed on our house when I made arrangements to pre-pay and have the seller hold it until I could come and get it. It was listed on FB Marketplace by the owner's daughter. She said he was happy to hear that I was going to restore it and therefore was willing to hold it under those terms. I picked it up and have stored it since then as I tried to get moved in, established in my new remote working jobs and, most of all, get a shop set up.
The oven side features a unique "half burner" and was in pretty good shape for a grill pushing 40 years old. However, the original cast iron grates (on both sides, actually, were mostly a lost cause. The oven side was supposed to have additional shelves. I found some for sale that are stainless but somewhat thin. Should be fine for this type of use. The cast iron is a problem, because this grill has the "2" body style that Broilmaster no longer supports. It doesn't use the high "waterfall" design, but it does have a slight ridge. So cutting down plain flat grates is not going to result in a level grilling surface - at least without modifications.


So, after picking it up and buying the stainless oven trays (test fitted above) I have had to leave this gem sitting stored in my never finished shop. My shop still needs a lot of attention, but I have started doing a little bit. I am assembling parts to take to the sandblaster, including the firebox and endcaps from my Genesis Jr. project. I really wanted to include the lids and huge body from this Broilmaster, so I decided to start disassembling it. Not a super easy task.
Like some Weber's this Broilmaster has issues with the hinges. Two out of four were frozen in completely, and one of these had actually broke itself - thankfully not the cast aluminum hood or firebox.

It is pretty nerve wracking working on removing these pins. I keep hearing Larry warning about shattered aluminum. If that happens, this project is toast since for something as rare as this, you don't just "wait for a donor grill." I have applied plenty of PB Blaster and might try the heat trick. Otherwise, a cut-off wheel and some very careful drilling. As in a Weber restore, I plan to use never-seize on the replacement pins, but I also want to be sure not to use ones that are so extremely tight.
In Weber restores I have noticed this problem is much more common in 300 series Genesis grills then in the older "classic" Genesis grills. I wonder if the heavier, larger hood in the 300 series required tighter tolerances to prevent sloppy openings and closings.
TO BE CONTINUED
Last edited:

