S J. Gold Mini WSM Smoker


Status
Not open for further replies.
Hi All,
Just joined the forum and wanted to say thanks to all for sharing your build ideas. I finished mine last Friday and had the first smoke on it Sunday. This one is my 5th smoker and will be great for camping and tailgating. Here are a few pics.
Thanks,
Mark

SmokerJoeBuild2011011.jpg


SmokerJoeBuild2011006.jpg


SmokerJoeBuild2011009.jpg
 
Originally posted by M.J. Alfaro:
Hi All,
Just joined the forum and wanted to say thanks to all for sharing your build ideas. I finished mine last Friday and had the first smoke on it Sunday. This one is my 5th smoker and will be great for camping and tailgating.
Wow! So shiny! I just used mine last night and it looks like a veteran.
icon_wink.gif
I made some ABTs on it and they came out great.

Welcome to TVWBB!
 
Originally posted by M.J. Alfaro:
Hi All,
Just joined the forum and wanted to say thanks to all for sharing your build ideas. I finished mine last Friday and had the first smoke on it Sunday. This one is my 5th smoker and will be great for camping and tailgating. Here are a few pics.
Thanks,

Welcome MJ.....she is a beaut.Don't you just love the way it cooks.Easy to clean up and economical.
Mark

SmokerJoeBuild2011011.jpg


SmokerJoeBuild2011006.jpg


SmokerJoeBuild2011009.jpg
 
Thanks for the welcome and the nice comments. I drilled the bottom with 8 3/4" holes and 8 5/8" holes on the outer radius. For the first smoke I cooked 5 cornish game hens each weighing around 22oz. I placed a tin pie plate on the bottom to catch the drippings and used the tamale steamer false bottom over that. The smoker took about 45 minutes to stabilize at 217 degrees. This is with the bottom vent open full. Consequently, a usual two hour cook time at 230-240 degrees took 3 hours. Next cook I will omit the false bottom to see if it will reach 225-230 before I go crazy with the drill or saw. The experimentation is fun and eventually I will get her dialed in.
Thanks,
Mark
 
Ruben, what you are refering to as the lid with holes is really the steamer tray. Yes, all steamer pots come with them, as that is yu place the food on (in the pot) to steam your food. (as mentioned above) I also use my steamer tray ( cut to size, and covered with foil) as my heat shield. I have found that it si all you need between the charcoal and whatever you have in your smoker.
Hope this helps,Tim
Mini-
wsmsmile8gm.gif
 
Hi everyone,

Just joined the forum and must say this thread is great!! Never realized one could build a Mini until now.

I've read every post of this thread and now I think my mind is like mush, trying to recall everything
icon_confused.gif


My wife and I camp in our 5th wheel quite a bit and really enjoy the outdoor grilling for dinner. Since I don't have enough room in the pickup for both a grill AND a smoker,I decided to go for the smjs and drill two extra vents on the base. In this way I would end up with a hybrid smjs/smjg. I saw an earlier post of someone who had done this but can't seem to find the post in the thread.

Does anyone recall who did this and where the post is located?

Thanks for any help,

Ken
 
Ken:

I would advise against drilling holes, unless you can close the holes off. You will not be able to control the temperature when smoking. If the purpose is to grill and smoke, you have two options. Buy a Gold, install the SJS bottom vent and heat shield/ash catcher. Or just use the SJS, as is, it gets plenty hot for grilling, makes an excellent smoker, using an inverted tuna can with holes drilled near the top sides, over the bottom vents, to keep the ash from clogging the vent.
 
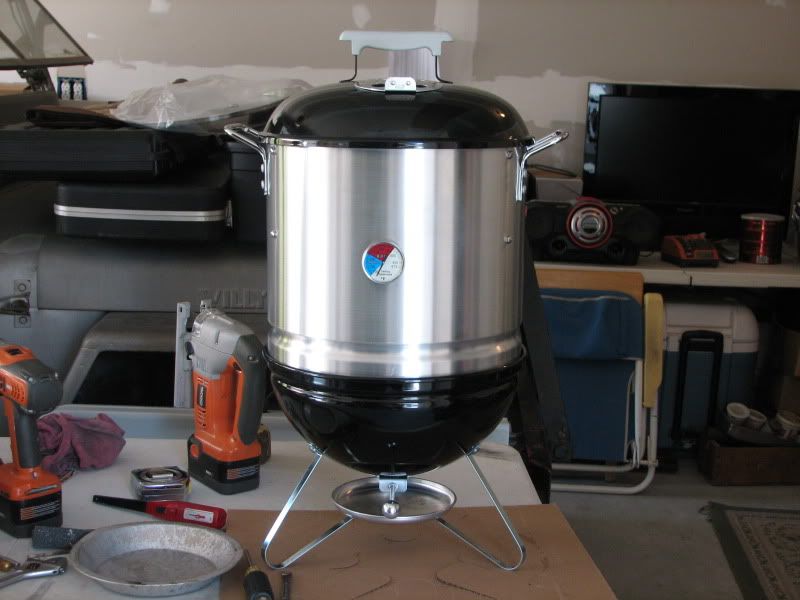
Thanks to everyone's help on this page I was able to construct my mini smoker
icon_biggrin.gif


I bought the Vasconia 32qt tamale steamer from Amazon and it's a perfect fit (thank you Ruben Z for the tip):
IMG-20110805-WA0003.jpg


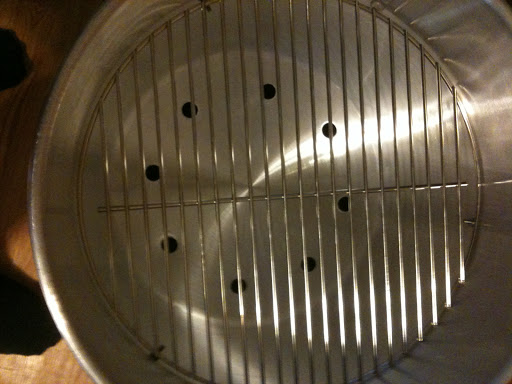
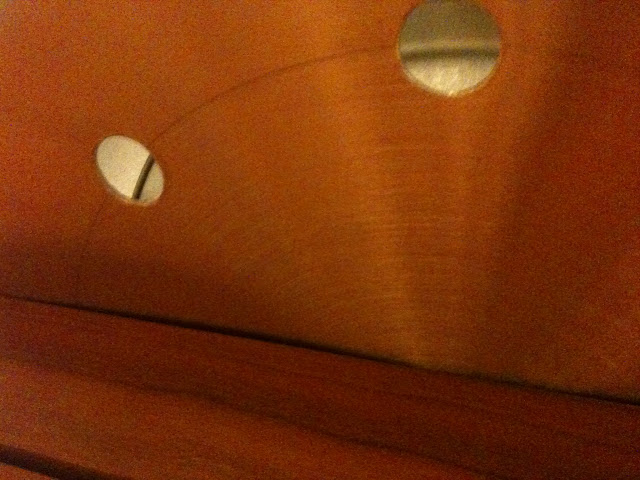
My original plan was to cut the bottom off then after reading feedbacks from others decided to try drill holes first; then if I find it's not enough I can still cut the bottom away. So I measured, and halfed, and measured, and halfed until I came up with 32 holes of 3/8" diameter each. Why 3/8" you ask? Because that's the largest drill bit I have lol.

Then looking at the circle of holes I said to myself: "This ain't enough, I need more!" so I eye-balled the next inner circle of holes, in between the outer circle (to try and leave as much material as possible for strength). Then after that second ring I was on such a roll I decided to drill yet a third ring of holes! So I ended up with close to 100 holes at the bottom - DEFINITELY enough space for the smoke to get through now!
IMG-20110807-WA0001.jpg


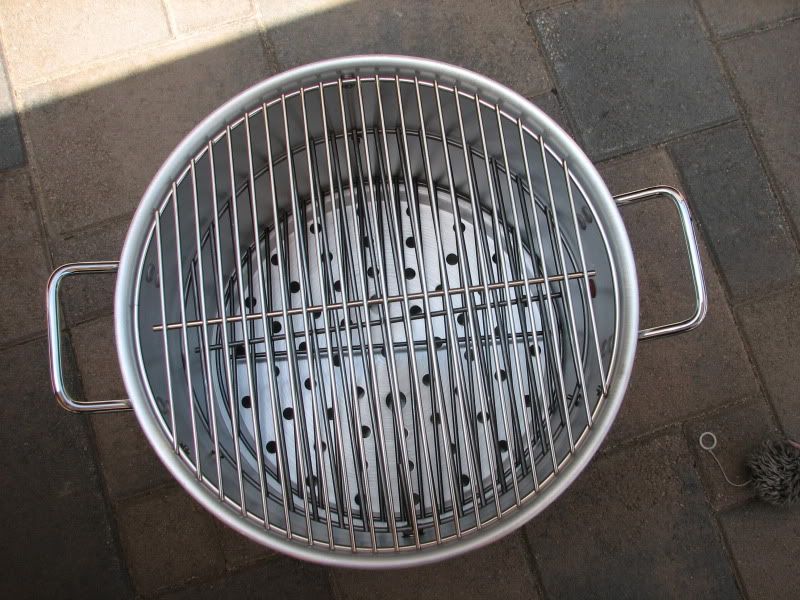
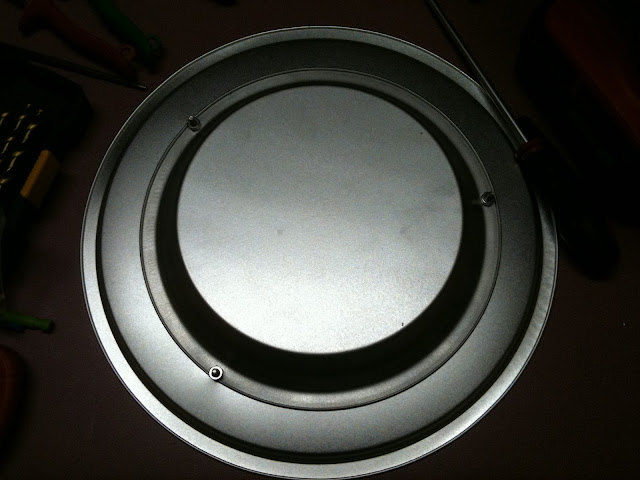
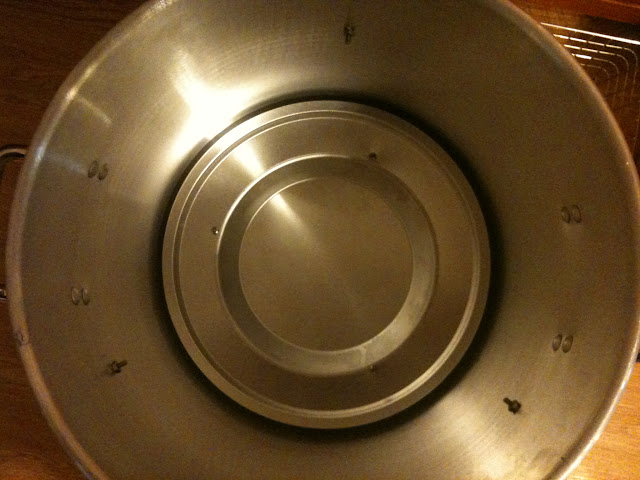
After all that hard work I then worked on drilling the holes for the layers and thermometer. I decided on a 3-layer setup (bottom grate would rest on the indent where the original steamer tray would go -> then about 4" up is the middle grate -> then about 4" up is the top grate). This would leave me with options to move around the grate depending on what I will be cooking.

My idea with the rings of holes along the outside was so that I can fit a clay saucer at the bottom to act as heat sink. It's low enough that it will clear the bottom grate with the thinking to try and even out the temps for multi-layer cooking. You can see in this picture that the clay saucer would sit at bottom and the holes are around it and not blocked.

IMG_20110807_200409.jpg


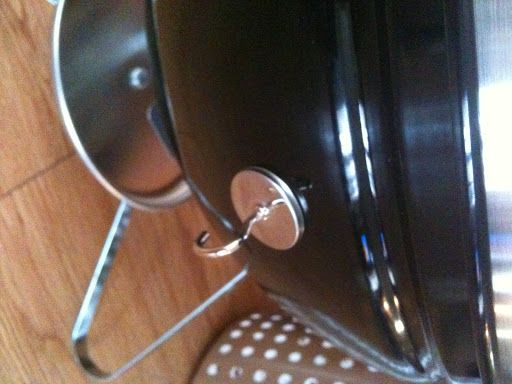
Once the holes are drilled it's time to put in the bolts & nuts and washers. I put washers in between the nut/bolt and the wall because I don't trust the relatively thin aluminum wall. Call it paranoid, call it over-engineering, all I know is it only cost me pennies extra with those washers
icon_smile.gif


Now it's time for paint! I used high-temp engine paint like others and chose to go with black. One thing I learned is that aluminum doesn't like to get painted. I ended up with a "matte dark gray" look to my pot but it's just cosmetic so I left it alone.

IMG_20110811_180426.jpg


With the paint dry it's time to put everything together! For my initial "break-in" I decided to do 5 lit + 22 unlit (brigs). Steamer tray in bottom position, and 2 Joe grates in the top positions (one old one new). I put the clay saucer on top grate to simulate a payload and see what temps I would get. BONUS: my Weber 6406 rib rack for my kettle fit inside the pot!

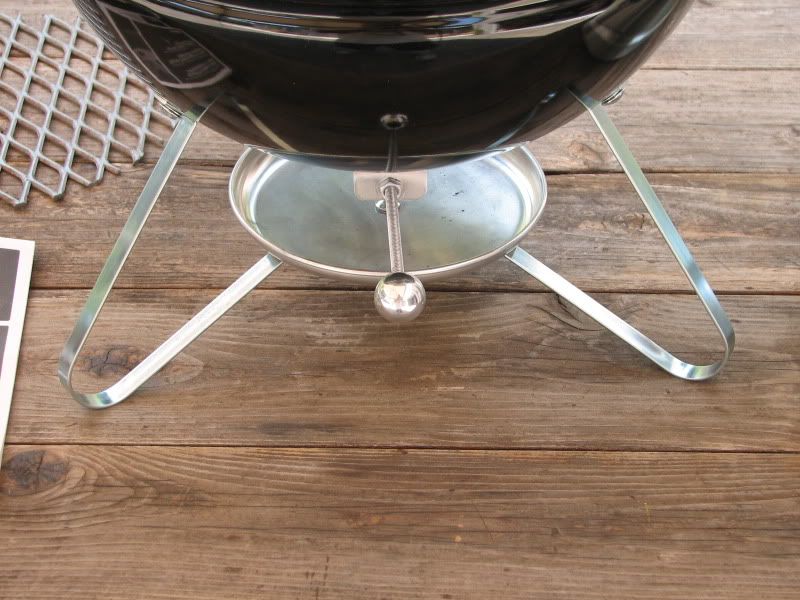
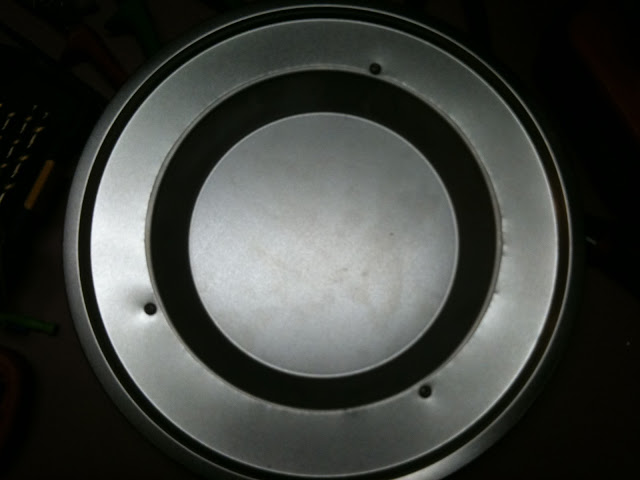
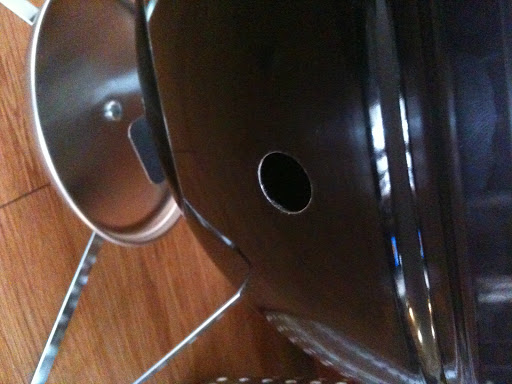
To my relief, there are plenty of holes for the smoke to get through:

IMG_20110811_183006.jpg


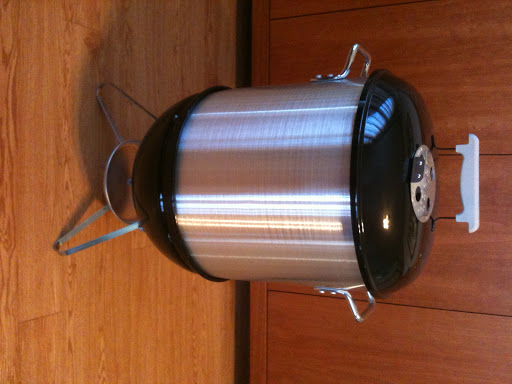
I must admit the sight of the mini smoker is awesome! Now it's time to put her to good use this weekend!
 
Originally posted by LDean:
<BLOCKQUOTE class="ip-ubbcode-quote"><div class="ip-ubbcode-quote-title">quote:</div><div class="ip-ubbcode-quote-content">Reply
Ken:

I would advise against drilling holes, unless you can close the holes off. You will not be able to control the temperature when smoking. If the purpose is to grill and smoke, you have two options. Buy a Gold, install the SJS bottom vent and heat shield/ash catcher. Or just use the SJS, as is, it gets plenty hot for grilling, makes an excellent smoker, using an inverted tuna can with holes drilled near the top sides, over the bottom vents, to keep the ash from clogging the vent. </div></BLOCKQUOTE>

Thanks LDean,

I guess I wasn't very clear on what I was attempting to do. The intent is to order two new vent covers,drill the correct size holes then install the two new vent covers on the side walls of the sjs. This way, if I want to grill, I just use the bottom vent. If, I want to do a smoke on the other hand, I only use the side vents.

I remember seeing where one of the members had done this modifiction. I just can't remember who did it. If the original poster sees my post, hopefully he will tell me what page to go to in this wonderfull but lengthy thread.

Thanks,

Ken
 
Originally posted by Angus Y:
Well done, Johnny! I can't wait to get started on my own mini smoker mod.

Agreed - I look forward to building a mini SJS/G (likely G) as well. Your pictures (and the posts of many others) are very helpful to me as well. I can definitely see how one can get a little OCD with all the details on this thing only to realize that it really isn't rocket science to build (but some aspects are, I think, less intuitive to those who do not have prior experience with a WSM.)

Drilling holes on the bottom seems simpler to me (less of a need to deburr a sharp edge cut out?, no need to use the steamer plate, less tools required and better for transport) and the potential loss of fuel down below with a more solid bottom doesn't seem to be much of an issue for most cooks. At any rate it is time to start looking for a local tamale pot...
 
although it would be cheap and easy to get both styles i would get the sjg if i could only have one. then i would add the lower vent wheel. but i have three sjs'a and two sjg's so its not a problem. but the can mod has worked well for me so see no point in getting to excited about which one you have.
 
I've been lurking/learning and went ahead and decided to join because I thought I had something worth telling folks about. I used a pot that wasn't a Tamale pot that I picked up from Academy Sports. It is a 36QT Turkey Frying Pot and it is pretty beefy. Link To Website I thought some people who may have trouble finding a tamale pot might like to know there is something else and it is a heavier made pot as well but not a ton of money either which is nice! There are some pics of my drip pan too. I wanted it to set at the bottom and not cover the holes and be deep enough to catch a lot of drippings for really fatty things like a butt. I also wanted it to fill most of the diameter of the pot so there would be less mess. Not much luck finding what I needed to fill the bill so I decided to make one from a 12" pizza pan (diameter of the pan is actually 13" edge to edge) and a 9" pie pan. I found these at the Dollar Tree store. I plan on covering it in foil before using to make cleanup easier. I know it is probably hard to tell, but the last pic is taken from underneath the pot to show through the hole so you can see how the pie plate holds the pizza pan up to keep it from covering the holes.

IMG_00001.jpg


IMG_00002.jpg

IMG_00010.jpg


IMG_00011.jpg


IMG_00005.jpg

IMG_00006.jpg

IMG_00007.jpg

IMG_00008.jpg


IMG_00009.jpg
 
kevin, nice and well thought out. i'm kinda wondering if you might need to drill more holes though. a couple of cooks will let you know.
 
My thinking is as long as the area of the holes in the pot is more than the area of the intake holes in the bottom of the SJ then I should be OK. I will find out this weekend. I have a 3lb chunk of balognia for a test subject!
I have been using a UDS I built a few years back with perfect results. Unless the outside temps are painfully low, I only use one 3/4 inch intake hole open to reach 220. That makes me think that by closing off the bottom vents a drilling a 3/4" hole in the side of the SJ might be the way to go. I will report back with the results.
 
I built my mini about 2 weeks ago, I have done a few test burns, this is my first time doing something real. I am amazed at how this goes up to 250 and just stays there. This is an amazing little cooker.
 
Status
Not open for further replies.


Back
Top