You are using an out of date browser. It may not display this or other websites correctly.
You should upgrade or use an alternative browser.
You should upgrade or use an alternative browser.
Quick partial disassembly of Weber genesis 1000
- Thread starter Jeffrey W
- Start date
I would let it burn a whole longer to see if the flames even out some. But, most likely, that middle burner is rotting out and needs replacing or you need to open the vent on the burner tube some.
DId you do any cleaning on the burners?
I cleaned the outside with a steel brush. Should I go hole by hole with a pick as well? If I were to get new burners is there any performance differences due to the difference with two rows of holes on the side vs the single row in top?
Could a faulty regulator also cause flames?
Thank you! I bought all new stainless steel fasteners, but I will definitely now add a washerEven if a wing nut I would verify the wing nut is stainless steel first, then use a stainless flat washer between the bracket of the manifold and the wing nut. That tis how my Genesis grills were made from the factory
Steve Hoch
TVWBB Olympian
If the regulator was bad, all the burners would look like that. As attractive as that middle burner tube with the double row of holes is to some people, they don't last forever. You can try cleaning it better first but it looks shot.I cleaned the outside with a steel brush. Should I go hole by hole with a pick as well? If I were to get new burners is there any performance differences due to the difference with two rows of holes on the side vs the single row in top?
Could a faulty regulator also cause flames?
LMichaels
TVWBB 2-Star Olympian
I like using a flat washer (even if the factory didn't make it that way) because it allows for slight movement between the parts as they heat up and cool down. What I don't remember is if there was a lock washer between the wing nut and the flat. Thinking hard I believe there was
Yeah, I gave it another brushing and let it burn for about 20 minutes. It looks solid on the outside, but who knows what is going on in the inside. I also picked it up in rural New Hampshire where it has been outside with a colony of ants in one of the legs (all cleaned out now) - any after market burner tubes you’d recommend or should I stick with Weber - I think I may switch out the regulator and hose also to update from the quick connect.If the regulator was bad, all the burners would look like that. As attractive as that middle burner tube with the double row of holes is to some people, they don't last forever. You can try cleaning it better first but it looks shot.
Steve Hoch
TVWBB Olympian
I don't have a particular aftermarket brand that I use, I always look at the price and most recent reviews to make that decision. You can also just buy an acme nut to replace the quick connect if the hose is still in good shape, that will save some money.Yeah, I gave it another brushing and let it burn for about 20 minutes. It looks solid on the outside, but who knows what is going on in the inside. I also picked it up in rural New Hampshire where it has been outside with a colony of ants in one of the legs (all cleaned out now) - any after market burner tubes you’d recommend or should I stick with Weber - I think I may switch out the regulator and hose also to update from the quick connect.
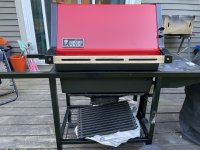
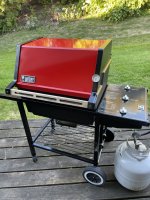
Very happy happy with how the stove bright satin black color turned out on the cookbox. My angle grindinder left swirl marks on the end caps that no matter how many layers of ultra high heat spray paint I can not get a perfect finish. Seems like sand blasting is the way to go. Over all I am very happy considering how it looked when I got it.
The handle can use some more cleaning. Hopefully it matches the new cedar I bought for the slats. Going to look at stains tomorrow

The handle can use some more cleaning. Hopefully it matches the new cedar I bought for the slats. Going to look at stains tomorrow


Thank you, All the wood stove dealers around me - there are quite a few as I’m in Vermont - carry it, and for much cheaper than for what it sells online. I thought it would be a good medium between the flat black of rustoleum - which always looks a little too gray to me. and the gloss of ultra high heat.It does look great. I never knew stove bright was paint. I always thought it was a treatment like gun bluing. Learn something new all the time
Steve Garretson
TVWBB Fan
brilliant! Thanks for a new lesson learned!Thank you, All the wood stove dealers around me - there are quite a few as I’m in Vermont - carry it, and for much cheaper than for what it sells online. I thought it would be a good medium between the flat black of rustoleum - which always looks a little too gray to me. and the gloss of ultra high heat.
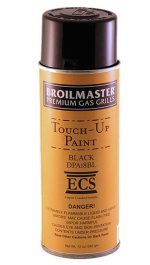
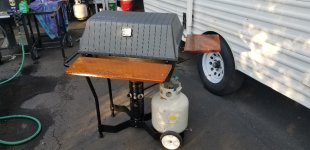
I used stove bright paint on my Broil Master rehab. Very good paint with a lot of color variations. But expensive and I had one heck of time with the spray nozzles clogging up.
View attachment 119901
I get it locally for $13.00. Also found it difficult to work with. I got some advice when I bought it to wipe the nozzle frequently with a paper towel. On the first round of use it also through a lot of splatter - second time I shook it vigorously for about 3 minutes and refined my technique. Switching to the regular rustoleum 2x for the frame and other parts made painting seem like a breeze
Josh Dekubber
TVWBB Hall of Fame
I've been thinking about getting Broilmaster paint for my broilmaster but I think I'm probably just going to use the Krylon or Rust-Oleum I have on hand.I used stove bright paint on my Broil Master rehab. Very good paint with a lot of color variations. But expensive and I had one heck of time with the spray nozzles clogging up.
View attachment 119901

Josh, I saw a post of yours where you used ebony watco butcher block stain on I think Brazilian rosewood. Loved the dark warm brown finish, in other pictures I found online the ebony gave a more opaque black finish. Were the results you got because of the wood you used, the amount of coats? I bought cedar with a reddish tint.I don't see that it would hurt anything. If you want the rails to be painted it might be easier to take them off to do a nicer job though.
Josh Dekubber
TVWBB Hall of Fame
The Brazilian walnut is pretty dark that I used and I actually tried it on a lighter wood yesterday and it did not turn out very well. I wouldn't really recommend it unless you're using it on a dark wood. It also looked great on Black Walnut. I just used one coat. Covered each piece one at a time with a thick coat rubbed it in for about a minute and then rubbed off the excess.Josh, I saw a post of yours where you used ebony watco butcher block stain on I think Brazilian rosewood. Loved the dark warm brown finish, in other pictures I found online the ebony gave a more opaque black finish. Were the results you got because of the wood you used, the amount of coats? I bought cedar with a reddish tint.
I do have a lot of cedar laying around if you want me to test it out and show pictures. I also got a sample of something similar from another company that I can try also.
Something to keep in mind also is that Watco product is not going to be a long-term finish. It will need to be reapplied periodically especially if in harsh conditions.
Last edited:
Thank you, but that’s alright, I just saw some examples online on lighter woods. I’m going to go to the hardware store and see what I could find that will give a dark reddish brown - maybe a mahogany. Thinking of using a clear water seal as wellThe Brazilian walnut is pretty dark that I used and I actually tried it on a lighter wood yesterday and it did not turn out very well. I wouldn't really recommend it unless you're using it on a dark wood. It also looked great on Black Walnut. I just used one coat. Covered each piece one at a time with a thick coat rubbed it in for about a minute and then rubbed off the excess.
I do have a lot of cedar laying around if you want me to test it out and show pictures. I also got a sample of something similar from another company that I can try.

