New Project - 2004 Genesis Gold C SS


Rich G

TVWBB Honor Circle
If you saw some of the back/forth in the Buy/Sell this am, you saw my post about this grill.......

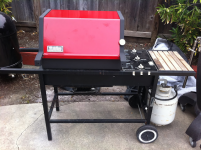
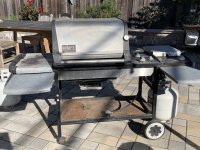
I saw this posted for free on NextDoor in a neighboring city (12 minute drive), and it looked in good shape, so I decided to pick it up. The lady who was getting rid of it said she bought it in 2004 when she got divorced. She wanted to clean it up and keep using it, but, not being handy, it was going to cost her about the same as a new one to get it refurbished. So, she's got a brand new Weber Grill (smart lady), and after some work, I'll have a "brand new" grill, too. :)

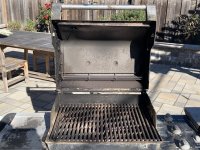
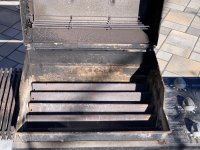
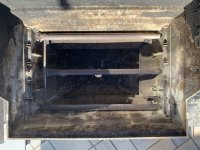
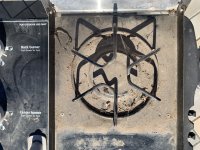
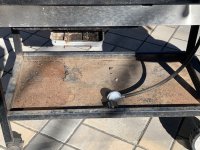
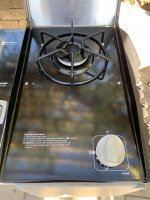
Now, it does have some issues, but I suspect none are insurmountable. There are some rusty areas on the frame, but they look like surface rust rather than structural cancer. The lower shelf is very rusty, so not sure that can be saved, but I'll try. The grates and flavorers are in pretty decent shape (this lady appears to be one of the few who took care of her grill!), as are the burners. The lower drip pan is in pretty good shape, with some of the common rusting along the edges, but it is structurally sound. The shelves all look and work great, valves turn smoothly, etc. I had to use my MAPP torch to light it, as the shroud for the igniter is toast (common), but everything lit up as it should, including the side burner. All of the burners, valves, etc will get a good cleaning anyway, and I expect that I'll get good blue flame once that's done.

I'm pretty excited to have picked this up, and to have the opportunity to restore it to full glory. It'll take a while, I'm sure, but I'll post updates here as I get to them. In the meantime, here are some "before" pics.... :)
1610914574464.jpeg

1610914584126.jpeg

1610914593744.jpeg

1610914623342.jpeg

1610914609499.jpeg

1610914642184.jpeg
 
Yah, that thing will clean up extremely well. You might want to consider replacing the SS Lid. They are hard to keep clean and the inside liner will never come clean like the inside of porcelain colored lid would. The liner already looks like some of the welds are gone. I am going to predict that bottom floor pan is a lost cause. If you can't reclaim it, there are a couple options.

How did loading it into your vehicle go?
I'll keep an eye out for a donor lid. You are correct, the inside liner is not in great shape.....no complete rust through, but at least the top welds are going to fail, and I'm sure some of the others when I inspect more closely. The floor pan (I assume you mean the one that slides out from below that the drip pan hangs on?) is actually quite serviceable. Not pretty, but just some rust damage on the edges. I think it will continue to work just fine.

I did a surface job on the burners, and cleaned out all the holes already. The burners are in good shape (other than the frozen bolts that hold them in. I'm doing a burn in test right now, and all burners on low after 10 minutes are pushing 450F, so this thing will put out plenty of heat. The side burner you were worried about, Bruce, is in great shape. Cleaned up nicely, and great blue flame from high to low.

Next step is finding some time to really dig into this! .....but, I'll have to cook something on it first. :)

R
 
Couple quick observations:

I am sure that Bruce meant the bottom shelf attached to the bottom part of legs. It does look rough and maybe hard to restore if your rust removal results in holes. A possible fix is to get a wire rack to replace that rust-prone piece or to add two horizontal frame tubes to hold the legs together as that shelf does now.

You mentioned the rusty bolts that hold in your burners. Glad you did not take them out; that almost certainly would have just broken off. Even Weber says to view these as just permanent pegs to hold your burner tubes and leave them in even if rusted down to pegs.

I agree with Bruce about a color hood replacement. You could, however, just cut out the liner. It is possible your stainless will develop a blue tint from high heat, but your hood will be able to be cleaned on the inside.

Overall, you have a solid and nice grill to work from. Double fold-down tables, a side burner and the classic Weber Genesis burner layout are all great things.

Best wishes! Keep the pictures coming.
 
Couple quick observations:

I am sure that Bruce meant the bottom shelf attached to the bottom part of legs. It does look rough and maybe hard to restore if your rust removal results in holes. A possible fix is to get a wire rack to replace that rust-prone piece or to add two horizontal frame tubes to hold the legs together as that shelf does now.
Oh, duh, yeah.....I pretty much already think that's toast. I'll take a run at cleaning it up, but don't have high hopes. Kind of a silly design as I'm sure it traps water REALLY well. :) If needed, my neighbor can weld, so we could put in some cross pieces, or I'll do the wire rack.
You mentioned the rusty bolts that hold in your burners. Glad you did not take them out; that almost certainly would have just broken off. Even Weber says to view these as just permanent pegs to hold your burner tubes and leave them in even if rusted down to pegs.
Ok, so I feel like I'm missing something here. What if I needed to replace my burners? I'm sure those need to come out (though, I expect there's new hardware with a new set, so maybe it's just that you don't care if you snap them at that point? How does one do the recommended burner maintenance in the Weber manual without being able to undo those bolts?
I agree with Bruce about a color hood replacement. You could, however, just cut out the liner. It is possible your stainless will develop a blue tint from high heat, but your hood will be able to be cleaned on the inside.
I looked it over a bit more this afternoon, and really, the only bad spots are the two top welds. The rest of the liner welds look good. I'll keep an eye out for a colored lid (what years/models will fit?), but no hurry on that front.
Overall, you have a solid and nice grill to work from. Double fold-down tables, a side burner and the classic Weber Genesis burner layout are all great things.
Thanks, I think it's going to turn out nicely. I'd like to cook on it a few times before I move into full break down phase. This afternoon I just spent some time doing basic cleaning, etc. I think the side burner turned out pretty well for a small investment of time! :)

1610928088628.jpeg
 
Nice pick up and already starting to look good Rich! Yah, the bottom shelf will be the hard one to replace but since you have a welder friend I'm pretty sure you guys will come up with a nice replacement. Those are nice grills as I have the platinum version of it (SS frame) and it cooks great.
 
Rich, you are supposed to remove the manifold or at least loosen the mounting bolts enough to back the burners out from under the place holder screws on the other end. Jon is right, you are not supposed to remove those screws. If you already did and they came out without twisting off, then great, just replace them.

The grill is already looking much better and if you want to do a full rehab, that is great. But as long as you do a good basic cleaning, you should be fine just like you are. But, if you do a full rehab, I think you will find it a rewarding experience. The only thing I wouldn't worry about a whole lot on the full rehab is the cook box. Just clean it up good. It will be all full of gunk again after a half dozen cooks anyway.
Ok, I think I get it now. Those screws don't go through holes in the ends of the burners, just slots......so, once the manifold is out, the burners "should"just slide out. I didn't take out the screws, as they wouldn't budge. :)

I did a full rehab on a '95 Genny several years ago, and I did enjoy it. Disassembled everything, took care of all the rust, repainted cookbox/endcaps, etc. I plan to do that with this one, too, just not right away. I've got it clean enough to use at this point, and the burners all seem to be operating properly. I'll update this thread when I get to the point where I tear it down......I'm sure I'll have a question or two. :)

I don't seem to have posted a finished picture of the old girl, but here she is painted and cleaned up.....waiting on some more wood refinishing:

1610940280041.png
 
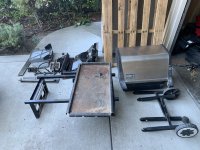
So, I wasn't going to tear into this grill immediately until I realized I have today off, and not too much to do, so.......

1611000212836.jpeg

Overall, I think it's in decent shape. I may go so far as to try and clean out the insides of all the rails, then use some of that Eastwood stuff on them to prevent them from rusting through from the inside. So I ran into some issues for which I'd love some input from you experts:

1. I snapped the firebox bolt (surprise, surprise). Is there a fix for that (the stud is still in the firebox)? I think I did that on my '95 Genesis, too, and I just forged ahead without a bolt, as there's plenty of grill weight to keep it firmly in the frame.

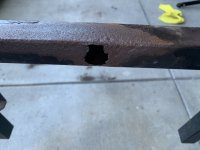
2. The crossmember on the left side where the firebox was attached is by far the worst in terms of rust issues (see pic below.) I'm thinking the best bet here is to weld in a patch after cutting out what needs to be removed?

1611000595277.jpeg

3. I can't get the lid hinge bolts out. They are supposed to come out for lid removal, right? (and, yes, I did remove the cotter pins!) :)

I think the solid bottom shelf may be salvageable. It will need some effort to remove all the of the paint and rust, but once that's done, I'm thinking some sort of coating like Por-15. The rest of the grill has some spot surface rust, needs cleaning, but with some spit/polish/paint should turn out quite nicely.

I'm sure I'll have more questions along the way..... :)

R
 
Whatever you do don't hammer on those pins. I know some will tell you to do so but believe me aluminum can become nearly as brittle as glass. When I have something like this stuck, I use a small socket and a small C clamp to simply push them out. As for the bolt, here too DO NOT try to punch it out. Simply cut it off flat and use one of those "locating drill bits" and follow up with a good drill to go all the way through. Once done follow up with stainless steel bolt and nut and a coating NeverSeize on everything
 
So, I wasn't going to tear into this grill immediately until I realized I have today off, and not too much to do, so.......


Overall, I think it's in decent shape. I may go so far as to try and clean out the insides of all the rails, then use some of that Eastwood stuff on them to prevent them from rusting through from the inside. So I ran into some issues for which I'd love some input from you experts:

1. I snapped the firebox bolt (surprise, surprise). Is there a fix for that (the stud is still in the firebox)? I think I did that on my '95 Genesis, too, and I just forged ahead without a bolt, as there's plenty of grill weight to keep it firmly in the frame.
Either try punching it out, but be careful as you could crack the cook box. Supporting the opposite side while hammering will help. Otherwise, you will need to drill it out. Start by grinding the stud down flat with the cook box. Then us a punch to center the drill in the middle of the stuck stud. Next use a centering bit to start your drill hole down the middle of the stud.
https://www.amazon.com/gp/product/B07CML2DYM/?tag=tvwb-20
Next use a good quality small drill bit like 1/8" and drill down through the middle. Then progress up to a bigger bit until the stud comes out.

2. The crossmember on the left side where the firebox was attached is by far the worst in terms of rust issues (see pic below.) I'm thinking the best bet here is to weld in a patch after cutting out what needs to be removed?
If you have access to a welder or know someone that does, just cut each end off flush with the frame rails and then replace the whole cross member with a new piece of 1 1/4" square stock.
3. I can't get the lid hinge bolts out. They are supposed to come out for lid removal, right? (and, yes, I did remove the cotter pins!) :)
They stick often in either the lid side or the cook box side. Best bet is to soak them in penetrating oil every couple hours for a day or two and then try to twist them out or punch them out......Be careful, you DO NOT want to break either the lid bracket or cook box bracket. Again, with repeated heating and cooling cycles, the cast aluminum becomes brittle.

I think the solid bottom shelf may be salvageable. It will need some effort to remove all the of the paint and rust, but once that's done, I'm thinking some sort of coating like Por-15. The rest of the grill has some spot surface rust, needs cleaning, but with some spit/polish/paint should turn out quite nicely.
That will be a lot of work to reclaim that bottom shelf, but have at it. Otherwise, if you can weld, just toss it and weld in two cross members across the front and back and create a new bottom with maybe wood or something else that won't be so prone to holding water and rusting.
I'm sure I'll have more questions along the way..... :)
Keep them coming and good luck. Keep us posted on progress....pictures are great.

R
PS: I have done a lot of hammering on my rehab cook boxes and only ever broke one. But, then I have several spares, so I can afford to throw caution to the wind and have fun.
 
Thanks, Larry and Bruce!! :)

No pics, but I got both pins out.......heat did the trick. BTW, this should be obvious to most, but Liquid Wrench is flammable (and smells bad when it's burning.)

I got some more cleaning done today, and once the lid was off, used my neighbor's angle grinder on the firebox. I got the front and one side just about done, and I was done for the day. Got all the pieces/parts stacked up nicely and covered with a tarp by the side of the house in case it rains. This makes my wife especially happy since she doesn't have to look at any of it! :)

Ordered a new catch pan holder, a replacement swivel caster and an elevated warming rack today, too. Next order of business is figuring out a plan for the crossmember that needs replacing, then a plan for the bottom shelf. I'll post more pics when I've got 'em.

R
 
Yeah being a mechanic from a lifetime ago I smelled my share LOL. We'd hit stuff with the penetrating oil it didn't work than the hot wrench. PU!


Back
Top