Looking for advice regarding fire box cleanliness


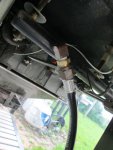
Ok so I finally received the last pieces I need to finish up the grill. The regulator hose fits the elbow piece perfectly,thanks for the Amazon links. I just need to add the sealant and I am all set. Do you cover the entire male threaded part with the pipe sealant or just the end of it? Hose.jpg
 
Just apply it to the part of the threads on the Male end that go into the elbow. If you get some above that, no big deal. Dont forget to test the connections by spraying soapy water on them when under pressure.
 
Can I do that test with just the manifold and the hose? I have to go buy a propane tank and I was going to test it in this open space by the Walmart. Also do you turn the propane tank all the way on and turn all 3 knobs to high when doing the spray test?
 
Yes you can/ Not sure why you would but it can be done. Don't over apply the sealer. A thin coat the length of the threads, screw them in tight but not TIGHT. Once they're snug just give them another 3/4 turn or so. Remember it's brass and WILL strip
 
Can I do that test with just the manifold and the hose? I have to go buy a propane tank and I was going to test it in this open space by the Walmart. Also do you turn the propane tank all the way on and turn all 3 knobs to high when doing the spray test?
Don't open the grill valves when doing the spray test. Just hook up the tank and open the valve on the tank.
 
Anthony: What did you use to clean the firebox? Getting ready to rehab my EP330 and I'd like to clean it up, but not go crazy. Mostly just replacing parts, but figured I'd clean her up in the process.
 
I used simple green, a scraper, a razor blade and a lot of elbow grease. I would use the scraper to kind of chip away at the carbon little by little until it was clean. The parts I couldnt chip away at I scraped with a razor to try to lift up as much as I could until nothing else would come up. The stuff that is left on my grill was just too difficult to remove and so I left it. I was going to use oven cleaner but I do not think that is a good idea because it could ruin the aluminum. I do not know if this is true or not but I didnt want to risk it.
 
I used oven cleaner on my last refurb. On the inside of the hood.
It won't pit if you do not leave it on for an extended period of time.
Hint: On days like these when that sun is beating down, just set it in the sun for a few hours and apply the oven cleaner after the parts get good and hot. Then maybe 15-20, no more than 30 minutes clean it off thouroughly.
That's what I did last time.
 
To the point of this thread, I just brought home that Weber I posted last night.
It has one of those old-style, plug-it-into-the-tank connections.
I salvaged a current-style hose off of a similar three burner unit, but by eye, it appears the connecting nut on the new style is bigger than the connecting nut on the old one. Not only that, the old style is an 'outie' while the other connector is an 'inny'. I've hit my first snag, it appears.IMG_0092.JPG
Friends, what an odd unit:
Durawood slats, Old 'Genesis' style 2 level flavorizer bars and a side burner as clean as new. The side tray has a slide bar it moves along to the 'erect' position.
I love my old wood slats, but I may move this one onto the deck once it is cleaned and operating.
 
Last edited:
Got it all painted! Thank you all for the tips! I am now looking to replace some missing parts and have some questions. As far as the warming racks go is it worth having them? If yes, both or just one? Also are the stainless steel channel type grates any good? I added a picture of my hose and regulator and wasnt sure if it is missing the plastic piece that screws on to the tank or if it is a type of fitting I am not familiar with. Is this type of regulator any good or should I replace it? Lastly I removed the ignitor from the grill and will just manually light it through the hole in the front. Do I need to worry about the open hole in the firebox where the ignitor connects to the grill? View attachment 4571View attachment 4572
I'm still using that old style connector! It reminds me of taking connections off of acetylene/oxygen bottles back in the day.
I even found an old wrench made just for the purpose, so 'old-school' up one side and down the other! All lpg gas tanks have the internal threads to
this day.
IMG_0098.JPG
 
I couldn't figure out how to unscrew it, but I looked hard at that possibility.
I took your good advice instead and went to the local hardware store that sells Weber.
Lo and Behold, an orphaned Spirit with all its' parts intact hopped into the back of my truck!
I then went inside and bought the half-union you showed from Amazon for $3.29
There's a picture of it, attached. Soap showed it needed a half-crank more.
Sweet and easy, I fired it up, one push of the igniter. It smoked for 45 minutes and pegged the thermometer.
I shut off the gas, opened the top and it looked like Dante's Inferno in there!
I closed the top with the flame and gas off, it still pegged the thermometer again before cooling down.
I guess many people just don't follow the Weber protocol of heating her up good before cooking, scrubbing the grates, and THEN cooking.
 

Attachments

  • IMG_0099.JPG
    IMG_0099.JPG
    114.7 KB · Views: 21
  • IMG_0102.JPG
    IMG_0102.JPG
    132.9 KB · Views: 21
Hey everyone I am back. I am not sure if I should make a new thread or just continue this one so if I did it wrong my bad. I have been enjoying the grill we built and recently was on the lookout for some extra parts and upgrades for this one. I found an awesome deal on another genesis that has the plastic wood tables and the little slider piece to hold the table up. I also got a rotisserie included in it all for $45!

When I did the first build on the red genesis I broke the screws on the bottom one on each side so it is able to hold the tray but if you bump it the tray will fall. I was thinking about taking the box off this new one and hoping I dont break the screws so I can use it. The thing is this one has oxidation all over the inside. Even under the black burnt parts its white powder. I included pictures and was wondering is this ok and does it still look in good condition or should i just keep the one I have and try to drill out the broken screws? i know the white powder is normal but I am not sure if there is a point where it is not. Thanks for the help!
 

Attachments

  • IMG_20210529_132925.jpg
    IMG_20210529_132925.jpg
    354 KB · Views: 15
  • IMG_20210529_132949.jpg
    IMG_20210529_132949.jpg
    378.2 KB · Views: 15
  • IMG_20210529_133247.jpg
    IMG_20210529_133247.jpg
    445.1 KB · Views: 15
That oxidation is very common. No worries. Just scrape or scrub the box and get it as good as you can.
I have a trick to getting the screws out of the slide rails in the bottom.


Good deal on the parts grill with the slide rail and rotisserie.
 
Just get some heavy house hold Stainless steel wool and scrub it out with some grill cleaner/oven cleaner or just a regular cleaner. Should take 15 minutes. Rinse it, dry it and cook in it.
 
Thank you Bruce I was able to get the screws out and when I flipped it over I noticed that some of the oxidation may be eating away at the outside of the box. There is some pitting but it hasnt eaten through the metal. That should be ok too once I clean it up and paint it? Will it get worse with time or will it eventually eat through completely?
 

Attachments

  • IMG_20210529_153019.jpg
    IMG_20210529_153019.jpg
    207.7 KB · Views: 9
  • IMG_20210529_153038.jpg
    IMG_20210529_153038.jpg
    418.8 KB · Views: 9
  • IMG_20210529_153100.jpg
    IMG_20210529_153100.jpg
    281.3 KB · Views: 9
That one you posted Samuel is the first box I had that I broke the two screws. I am bummed it didnt work out because I spent a lot of time cleaning it and the paint stuck to it perfectly. The good thing is I have this second one now and the screws didnt break. Those 4 little screws can burn in hell.
 
The pitting is OK. Clean it up and it will probably last another 20 years. If not, then you can find a new one at that point.


Back
Top