LinkMeter v2 Homebrew BBQ Controller - Part 2


Originally posted by Kyle Stierwalt:
Can someone please double check this setup; it was a bit unclear to me by looking at some of the pictures. I'm a total novice to soldering/electronics...great project, having fun. Basically soldered the gnd to the single post sticking out, and the others to one of the post on the back.
Connections look good to me. That's a really nice soldering station you've got there too.
 
I did change it around 10:20. I'll stash it when it completes.

I tried 10, but didn't see much difference. After reading some on tuning the PID, I saw a paper where the guy use 8, 256, 2 for P, D, and I. So tried 50 and it has been great
icon_smile.gif


The fan acts closer to how my BBQ Guru works. I can't plot that, but just watching how it pulses on and off.

dave

Originally posted by Bryan Mayland:
<BLOCKQUOTE class="ip-ubbcode-quote"><div class="ip-ubbcode-quote-title">quote:</div><div class="ip-ubbcode-quote-content">Originally posted by D Peart:
A while back we talked about adjusting PIDD to reduce oscillations. I just got around to trying this out on my current smoke and changing it from 5 -> 50 made a big improvement for me.
Nice! 50? Man that seems crazy high. Did you stash that RRD? I'd be interested in looking at the detail a little. I assume you changed the PIDD around 10:20? </div></BLOCKQUOTE>
 
Yes, that is all I changed.

I have a UDS and it has always shown this oscillation with the LM. My BBQ Guru does not show this oscillation so I know we can fix it.

I've see that it is worse when it is empty, but it still exists when loaded.

dave

Originally posted by J. Winn:
So you just changed the bias from 5 to 50 then? You didn't mess with any of the others?
 
Originally posted by D Peart:
Yes, that is all I changed.

I have a UDS and it has always shown this oscillation with the LM. My BBQ Guru does not show this oscillation so I know we can fix it.

I've see that it is worse when it is empty, but it still exists when loaded.

dave
Cool thanks, I'll probably do a few runs first to see how it goes but now I know what to do if I see something like this.

Bryan, what did you think of my capacitor "experiment" i post a couple pages back, do you agree with using a 15uF possibly? Thanks!
 
Apologies for being a little off topic...

Just read a review of the latest BBQ Guru Wifi controller.

It reminded me that the Linkmeter compares pretty well in terms of functionality... it beats it hands down on the 'fun' of building your own.

Bryan, you should send in a Limkmeter for them to review!
 
Originally posted by J. Winn:
So you just changed the bias from 5 to 50 then? You didn't mess with any of the others?
Unless I misunderstood, Dave changed the Derivative, not the Bias. The "D" parameter. This means that for every degree the temperature has changed in the last 20 seconds, adjust the fan speed by 50%. E.g. if the temperature has changed from 249.2 to 249.7, reduce the fan speed by 25%.

EDIT: Regarding the capacitor, it is up to you really. I erred on the side of a larger capacitor which reduced the buzzing sound the fan made. That buzzing sound is actually generating a lot of electrical noise as well and I was concerned about it messing up the system. I don't know that for a fact though because I only know software
icon_smile.gif
 
Originally posted by N Waring:
Just read a review of the latest BBQ Guru Wifi controller.
It does look like a nice unit and slightly less costly than other wifi devices but golly $400? And why do all these grill controllers have the worst looking web pages generated since Y2K? I can only say good things about their device's operation but for a couple hundred dollars they could hire a web designer to make it not look like just some input boxes in the default font.

Not that the LinkMeter pages are all that pretty either, but we got graphs and live updates and stuff and I'm just some amateur.
 
Originally posted by Bryan Mayland:
<BLOCKQUOTE class="ip-ubbcode-quote"><div class="ip-ubbcode-quote-title">quote:</div><div class="ip-ubbcode-quote-content">Originally posted by Kyle Stierwalt:
Can someone please double check this setup; it was a bit unclear to me by looking at some of the pictures. I'm a total novice to soldering/electronics...great project, having fun. Basically soldered the gnd to the single post sticking out, and the others to one of the post on the back.
Connections look good to me. That's a really nice soldering station you've got there too. </div></BLOCKQUOTE>

Thanks for double checking my work Bryan/Daniel. I'm happy with the Hakko FX-888...heats up fast, and love the micro chisel tip it came with, perfect size for the LM PCB.
 
I'm just some amateur

But to all us you're more than an amateur!...

Perhaps there are different levels - you could be a 'Godly' (or perhaps Ninja) level Amateur (but I really suspect you're more than that)
 
My thoughts exactly. I love my BBQ Guru, but it cost me $400 and I don't get web access. It runs like a dream though, very much plug-n-forget. I've used it a lot in comparison with the LM.

The LM is nice now that I have it working plug-n-play, still a little more picky than the Guru, but I'll have to admit I use it instead of my Guru now
icon_smile.gif


dave

Originally posted by Bryan Mayland:
<BLOCKQUOTE class="ip-ubbcode-quote"><div class="ip-ubbcode-quote-title">quote:</div><div class="ip-ubbcode-quote-content">Originally posted by N Waring:
Just read a review of the latest BBQ Guru Wifi controller.
It does look like a nice unit and slightly less costly than other wifi devices but golly $400? And why do all these grill controllers have the worst looking web pages generated since Y2K? I can only say good things about their device's operation but for a couple hundred dollars they could hire a web designer to make it not look like just some input boxes in the default font.

Not that the LinkMeter pages are all that pretty either, but we got graphs and live updates and stuff and I'm just some amateur. </div></BLOCKQUOTE>
 
Got my 3 Pcb boards yesterday

Time to retire the wire wrapped monstrosity.

I kinda hope that going to the pcb it will cure some of my Lcd problems I have delt with since building mine last year.

and hopefully i can figure out how to add the transitor to the lcd, as im using a bigger display then what has been called for.

I hopefully will be working on it tomorrow
 
Good luck on the LCD problems. I ended up swapping out the diode until I found one that worked
icon_smile.gif


dave

Originally posted by John Bostwick:
Got my 3 Pcb boards yesterday

Time to retire the wire wrapped monstrosity.

I kinda hope that going to the pcb it will cure some of my Lcd problems I have delt with since building mine last year.

and hopefully i can figure out how to add the transitor to the lcd, as im using a bigger display then what has been called for.

I hopefully will be working on it tomorrow
 
Bryan,

Had another awesome cook for the 4th. Have to say I absolutely love the LM! I ran with the derivative set to 50 again for the entire cook, and the results were perfect. I couldn't ask for anything better.

As a word for everyone else. Each smoker is a little different so 50 may not work for you, but it doesn't cost you anything to try it out
icon_smile.gif


Thanks again, everyone loved the LM results!

dave
 
Originally posted by John Bostwick:
Got my 3 Pcb boards yesterday

Time to retire the wire wrapped monstrosity.

I kinda hope that going to the pcb it will cure some of my Lcd problems I have delt with since building mine last year.

and hopefully i can figure out how to add the transitor to the lcd, as im using a bigger display then what has been called for.

I hopefully will be working on it tomorrow

I had the same experience with the LCD problem as Dave mentioned. I was getting garbled LCD which was resolved by switching the diode until I got one that worked. I think I ended up using a 1N4148 (or something like that).
 
Originally posted by Brian J Wilson:
I had the same experience with the LCD problem as Dave mentioned. I was getting garbled LCD which was resolved by switching the diode until I got one that worked. I think I ended up using a 1N4148 (or something like that).
I don't think anyone has had an LCD issue (other than contrast adjustment) since the new diodeless design. Thank goodness, that was a nightmare.
 
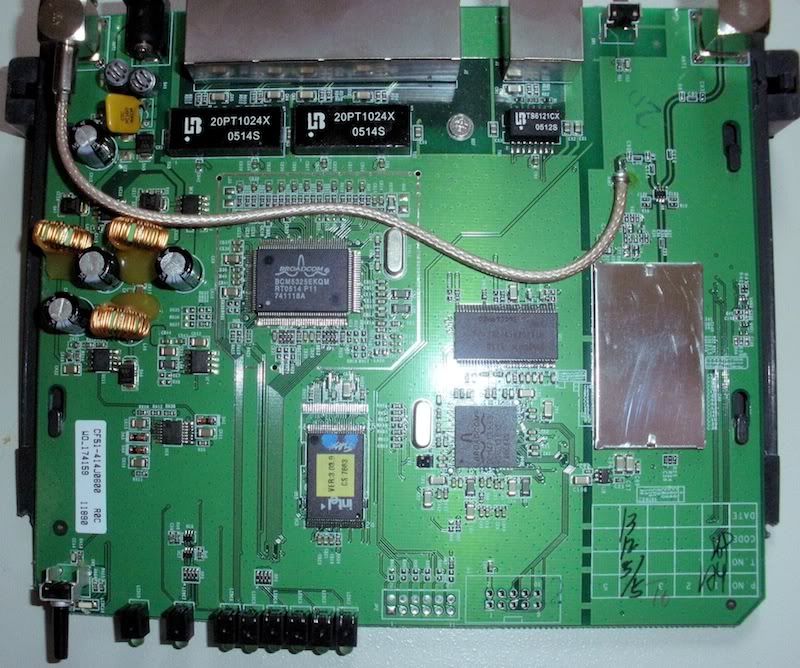
In the process of doing my first link meter and first circuit board ever. A friend gave me a WT54GV22 linksys router. Does anyone have any ideas if this will work?

wrt54gv3_inside2_196.jpg


Also on the Circuit board the RFM12b what is the best way to put that on the circuit board? I'm using the Dorkbox one. Should I just solder it directly on the board or put some sort of pins and elevate it a bit and solder it that way?

New to this so don't mind my noob questions :)
 
Originally posted by Dennis C:
In the process of doing my first link meter and first circuit board ever. A friend gave me a WT54GV22 linksys router. Does anyone have any ideas if this will work?

Also on the Circuit board the RFM12b what is the best way to put that on the circuit board? I'm using the Dorkbox one. Should I just solder it directly on the board or put some sort of pins and elevate it a bit and solder it that way?
Perfectly valid questions! The WT54GV22 should work but you're going to have to figure out the pinout of the serial header. Depending on how you fit it in there, you'll probably need to adjust the position of the LCD to make it fit once the case goes back on.

The RFM12B just put it in position directly on the board and put a piece of tape over it. Then just touch the soldering iron to the PCB pad and touch it with solder and hold the iron on it for a few second to allow the solder a chance to heat the RFM12 contact to ensure a good connection. Be careful removing the tape to not yank off any of the surface mount components. I was a little sketchy on it at first too but it turns out to be pretty easy. Double verify the orientation because once it is on, there's very little chance of being able to remove it without a heat gun or putting it in the toaster oven.
 
Thanks for the fast response. I figured that I would have to do some modification inside. I even thought of making a large box for the router instead of using it's own casing.

Thanks for the tip with the tape. Taking my time with the project as I'm in no rush


Back
Top