INTRODUCING: the "Roto Damper"


Hi,

I've had a couple of versions of the link meter and it works great. Ralph, being in the uk means I understand the issues cased by wet, windy and snowy weather.

I've been watching progress for a while and it's time to move from my home-made 'traditional' blower to something more sophisticated.

Printing the parts is the main issue for me... Matt was really helpful in mailing me a case for my current linkmeter to the uk. Would you be willing to print me a set and posting to the uk? Of course, I'd pay for the increased postage cost.

One other question... I assume you have wireless probes?

Nick
 
Juan, I've got a fresh one printed up and assembled right now but it isn't wired up yet. I wanted to test the new CAT5 wiring a bit first to make sure it's reliable before I wire up more than the prototype. Since everything has been working great the past couple weeks I guess I should get moving on that now...

Sounds good Ralph just let me know and i can send you some money via paypal.....
 
One other question... I assume you have wireless probes?
Nick

Sorry for the delay, been out of town for a few weeks....

I am not using wireless probes, I connect the probes to the jacks on my servo damper then run the probes through the CAT5 cable (along with the servo and fan wires). I've tested it with more than a 50ft cable and it works fine...

Juan, when I get caught up with work and stuff around the house I will contact you.....
 
Roto-Damper V2

In response to initial feedback from those whom I've sent Roto-Damper parts I have come up with the Roto-Damper V2. The most common feedback said the support material was a PITA to remove. Although I thought the same initially, I eventually got really good at removing the support material so this was not a huge motivation for me to re-design the parts, but the support material was also difficult to print well. At first I decided to just clean up the parts myself (remove the support grid) before I sent the parts out to anyone... Thinking that over again I decided I would prefer to modify the model to eliminate the cleanup rather than scrape out these parts over and over again, so I set out to re-design the parts....

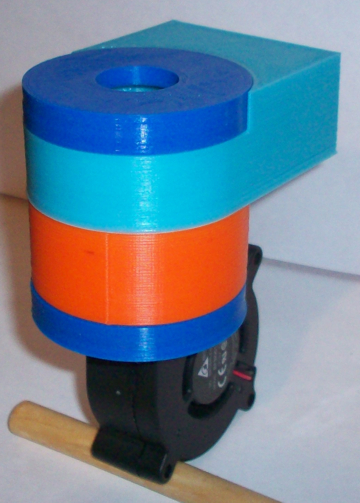
Introducing... Roto-Damper V2:
RotoDamperV2.jpg

I had always planned to split the bottom half into two pieces mainly because I have several different blowers that I like to use at times (that are not the standard HM blower or size, bigger blowers for high heat Pizza cooks). Splitting the bottom half allows me to make different blower mounts to fit whatever blower I want to use. Splitting the bottom half was pretty easily done, while I was at it I streamlined the standard Heater Meter blower mount a bit so it can be printed face down with minimal support material, and adjusted the opening for the servo so it fits better. With v2 parts the only cleanup required on the bottom half is removing the small support grid from the channel that grips the blower, everything else mates perfectly right off the printer bed...

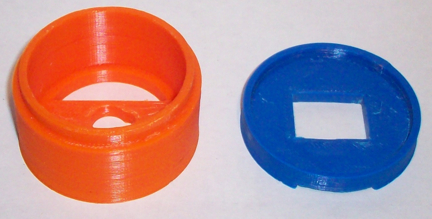
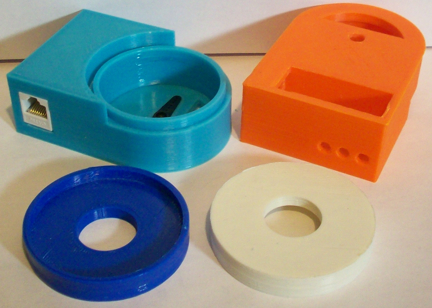
Here are the new parts for the bottom half:
RotoDamperV2Bottom.jpg


Here is a picture of the blower mount with the small support grid in place and also removed:

RotoDamperV2BlowerMount.jpg


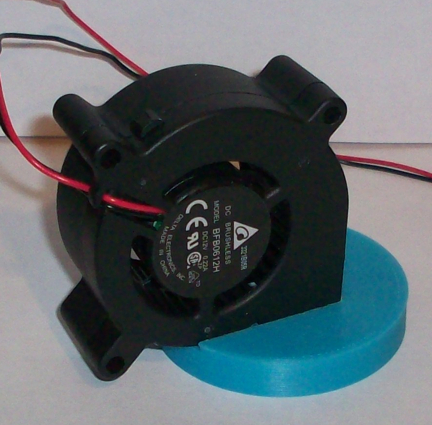
Here's a shot of the standard Heater Meter Blower pressed into the mount:
RotoDamperV2MountedBlower.jpg


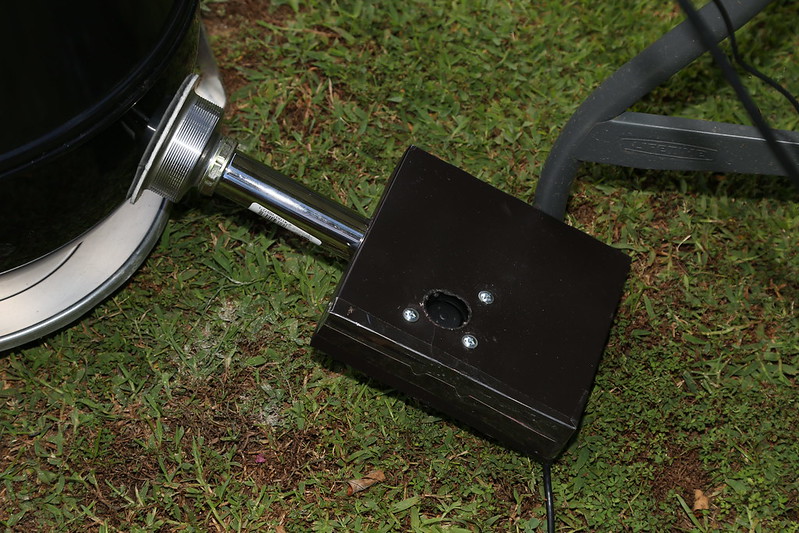
Once I had that done I decided to take a look at the top half of the unit. Most of the design of the top half is centered around the wiring cavity, fitting in the CAT5 jack and probe jacks and making the structure solid enough to hold up to use and abuse. I wasn't able to lift off the entire top of the object without weakening the CAT5 jack mount, so I decided to lift off just the top of the round portion where the air flows. I was motivated to do this for a couple reasons, first off I can now make different tops that snap on the unit that have different output options. I've been using copper pipe to connect my damper to the grill adapter, but I think other Kamado users might prefer a square output, or WHATEVER... Now I can accommodate connection to just about any grill adapter by printing a different cap. The other motivation was, again, eliminating support material and post print cleanup of the parts. I still print support material inside the wiring cavity, but my new improved support material comes out super easy leaving very little cleanup to be done on the part.

The final motivation for splitting (both of) the parts was ease of assembly. With the one piece parts assembling the unit was a bit like a game of "Operation"! (maybe you've got to be an "old timer" to remember that game...) I am good at this sort of thing but I could see how it might prove frustrating for some. The new design is super easy to assemble 'cause the unit is wide open with the cap and blower mount removed. While I was at it I made some adjustments to the opening for the servo lever, it now fits into the slot perfectly with no cleanup required.

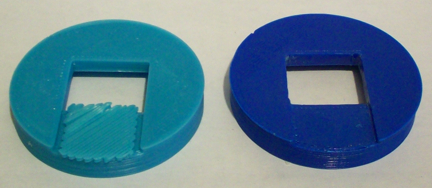
Here are the new parts for the top half:
RotoDamperV2Parts.jpg


The cap on the top and bottom half snap right into place, no screws or glue required. The seal is pretty tight, on the bottom half a little leakage isn't a big deal since the top surface makes the valve close off tight irregardless, so a little leaking wont effect the valves ability to tamp down the fire. The seal of the cap on the top half is a bit more critical, if the top half leaks the fire may continue to stoke itself and hamper the Heater Meters ability to control the pit. With the new 2-piece top I can tell it leaks just a tiny bit more than the one piece part, but the valve still closes extremely tight and I don't expect it to have a hard time tamping down a fire. If leakage does become a problem for someone (which I highly doubt) you can seal the cap on the top half with some silicone and that would eliminate any extra leakage from the 2-piece part.

In the end I don't think the re-design and elimination of all that support material really shaved much time off the printing since there are more parts to print now. It did eliminate a lot of the post print cleanup and made the unit much more versatile in that it can be mated to just about any blower or grill adapter by printing a custom cap. It's nice to have near ready to use parts come off the printer, I've nicked my fingers a few times scraping out support material and that's no fun!

Speaking of no fun, my first attempt to re-design the blower mount turned into a major PITA. I had simply cut the existing blower mount off of the barrel portion and then extended a ring on the bottom side so it fit into the barrel, easily enough I thought... but the ring on the bottom and blower mount on the top mandated the use of support material on the part, one side or the other... I tried printing it both ways, either way removing the support material from this small part was a nightmare, way worse than cleaning out the original 1 piece bottom half ironically. So I ended up streamlining the blower mount so that side is flat and can print face down, this way the inside portion can be printed face up and hollow without any support material. As the saying goes, "there's more than one way to slice a damper", or something like that! LOL

Here is a picture of a couple of the nightmare first draft blower mounts I printed:
CleanupNightmare.jpg


I just got the first v2 unit together today, so I haven't tested it out with a real cook yet. The outdoor thermometer near my FauxMado grill says 9 degrees right now and we are at the warmest part of the day so I'm not sure WHEN I will get around to doing a real test cook! Anything close to 30'ish and I am good to go outside, but when it gets down to single digits I tend to stay indoors...
 
Last edited:
Ralph, that looks really nice. You have done a great job with this. Very clever. I'm interested in one whenever you are ready to sell them.

I have a suggestion about a potential way to make it easier to mount to a dog food bowl. How hard would it be to include 2 tabbed areas on either side of the output opening? That way, 2 small self tapping screws could be inserted through the inside of the dog food bowl into the RotoDamper to pull it tightly against the bowl.
 
Does the dog food bowl get hot? If it stays cool enough I could make a top piece that would mate to the bowl and press together to hold in place. If it gets too hot you will need some sort of metal stand-0ff.
 
Ralph, are you selling these now? I might be interested, send me a PM. I still need to find a better way to attach it to my egg.
 
Does the dog food bowl get hot? If it stays cool enough I could make a top piece that would mate to the bowl and press together to hold in place. If it gets too hot you will need some sort of metal stand-0ff.

I am not using a dog bowl right now. So, I don't know how hot it gets. Right now, I'm using a kitchen sink drain and a short piece of drain pipe that connects to the sink drain with a large nut that fits over the pipe. The sink drain fits over the tabs on the WSM vents snuggly enough that I don't have to use any other fastener. I have piece of Nomex going around the surface of the sink drain where it meets the grill. That might be providing some insulation. At any rate, I can grab the pipe and turn the whole thing during a cook. So, I know the pipe itself stay pretty cool. I'm not positive about the sink drain because I've never grabbed it. I could also put Nomex around the dog food bowl.

I asked about the dog bowl because I was thinking it would be an upgrade for me in terms of aesthetics and simplicity. But, there could be a way to use the sink drain with the RotoDamper even easier. I guess the bottom line is that I am flexible. I can upload a photo if it would help.
 
Does the dog food bowl get hot? If it stays cool enough I could make a top piece that would mate to the bowl and press together to hold in place. If it gets too hot you will need some sort of metal stand-0ff.

I also use a dog food bowl. My first mounting solution for the stock fan was to cut a rectangular hole in the side of the dog food bowl & secure it with a short length of spring between 2 eye bolts in the bowl. The bowl gets relatively warm under normal low-heat cooks, but when I did a test run to see how hot I could get the mini-msm with the heatermeter it got hot enough that the mouth of the fan distorted. Granted this was at a cooking grate temperature of around 600 degrees, but without a metal standoff, it can get hot enough, on the sides of the bowl at least, to melt whatever plastic the fan is made of.
 
Pretty awesome, Ralph. I've actually been playing with my own design based on your concept just because I had such a hard time with the support material :)

I put all the junk in the top part so the bottom only holds the blower, and the output is out the side so I can hook it to the grill using a 80 cent 1" electrical conduit connector. Your design looks cleaner from the front because mine has the input jack messing up that smooth curve. It works ok, but I still need to make the bottom piece, which will be pretty small because it just needs to hold the fan.


Of course I might just scrap my whole design and use yours. What holds the end caps on?
 
The version I'm testing of Ralph's design is printed in 2 pieces, the caps are integral to each half of the unit (the color differences that make it look like separate caps are purely aesthetic)
 
I am not using a dog bowl right now. So, I don't know how hot it gets. Right now, I'm using a kitchen sink drain and a short piece of drain pipe that connects to the sink drain with a large nut that fits over the pipe. The sink drain fits over the tabs on the WSM vents snuggly enough that I don't have to use any other fastener. I have piece of Nomex going around the surface of the sink drain where it meets the grill. That might be providing some insulation. At any rate, I can grab the pipe and turn the whole thing during a cook. So, I know the pipe itself stay pretty cool. I'm not positive about the sink drain because I've never grabbed it. I could also put Nomex around the dog food bowl.

I asked about the dog bowl because I was thinking it would be an upgrade for me in terms of aesthetics and simplicity. But, there could be a way to use the sink drain with the RotoDamper even easier. I guess the bottom line is that I am flexible. I can upload a photo if it would help.

Yah, a photo would help....
I've never used a dog dish to connect a HM to a grill either so I am at a loss as well, but I would be glad to try and work up something that helps you out. My outdoor thermometer says 10 degrees BELOW zero today, they say it is 50 below with the wind chill... I'm not planning on leaving my house until it warms up a tad, so 3D printing projects are on my agenda right now...

I can take more angles or close ups if it would help. This was just supposed to be a temporary solution while I brainstormed other ways. So, I'm not married to any part of the concept.

9507222140_b6c07b8ce0_c.jpg
 
Darren,
If what you have there seals well to the grill then I say stick with it, I like the look, chrome and all...
It should be easy enough for me to make an adapter for the roto-damper that would plug right into the tube you have there. What is the end like that is inside the box you have there? Is it straight or flared out? Depending on its shape I could make the adapter fit inside or outside of that pipe.
 
Ralph,

It's just straight drain pipe like you'd find under your kitchen sink. Here's a link to the pipe on HD's website.

It simply slides over the tabs of the vent on the WSM. The tabs can be gently bent outward to increase the grip. I don't notice any leaking. It seems to fit pretty snuggly. But, with the roto damper spinning, I'm afraid it might work loose without fastening it somehow. Using the pipe with the dog food bowl might work better. But, I'm not sure how I'd tighten the pipe to the bowl.
 
OK, if it is just kinda pushed over the vent tabs then it might indeed work loose...
How about using a spring inside the tube, clip it though the hole on the grill vent and on the end of the tube (or to a screw you add to the tube)? That should hold it tight to the grill....
 
Last edited:
Of course I might just scrap my whole design and use yours. What holds the end caps on?

The end caps press on and hold really tight just like that, the blower is press-n-fit as well. It all holds together really well as is, but you could put some silicone sealer on the junction if you need it to hold more firmly.
 
Last edited:
The version I'm testing of Ralph's design is printed in 2 pieces, the caps are integral to each half of the unit (the color differences that make it look like separate caps are purely aesthetic)

Yes, the original two piece unit is a bit more hearty IMHO, but a little less versatile and harder to print and assemble.


It's a bit ironic that I had started changing filament colors to make the one piece unit look more snazzy. As it turns out, the two piece units end up looking just the same if I use different colors for the parts. That was simply by coincidence...
 
Last edited:


Back
Top