HOW TO: Paint a Weber Genesis Frame


Bruce

TVWBB 2-Star Olympian
WHAT: This HOW TO will show you how I paint my Genesis grill frames. This does not cover prepping the frames or anything like that. That is a whole other discussion. I am just showing you the method I use to actually paint the frames.

WHY:
I have painted approximately 100 Genesis frames over the past 4 years or so and this is the method I found that is the quickest and most effective.

What You Need:
o A cleaned and prepped Genesis gas grill frame.
o A can of Rustoleum High Heat Ultra or similar spec'ed spray paint.
o A can of Rustoleum 2X Gloss or Semi-Gloss spray paint or similar.
o Something to stand the grill on up off the ground.
o For best results, read and follow painting recommendations for the paint you are using and make sure it is not a windy day.

General Overview: Start with the frame upside down. Then paint the underside and sides of the frame parts. This way, when you tip the frame right side up to paint the top, you won't have to worry about the object(s) (5 gallon pails) you set the grill on marking up the top of the grill. Then, you want to paint the area of the frame that is close proximity to the cook box with High Heat paint. Then move on to the other parts with the the 2X paint. You are painting the bottom and both sides of each frame piece at this point. Once that is done, you have to wait a while until the paint is dry to the touch, then you can carefully flip the grill upright and proceed to paint the top side of the frame which will complete the process of painting the frame. This should take about 10 minutes of actual paint time. You can always do a second coat, but unless the frame was in rough shape and you had to strip a lot of the old paint off prior to repainting, one coat should be fine. The original paint that Weber used is superior to the spray paint we use, so I tend to not strip any of it that I do not have to.

VIDEO: This video is full demonstration of the process I use to paint my Genesis grill frames. Enjoy. If you have any questions, let me know.

 
The original paint that Weber used is superior to the spray paint we use, so I tend to not strip any of it that I do not have to.
It's some form of urethane coating that is much thicker than paint, and if you notice there is no "orange peel" or any evidence of it being sprayed on. It is far superior to anything we can do in the backyard.

That urethane coating is the reason your vintage grill is still around after 15 - 35 years.
 
Last edited:
Thanks Bruce, one difference from the way I did it was that I painted all the pieces of the frame individually and then assembled them. Your way seems better.
 
Yah, steve, when you do rehabs, it is all about efficiency. No problem with doing each part individually, but my guess is that between swapping pieces to paint and hanging all of them to dry it takes much longer. It took me right around ten minutes from beginning to end to do the entire paint job. Plus, no disassembly and reassembly. Like I said in the video. That is how I do it. Others may have different, similar and likely even more efficient methods.
 
Thanks Bruce, one difference from the way I did it was that I painted all the pieces of the frame individually and then assembled them. Your way seems better.
Steve, that's the "classic" way of doing things, but one of the disadvantages is that it can take 30 days or more for paint to dry completely, and unless you bake it you have to be careful not to nick or scratch the paint when putting it together while it is still soft. It's much easier the way that Bruce does it, but really, there is no right way or wrong way.
 
It's some form of urethane coating that is much thicker than paint, and if you notice there is no "orange peel" or any evidence of it being sprayed on. It is far superior to anything we can do in the backyard.

That urethane coating is the reason your vintage grill is still around after 15 - 35 years.
That, and the pretty heavy duty steel tubing they made the frame out of.
 
I had to take my frame apart to deal with some rust issues. I thought about putting it back together for the final coat of paint, but didn't. Now I see that was a mistake. Thanks for making that video. I know a lot of people will find it helpful in the future. One question, do the two different paints look the same when they dry?
 
The paints do have a bit of a contrast. The High Heat is a "Semi-Gloss" and the 2x was Gloss. They do make the 2x in a semi gloss as well but it is harder to find.

The thing is that the cook box, tables and control panel pretty much masks the frame so it is hard to tell and they kind of feather into each other anyway.
 
Bruce, I just now noticed! You look like me when you're bent over! :ROFLMAO::ROFLMAO::ROFLMAO::ROFLMAO::ROFLMAO: I'm a celebrity look-alike!

{Better add, that's from the top down, not the other direction]
 
Bruce,
You are a way steadier spray painter than me! Thank you from all of us for taking the time to put together another helpful and even fun presentation. I am trying to get better at it.


Two observations:
1.) I like the Rustoleum products very much, but I have also found that the Krylon high heat in the white can - if you can still find it - seems for me to be less susceptible to runs (something I AM good at :p ).

21.) You are wise to be painting in the wide open so there is plenty of fresh air. I usually do as well. Even so, I am TRYING to make myself put on a respirator (not just a paper mask) when spray painting. Even in fresh air, you can't avoid breathing in some of that stuff. I remember reading my Classic Car magazine when the editor revealed that he had a type of lung cancer. His doctor asked him how long he had smoked to which his answer was "Never." But then he thought about all the cars he had done spray paint work on.

Not saying this to be melodramatic, but to remind me - and all of us here - that keeping this hobby safe does require vigilance and some safety equipment.

 
thanks for the video. I'll be doing some painting this fall on two or three grills and the bucket tip is a great idea.

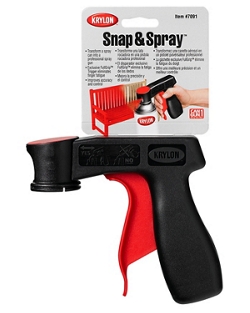
I started using one of these a while ago, I like it because it makes holding the can more natural for spraying, and keeps the paint off my finger.


paint_template-1
 
thanks for the video. I'll be doing some painting this fall on two or three grills and the bucket tip is a great idea.

I started using one of these a while ago, I like it because it makes holding the can more natural for spraying, and keeps the paint off my finger.


paint_template-1
That's a great idea. It works pretty good?
 
Rookie question: why not use paint and a brush, instead of spray? Seems more economical.

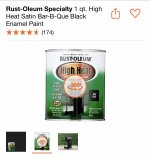
I bought this quart two days ago but now I’m wondering if I should return it and go with sprays.

1632484400407.jpeg
 
To me, the spray is just easier and there is no cleanup when you are done. It gets into the tight areas well. I know a lot of people use the brush on stuff on the cook box and end caps, and there I think it would probably be a good choice. I still use the spray on those, mostly due to convenience.
 
I have done both spray and brush. Brushing works fine, just take your time and don't leave a lot of texture behind. I used that exact can of high heat paint. You can work it a bit when you put it on, you will see what I mean. Like when you paint a door, first get the paint on, then at the end do one last brushing to get the paint to look how you want it to. It will forgive you a bit too. You'll see.
 
The quart of paint I bought is going to sit unused. After a couple of grills, I confirm that spray paint is not only easier to apply, but looks better without the streaks. It costs a little more, but the results speak for themselves.
 
The quart of paint I bought is going to sit unused. After a couple of grills, I confirm that spray paint is not only easier to apply, but looks better without the streaks. It costs a little more, but the results speak for themselves.
I'm planning to use the can to try and gain texture on a very weathered cookbox and end caps that is too smooth.

We'll see how it works. This will not be time efficient, but instead to make my keeper look a little better on the outside.
 
Most people use the brush on paint to get some texture. If you manage texture with the rattle cans, let us know how you do that.


Back
Top