You are using an out of date browser. It may not display this or other websites correctly.
You should upgrade or use an alternative browser.
You should upgrade or use an alternative browser.
Heirloom Redhead Genesis 2000 Restoration
- Thread starter SClark
- Start date
Tim Snyder
TVWBB Super Fan
That was a ton of work, very nice job. You got an even color match on your wood slats, that's not easy to do. I think it looks better when there isn't too much color variation in the wood parts.
Why did you choose walnut shell blast media? For your application, there are more efficient/faster performing choices. Walnut shells are usually reserved for precision surfaces.
Why did you choose walnut shell blast media? For your application, there are more efficient/faster performing choices. Walnut shells are usually reserved for precision surfaces.
Joe Anshien
TVWBB Platinum Member
Outstanding rebuild and documentation. Your dad may want the grill back if / when he sees it! Very nice workshop.
Jason Godard
TVWBB Pro
Beautiful work. Happy grilling.
SClark
New member
Thanks! Yep, I used those just as spacers for the top slats (removed them after screwing the slats to the Z-bars).That is an A plus job! The only part I don't get is the hex nuts turned on their sides, were you using those as spacers or something?
Great work, enjoy it!
Last edited:
SClark
New member
Google said walnut shell was a good pick for paint + rust and wouldn't touch the aluminum, but I probably should have picked something else. It was very slow going, especially with the compressor I was on which was too weak to hold good pressure for long at allThat was a ton of work, very nice job. You got an even color match on your wood slats, that's not easy to do. I think it looks better when there isn't too much color variation in the wood parts.
Why did you choose walnut shell blast media? For your application, there are more efficient/faster performing choices. Walnut shells are usually reserved for precision surfaces.
What would you recommend? I've still got the holder for the propane tank to blast. I have a bag of I think black diamond sand I was thinking of trying.
Last edited:
SClark
New member
Haha yes he's been making jokes that there's no bill of sale or anything so the transfer isn't complete and he might just keep it.Outstanding rebuild and documentation. Your dad may want the grill back if / when he sees it! Very nice workshop.
All jokes aside though, he already got himself a brand new Weber which he's very happy with. Personally I think these old ones have so much more character and beauty.
SClark
New member
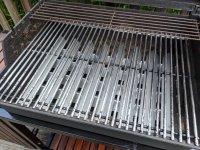
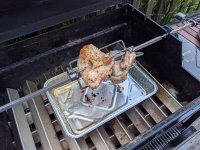
Got my new RC flavorizer bars and rotisserie!
The two upper racks are the only non stainless things in there now...
First cook on the spit was split breast chicken. Amazing how moist they turned out. So simple to cook too! I'm really wanting to try a rib eye on it next.
The two upper racks are the only non stainless things in there now...
First cook on the spit was split breast chicken. Amazing how moist they turned out. So simple to cook too! I'm really wanting to try a rib eye on it next.
Attachments
Tim Snyder
TVWBB Super Fan
For something like cast aluminum with a home compressor, I'd use a garnet. If you have the sand, that's better than the walnut shells. Problem with sand or glass beads is usually poor recyclability.Google said walnut shell was a good pick for paint + rust and wouldn't touch the aluminum, but I probably should have picked something else. It was very slow going, especially with the compressor I was on which was too weak to hold good pressure for long at all
What would you recommend? I've still got the holder for the propane tank to blast. I have a bag of I think black diamond sand I was thinking of trying.
Walnut shells are used for precision surfaces, engine parts, precision machinery parts, aerospace, etc. where you want to maintain the original surface finish and not leave "abrasive" residue behind. For something like a grill, blast it with something very abrasive, especially if it's going to be painted anyway.
At my auto shop we had a portable walnut shell blast system we'd use on some of the German cars with carbon build up on the valves. They had so much carbon build up that they wouldn't run when cold. We'd remove the intake manifold, close the valves, and blast away at the intake ports and valves. I also had two blasting cabinets, one was strictly walnut shells for engine parts, the other was usually garnet for the nasty rusted steel stuff.
Last edited:
Sam Bee
TVWBB All-Star
If you're looking for a stainless rack (the one that rests on the firebox) then here's one....pretty pricey now though....Got my new RC flavorizer bars and rotisserie!
The two upper racks are the only non stainless things in there now...
First cook on the spit was split breast chicken. Amazing how moist they turned out. So simple to cook too! I'm really wanting to try a rib eye on it next.
Amazon.com : RiversEdge Products Stainless Steel Warming Rack, 7513 88719, Solid 304 Grade, Replacement for Weber : Patio, Lawn & Garden
Amazon.com : RiversEdge Products Stainless Steel Warming Rack, 7513 88719, Solid 304 Grade, Replacement for Weber : Patio, Lawn & Garden
www.amazon.com
I have one of those and got it for $30 (in 2018)
Here's another one that I have and like more because it's raised and fits snuggly on my grill...unavailable though and not sure if they'll ever be in stock again. I don't think it's made of 304 SS like the other (probably 400 series) but it is stainless and better than the OEM one so I'm satisfied.
Amazon.com : Uniflasy 7641 Warming Rack for Weber Spirit 300 Series Gas Grills : Patio, Lawn & Garden
Amazon.com : Uniflasy 7641 Warming Rack for Weber Spirit 300 Series Gas Grills : Patio, Lawn & Garden
www.amazon.com
SClark
New member
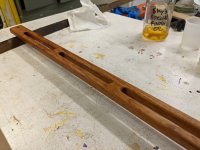
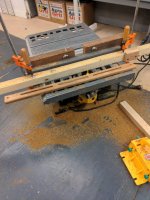
Some work on the new handle. Used a round over bit on the router first (although I probably should have done the cut outs first).
Then set up a piece of wood with some stops on it so I could make the 5 3/4" long slots. Several passes with a plunge bit and it was going pretty well. I was able to use the same setup for both of the outside slots but I had to adjust it when I was going to do the middle one and somehow the distance from fence to bit shifted. So that one ended up way off center. I flipped it over and made the center slot wider but at least centered; but then I had to go back to the outside two to make them wider so that they'd all match.
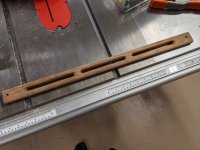
After all that I had some slots on the right places but they were kind of square shaped and didn't look great. I pulled out a chisel to bevel the long edges, and then used two different diameter round rasps to round out the slots and add the bevel around them as well.
After sanding it down I think it's looking respectable. There's still some more cleanup work to do with sanding and filing before I can go to finishing but I'm happy with how it's turning out!
Then set up a piece of wood with some stops on it so I could make the 5 3/4" long slots. Several passes with a plunge bit and it was going pretty well. I was able to use the same setup for both of the outside slots but I had to adjust it when I was going to do the middle one and somehow the distance from fence to bit shifted. So that one ended up way off center. I flipped it over and made the center slot wider but at least centered; but then I had to go back to the outside two to make them wider so that they'd all match.
After all that I had some slots on the right places but they were kind of square shaped and didn't look great. I pulled out a chisel to bevel the long edges, and then used two different diameter round rasps to round out the slots and add the bevel around them as well.
After sanding it down I think it's looking respectable. There's still some more cleanup work to do with sanding and filing before I can go to finishing but I'm happy with how it's turning out!
Attachments
SClark
New member
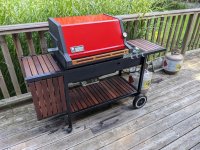
Update! I finished the handle with the same thing as the slats-- a mixture of marine spar varnish, tung oil, and paint thinner. I'm really happy with how it turned out. The finish looks awesome and feels great to grab.
It's amazing how much the slats have already begun to fade, even though the grill has been covered almost all the time! Right now the handle is a bit darker than I would like relative to the slats but I think once the handle fades a little bit it will look even better.
I've noticed some of the paint on the endcaps has rubbed off the corners exposing some of the aluminum underneath. So I may need to give that another coat at some point. I don't mind the look at all though, it just feels like weathering.
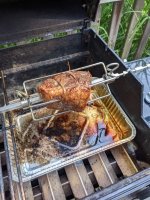
I also made a delicious bit of top round steak with the rotisserie. I want to do a rib eye roast but I figured I should try a cheaper cut first!
It's amazing how much the slats have already begun to fade, even though the grill has been covered almost all the time! Right now the handle is a bit darker than I would like relative to the slats but I think once the handle fades a little bit it will look even better.
I've noticed some of the paint on the endcaps has rubbed off the corners exposing some of the aluminum underneath. So I may need to give that another coat at some point. I don't mind the look at all though, it just feels like weathering.
I also made a delicious bit of top round steak with the rotisserie.
I want to do a rib eye roast but I figured I should try a cheaper cut first!Attachments