You are using an out of date browser. It may not display this or other websites correctly.
You should upgrade or use an alternative browser.
You should upgrade or use an alternative browser.
Drewski's Redhead Resto
- Thread starter Andrew-Drewski
- Start date
Bruce
TVWBB 2-Star Olympian
No problem. I just read where they are going to start sending them early next week. I think most people will have them by the end of that week if you had filed in 2018 or 2019 and used direct deposit for your refund.Thanks Bruce! Now I just have to wait for that stimulus money lol
Andrew-Drewski
TVWBB Member
Good info, Bruce! Thank you! I'm going to attack it more aggressively going forward and will post an update soon. Would like to finish up for this weekend.Andrew. The metal underneath is basically smooth. The powder coat gives it the texture. No way around that. They do look good when painted, but you need to make sure you strip all the powder coat first.
Bruce
TVWBB 2-Star Olympian
Larry: Believe me, if any of the original powder coat is peeling or flaking, you want to strip the whole thing. First, if you try to chip off the loose stuff, you will find that you won't get it all and will be left with a mess a month later. Second, it looks like hell with bare spots after you recoat it since the original coat is textured and underneath it is smooth. When I do a rehab, it is either all or nothing on the end caps. You can get away with some of that on the cook box because a lot is hidden behind and below the frame and you are typically using flat paint which is better at hiding inconsistencies. The end caps are a different animal though.
But yah, if the base coat is intact, then degrease and repaint is the way to go.
But yah, if the base coat is intact, then degrease and repaint is the way to go.
Kyle in Woodstock
TVWBB Guru
Andrew,
I think it goes without saying, because you appear to be doing a great job, but just wanted to make sure you don't plan on painting the inside of the lid end caps or inside the firebox. Once you grind those areas down, just leave the bare cast alluminum. After a few cooks it'll get nice and seasoned again.
I think it goes without saying, because you appear to be doing a great job, but just wanted to make sure you don't plan on painting the inside of the lid end caps or inside the firebox. Once you grind those areas down, just leave the bare cast alluminum. After a few cooks it'll get nice and seasoned again.
Andrew-Drewski
TVWBB Member
Thank you, Kyle. I appreciate it and I will not be painting the inside. I had a feeling it wouldn't be a good idea and that was confirmed with my research on here and other areas when reading about other restorations. Still debating if I want to take the firebox down to bare cast on the inside since it wasn't extremely bad and pressure washing cleaned it up pretty good.Andrew,
I think it goes without saying, because you appear to be doing a great job, but just wanted to make sure you don't plan on painting the inside of the lid end caps or inside the firebox. Once you grind those areas down, just leave the bare cast alluminum. After a few cooks it'll get nice and seasoned again.
Kyle in Woodstock
TVWBB Guru
If you will be cooking on it, then don't waste your time.Thank you, Kyle. I appreciate it and I will not be painting the inside. I had a feeling it wouldn't be a good idea and that was confirmed with my research on here and other areas when reading about other restorations. Still debating if I want to take the firebox down to bare cast on the inside since it wasn't extremely bad and pressure washing cleaned it up pretty good.
The only reason I would do it is if you are really bored and have nothing better to do....even if you are fixing this up to sell, then i don't think grinding the inside would be worth it, at least not down in my area.
Andrew-Drewski
TVWBB Member
That's exactly what I was thinking and plan to use it often as it is my only gas grill. Figured there was no reason to put in the extra work.If you will be cooking on it, then don't waste your time.
The only reason I would do it is if you are really bored and have nothing better to do....even if you are fixing this up to sell, then i don't think grinding the inside would be worth it, at least not down in my area.
")
Andrew-Drewski
TVWBB Member
Thank you and I'm trying to be patient and not let the excited rush me through the process. Lol. But having a lot of downtime has allowed me to get a lot done in the weekends and some during the week. Can't wait to post the finished grill.Nice job Andrew. Man, you go fast wih this. looks like my resto job, only faster
Can't wait to see the end result!
Andrew-Drewski
TVWBB Member

Bruce
TVWBB 2-Star Olympian
Perfect.Sanded to the emblem today.
Andrew-Drewski
TVWBB Member
Andrew-Drewski
TVWBB Member
Was still looking into what you use so I'll go with that. Thank you for the recommendation. CheersWhat kind of protection are you planning on? My recommendation would be spar urethane.
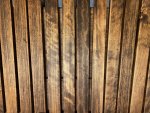
Are those the original slats or replacements? They sure came out with a wide variance of dark/light coloring.Finished sanding and staining the wood slats.
Edited to add:. It looks to me that they are pretty splotchy with the stain coloring. Those slats are a softwood (cedar?). Softwood needs to be sanded to a very fine grit to lessen the "splotchyness". I think that something called Sanding Sealer is also recommended for even staining on softwood. I am very sorry to criticize, but I would redo the wood.(Personally I'm not a fan of wild grain or wild variations of stain on the slats, so take that into account)
I don't know what Weber used for a stain, but they tried to make it look like redwood, and it was very consistent from board to board
Gerry
Last edited:
Andrew-Drewski
TVWBB Member
The boards that are splotchy are the ones with grease stains all over them. I used a 220 and sanded down pretty far and still ran into the grease stains. I'm actually ok with it since it reminds me of the grills previous history. I do want to put wood slats on the bottom of the grill and plan to redo all the wood if I go the route. I think this will be fine for now. I get where you're coming from, trust me, just not letting this one bother me. Thank you for the info. CheersAre those the original slats or replacements? They sure came out with a wide variance of dark/light coloring.
Edited to add:. It looks to me that they are pretty splotchy with the stain coloring. Those slats are a softwood (cedar?). Softwood needs to be sanded to a very fine grit to lessen the "splotchyness". I think that something called Sanding Sealer is also recommended for even staining on softwood. I am very sorry to criticize, but I would redo the wood.(Personally I'm not a fan of wild grain or wild variations of stain on the slats, so take that into account)
I don't know what Weber used for a stain, but they tried to make it look like redwood, and it was very consistent from board to board
Gerry