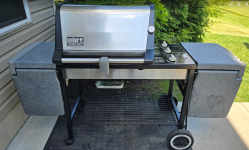
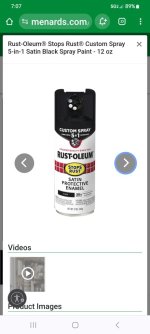
Which paint to use for restoring a Weber gas grill?


Rick, not really. You need to prep them after you clean them out with whatever your choice of cleaning agents are. Even if you have your parts sand blasted, you would be well advised to prep them with a proper prep such as brake cleaner.
I never thought to use brake cleaner as prep for painting. Great idea. Much easier too apply too, and cheap
 
Rick, not really. You need to prep them after you clean them out with whatever your choice of cleaning agents are. Even if you have your parts sand blasted, you would be well advised to prep them with a proper prep such as brake cleaner.
Not to resurrect an old thread, but is there a write up somewhere from those who have had success painting the lid sides? I have tried twice, but am still having some flaking and oddly, when covered for a few days, the paint seems to start sticking to my cover. This is after fully sanding, painting multiple thin coats, and curing (Rustoleum HH Ultra Semi). I did use a degreaser after sanding, but didn't use a different cleaner (like the recommendation above to use brake cleaner). I'd definitely like the third time to work out.
 
Could be the material the cover is made of. Some plastics will react with paint no matter what you do
 
Could be the material the cover is made of. Some plastics will react with paint no matter what you do
Interesting. There is some semi rubber\plastic liner to make it "waterproof". I have used the same cover brand for a few years on the original, and never noticed a problem, but obviously the original paint was different.

However, I have noticed the paint that is not touching the cover isn't very durable. Not sure if I should remove a third time...use brake cleaner...perhaps a primer....who knows. The initial paint jobs looked great for a week, then started to fail. I did cure, and waited a few days before using the grill after the cure.
 
I never thought to use brake cleaner as prep for painting. Great idea. Much easier too apply too, and cheap
I use automotive grade wax and grease remover. The brake clean is pretty good, too. But it evaporates so fast that I don't fully trust its cleaning capabilities for pre-painting prep. But to each their own. I do use it for initial cleanings though.
 
Have had no issues using BrakeKleen for a paint prep/degrease. Tom, at issue with these "contact paint flaws" is consumer paints are solvent borne (whether that solvent is water or some type of hydrocarbons) is a matter of end use application(s).
Whereas what is used in the factory is static applied powder coat, and liquified through heat to cure.
A solvent based product will always be prone to reacting to anything made with hydrocarbon type carriers. Nothing you can do about that other than MAYBE only use a natural fabric cover. I.E. canvas
 
After sandblasting the firebox and lid end caps I used Acetone to clean any fingerprints and remove any loose sand particles. Denatured alcohol would work fine too, and safer over painted parts. Acetone will strip a lot of paint of parts, if not baked on by mfg.

While Weber purists might disagree, I sanded out the casting feed marks in the bottom opening of the firebox. And where the inside mold meets with the outside firebox mold there was some casting flashing, I sanded down. I used to manufacture aluminum castings and machines for Jet Ski racing components which go powder coated or water blasted finish so habit of grinding and smoothing out any casting marks.
 
Thank you all for the responses, great information. I think I am going to attempt this a 3rd time. If anyone has any sanding grit level, primer, or paint recommendations, curing or not, etc... feel free to pass them on. The first two attempts I sanded smooth, 320 grit the first time, stopped at 120 the second time. Used degreaser then alcohol to clean. Then a tack cloth. Then sprayed 2-3 thin coats of Rust High Heat ultra. I found it matched the firebox very well, which was brand new.

Side note, awesome Weber warranty replaced the cookbox because it warped...on my 2001 (or 02 ish...don't recall) Genesis Gold B SWE SS. I contacted them for a recommendation on bending it back, and they replaced it without question (after I sent them a few pics). This rehab was more of a teardown, paint, clean up, and everything else went well...except for the sides of the lid, unfortunately.

Before:
1718212566915.png
After
1718212518338.png
 
I've been using Krylon High Heat Max on frames, carts and miscellaneous parts as well as out side the cook box and lid. Would I be better off using a regular non-high temp paint for the non-high temp areas? Or are you of the opinion that it's not that critical? I definitely haven't done well over 100 restorations. I'm probably around a dozen or so but I would definitely like the best outcome. I appreciate you guys and value your input.
 
You can use the high temp stuff on all the parts. But, it is more than twice the price of the Rustoleum 2X Semi gloss black which matches the High temp very well. The 2X goes on better as well. But, on end caps and frames, I use the High heat where the frame is adjacent to the cook box. I use it on the end caps and badges as well. I use the matte High heat on the cook boxes. Works well for me.
 
You can use the high temp stuff on all the parts. But, it is more than twice the price of the Rustoleum 2X Semi gloss black which matches the High temp very well. The 2X goes on better as well. But, on end caps and frames, I use the High heat where the frame is adjacent to the cook box. I use it on the end caps and badges as well. I use the matte High heat on the cook boxes. Works well for me.
Thank you very much I appreciate it!
 
Thank you all for the responses, great information. I think I am going to attempt this a 3rd time. If anyone has any sanding grit level, primer, or paint recommendations, curing or not, etc... feel free to pass them on. The first two attempts I sanded smooth, 320 grit the first time, stopped at 120 the second time. Used degreaser then alcohol to clean. Then a tack cloth. Then sprayed 2-3 thin coats of Rust High Heat ultra. I found it matched the firebox very well, which was brand new.

Side note, awesome Weber warranty replaced the cookbox because it warped...on my 2001 (or 02 ish...don't recall) Genesis Gold B SWE SS. I contacted them for a recommendation on bending it back, and they replaced it without question (after I sent them a few pics). This rehab was more of a teardown, paint, clean up, and everything else went well...except for the sides of the lid, unfortunately.

Before:
View attachment 93217
After
View attachment 93216
If you talking about the lid end caps, this has to be high heat or High heat ultra due to temperature.
You need to get all layers of paint off the end caps if this has failed before.
The best is to completely remove the end caps and have them sand blasted to remove all finish and add something for the paint to grip.

If not going full restoration, then I would use acetone to remove most aftermarket paint layers. Then send with 180-220, or fine scotch Brite pads as you don't want to go any finer or the paint will not stick as well. After 2-3 coats you can go 320 before the final coat, because it is melting into the other paint layers not fully cured.

I painted mine 3x over the 27 years without disassembly, with both Rust-oleum flat and Ultra, and had no paint failures other than fade with age. Painting all comes done to prep.

The semi-gloss Ultra has held up uncovered in SoCal sun better than the flat if you like the blacker look with some sheen
Thank you Mark, yes only talking about the lid end caps. The first 2 times I removed all of the paint (disassembled, sand until shiny silver all around on the outside and the edge, not on the inside at all). Each time I cleaned with degreaser, dried in sun, then sprayed with Rustoleum HH Ultra (semi gloss). The first time I assumed it was too smooth, as I had sanded down to 120 grit. The second time I stopped at 320 to see if that would help. No primer of any kind, but I also didn't use brake cleaner or the like to clean, just degreaser, then iso alcohol (and tack cloth after). I felt like the coats were thin enough...approx 3 coats...and I cured for 1hr at 450 (ie, just the grill running, not in oven or anything like that). The paint seemed solid, but as noted it seems to start failing after a week or so (used multiple times). And, of course the top edge that touches the cover is now sticking to the cover, even though it didn't for the first few days. The grill is covered all day, but gets blasted by the sun in the summer where it sits, and gets very hot just sitting in the sun. I think I can find a solution for the cover. Perhaps I need to let the grill sit unused after painting, uncovered, for a few days. Gonna give this a third attempt next month when the family is gone and the grill is not in use.
 
Thank you Mark, yes only talking about the lid end caps. The first 2 times I removed all of the paint (disassembled, sand until shiny silver all around on the outside and the edge, not on the inside at all). Each time I cleaned with degreaser, dried in sun, then sprayed with Rustoleum HH Ultra (semi gloss). The first time I assumed it was too smooth, as I had sanded down to 120 grit. The second time I stopped at 320 to see if that would help. No primer of any kind, but I also didn't use brake cleaner or the like to clean, just degreaser, then iso alcohol (and tack cloth after). I felt like the coats were thin enough...approx 3 coats...and I cured for 1hr at 450 (ie, just the grill running, not in oven or anything like that). The paint seemed solid, but as noted it seems to start failing after a week or so (used multiple times). And, of course the top edge that touches the cover is now sticking to the cover, even though it didn't for the first few days. The grill is covered all day, but gets blasted by the sun in the summer where it sits, and gets very hot just sitting in the sun. I think I can find a solution for the cover. Perhaps I need to let the grill sit unused after painting, uncovered, for a few days. Gonna give this a third attempt next month when the family is gone and the grill is not in use.
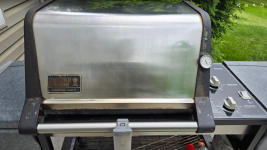
Sanding 120-180 should give the paint a good bite, going smoother the paint will not have good adhesion.
I think your problem is the degreaser leaving residue. I would use simple green or Dawn to clean after chemical degreaser, then rinse well with plain water.

ISO alcohol has too much water content for paint prep, which is why house painters use denatured alcohol. But for metal parts like this I recommend your buy Acetone. Acetone leaves Zero chemical residue and dries completely in less than 1 minute.

I would due the Acetone final clean wait 5 minutes and spray your high heat paint on 3-4 coats waiting 5-10 minutes between.

I have painted my end caps 4x over the 27 years with Rustoleum high heat and Ultra with zero problems other that UV taking away the sheen after a few years. Doing a full bare metal restore this year, I removed the end caps and had sandblasted inside and out and wiped with Acetone just before painting. I masked the inside which is exposed in the cookbox, but painted the inside flange so I had continuous paint from outside to inside so the visible edge of cap was well painted where it meets the hood. I did not want a paint edge to break the bond for future pressure washings.

Good luck
Awesome info Mark. I will follow your approach. Now on to find a local shop that can sand blast the end caps.
 
End caps are small so lots of places should have small blast cabinets.
I used a larger sandblast shop since I did the firebox and all the frame components. The frame was powder coated. I used Acetone to clean and remove loose sand, and sprayed 4 coats Ultra high heat.
 
I just hit mine with the air compressor to get out all the dust before painting. Works for me.
 
Mark, and all you other restorers et al out there who do a lot of restoring/painting. If you already have an air compressor maybe have a go to Harbor Freight. Grab yourself maybe one of ea of these https://www.harborfreight.com/paint...oz-hvlp-gravity-feed-air-spray-gun-62300.html https://www.harborfreight.com/paint...-paint-system-starter-kit-17-piece-57508.html https://www.harborfreight.com/painting/paint-sprayers/120cc-hvlp-touch-up-air-spray-gun-61473.html
Then simply buy cans, mix and spray yourself. Better job, once you're set up, easier on your hands, more accurate, and so on. Especially if you line up 2 or 3 projects at once, and hit them all.
Once you get the hang of using these HVLP models you'll love it


Back
Top