You are using an out of date browser. It may not display this or other websites correctly.
You should upgrade or use an alternative browser.
You should upgrade or use an alternative browser.
***Weber Unicorn Alert*** SS Platinum Conversion from Shallow to Deep Box
- Thread starter Bruce
- Start date
Bruce
TVWBB 2-Star Olympian
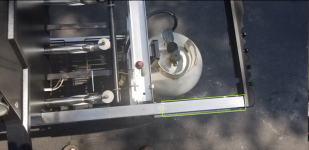
Nope, the sheets were only 24" wide so they don't reach all the way to the top. It has plenty of venting as you can see in the photo below, but vents are not real important to prevent moisture build up as there is really nothing to rust. I did drill some holes in the bottom panel to allow drainage of water that does make it inside.


Bruce
TVWBB 2-Star Olympian
No, no real discoloration. Some scuffs and stuff maybe and a few grease smears. The aluminum is showing no signs of oxidizing or anything and is still quite shiny. To clean it, I just take everything out of it and pressure wash the inside and outside of the cabinet....well, I pretty much do that to the cook box as well. I let it drain off and leave it outside and open to dry and then reload everything in it and get back to grilling.
The rivets I used are aluminum. Again, totally rust proof. The bigger fasteners you see on the back of the cabinet are the original 1/4" SS bolts that hold the frame pieces together.
The rivets I used are aluminum. Again, totally rust proof. The bigger fasteners you see on the back of the cabinet are the original 1/4" SS bolts that hold the frame pieces together.
Bruce
TVWBB 2-Star Olympian
Well, two reasons really. First and foremost, since I had to modify the frame slightly to be able to use the 13 bar deep box, it was no longer a big enough space to hold the side burner. Second, while it seems like a cool thing at first, it takes away from counter space that I covet even with the left side table and two flip tables. Third, I find the side burners to be less than effective due to wind. If it is at all windy out, the side burners loose a lot of their heating capabilities.
I could further mod the frame to accommodate a side burner if I really wanted to. It wouldn't be that big of a deal.
I could further mod the frame to accommodate a side burner if I really wanted to. It wouldn't be that big of a deal.
Hi Bruce, do you know where I can find a set of the frame extensions? I'm looking to add a side table. Thank you in advanceOK, I had been talking about doing this for a good year and had been thinking about how to do it the whole time. I took this as a challenge as it has been attempted by others and talked about by many more. I wanted to give it a shot and try to do with as little cobble jobbing as possible. I wanted it to look and function "normal" after I got done. I finally got around to starting this project a month or so ago and got to a point where, while not fully complete, is at a stage where it is 100% usable and functional. I am still working on getting some stainless or aluminum sides, back and bottom for the grill and then re-installing the SS doors. But, that will have to wait. In the mean time, it will live as an open cart grill with wire rack bottom. I will declare success to this point and post up here what I did to make it all work. I wanted the best in both words with this grill. I wanted the E/W deep box along with a virtually bullet proof grill. I have, I think created my personal Weber Unicorn.
The biggest challenge to making this happen is to figure out how to stick a deep box in where a slightly shorter shallow box is supposed to reside. Sure, the deep box will slide right in, but it pushes everything a little over an inch further to the right to include the control panel which in turn makes the space for the side burner/right side table that much smaller. This makes the igniter button not line up as well with the bracket that holds the igniter switch. So, this presented two (three) challenges.
1. How do I make the igniter switch bracket/control panel mount line up with the igniter switch in the control panel.
2. How do I make the side table/side burner fit in the shorter space.
My solution for #1 was to cut out the igniter bracket/control panel mount from where it was and move it about 1.25 inches further to the right. I used an angle grinder and cut off wheel and got that done quick and easy. I think determined the optimal new location (approx 1.25 inches to the right) and welded it back in. After that, the control knobs and igniter button all lined up perfectly as shown in the photos. That brought me to issue #2
My solution for issue #2 was to remove the side burner. (I didn't care for it anyway) So, that left me with a right side thermoset shelf which was now a bit over 1" too wide. Well, the table saw made that problem go away by shaving a little over a half inch from both sides. It now fits great in the smaller space. See photos.
Those were the two critical hurdles. By removing the rusted out bottom and side panels, I needed bracing across the front and back for the frame. A six foot piece of SS square tubing from Amazon for about $30 was just enough for a front and back cross bar brace which I welded in. Removing the side panels also took away the mounts for the tank bumpers on the right side. So, I had another piece in my scrap pile and welded a side cross bar at the correct height to mount the plastic bumpers for the tank.
While I had the welder out, I took the opportunity to permanently weld the frame extensions on the left and right into place so I would not have to worry about the very common broken welds on the brackets that hold them in. Now I don't have to worry about the side shelf dropsies.
So, I fully understand that not everyone has access to welding equipment or someone that does, but if you do, this really is not a hard project to accomplish. I am a very novice welder and with help from my grinding wheel, it all looks pretty darn good and is solid.
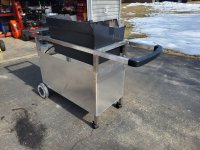
This is what I started with:
View attachment 35261
This shows how I moved the igniter/control panel mount to the right.
View attachment 35260
This shows the valves and igniter button line up after the modifications.
View attachment 35251
This shows where I shaved a total of about 1.25" off the sides of the right side thermoset table to accommodate the smaller spacing. It still retains the lengthwise bracing and the rubber pads.
View attachment 35252
This is the overall view. I dropped a skyline lid on it with a #9057 Grill out handle Light since this will be my personal grill. I went with black knobs and handles as well. I can always drop another lid on there any time I want. I may go back to my Blue head at some point.
View attachment 35253
This shows the slightly narrower but fitting side table
View attachment 35254
View with the swing tables up.
View attachment 35255
Yah, I know, the lid isn't spotless inside. I don't care. I did have the cook box and end caps sand blasted and even High Temp Powder coated for this project.
View attachment 35256
This is showing that indeed I did shoe horn a Deep Box into this 05 SS Platinum Frame.
I also moved over my RCP grates and flavorizer bars from my old personal Genesis 1000.
View attachment 35257
This shows the side cross bar that I welded in to accommodate the plastic tank bumpers.
View attachment 35258
The wire rack....Yes it is rusty, but I am planning to replace it with SS or aluminum soon anyway. For now, this will hold all my "stuff".
View attachment 35259
That is it. This is my personal "Forever" Weber Unicorn grill. If anyone wants to try this and has questions, let me know. If you want to do something similar and can use this as a source of inspiration, that is great. If you think I went down a Rabbit Hole and need rescuing, I get that.
But, I really think I have a grill here that is fully functional, low maintenance and one that I could leave out in the Wisconsin climate year round and not have to worry about it falling apart. The only regret that I have is that I have not yet christened it with that 1.5 lb Ribeye.
Oh, yah, one other bonus that I did not count on is that this grill is about 3" taller than my Genesis 1000 at grate level. It is 37.5" from the ground to the grates which makes it much more comfortable to work on. I know those 6 foot plus guys would really appreciate that.
Cody Bratton
TVWBB Platinum Member
Weber P/N - LF/RR - 99239Hi Bruce, do you know where I can find a set of the frame extensions? I'm looking to add a side table. Thank you in advance
Weber P/N - RF/LR - 99238
Steve Hoch
TVWBB Olympian
I don't think anyone has 99239 anymore. When I was looking for Gold C parts I remember seeing that unless I missed a source.Weber P/N - LF/RR - 99239
Weber P/N - RF/LR - 99238
Cody Bratton
TVWBB Platinum Member
I looked a while back and of all places WalMart had them. Idk if they still do though.I don't think anyone has 99239 anymore. When I was looking for Gold C parts I remember seeing that unless I missed a source.
Thank you, guys for the update, I'll let you know how I make out. Those pictures look great, awesome job! I'm new to the site and just posted a new thread on the Introduction forum with a picture of my first project. Great site and a shout out to Samuel for all the help!!!I looked a while back and of all places WalMart had them. Idk if they still do though.
Bruce
TVWBB 2-Star Olympian

