Weber Genesis S330 - Door Pins Rotted.


Mark Worms

TVWBB Member
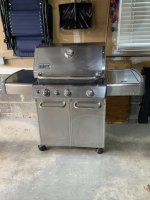
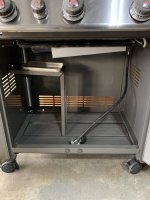
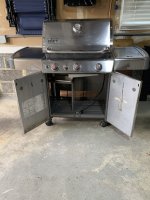
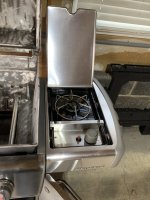
Great deal today and picked up a Genesis S330 today for $20. Gonna tear it down and rebuild. The bottom panel is rotted but I can rebuild it with composite decking.
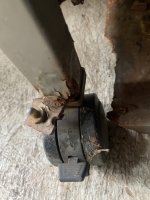
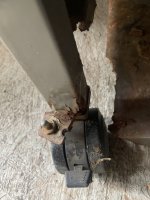
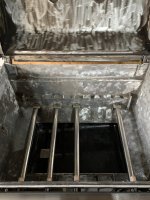
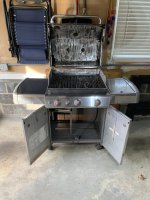
Of course the left side panel is also rotted and the door pin looks bad. ( see attached ). This is what concerns me. Don't want to rebuild it and then have the doors fall off. Anybody have thoughts on how to rebuild/repair the left leg bottom with the door pin? appreciate it. thanks
 

Attachments

  • IMG_0806.jpeg
    IMG_0806.jpeg
    122.5 KB · Views: 19
  • IMG_0807.jpeg
    IMG_0807.jpeg
    127.9 KB · Views: 19
I would try to get another free grill as a donor. The frames disassemble fairly easily.

Please note that the burner orientation has to be the same for the frames to match up.

Alternatively, you could weld in a leg piece. It would require some good fabrication skills to get everything to match up.

For a hack you could remove the doors and make a removable panel to service the grease tray. If you did that it would probably make sense to put the tank scale and tank on the outside.
thanks. I thought about welding the leg piece, as i have a few legs with the pins, but my welding skills are more or less non existent. the removable panel sounds good. you have any pictures of what that might look like that you could share?? Thanks
 
thanks. I thought about welding the leg piece, as i have a few legs with the pins, but my welding skills are more or less non existent. the removable panel sounds good. you have any pictures of what that might look like that you could share?? Thanks
I don’t have any pictures. My thought would be to study the rear panel for ideas. Something like a panel that hooks and hangs on tabs or a lip.
 
Dan - this is great !! Some good ideas!! Thank you
YW.

Please take before and after pics so we can learn from yours.

If you decide to stay with a closed cabinet, I recommend outboarding the tank.

I did that on my E330 and it's much easier to get to the tank valve and frees up storage space.

1673808781756.png

 
Here are some pics of my rebuild. ( sorry, forgot to get some of the before pics)
- Composite decking for the new base.
- Wire wheeled the cookbox clean. ( did the same for the lid) as well as the grates.
- Cut an old piece of tubing from a scrap grill I had and made the front crossbar. Then used tubing inserts to hold in place.
- new burners and new flavor bars.
- Polished with Bar Keeper and 0000 steel wool.
Came out well. :giggle::blackgenesis:
 

Attachments

  • IMG_1015.JPG
    IMG_1015.JPG
    142.8 KB · Views: 20
  • IMG_1017.JPG
    IMG_1017.JPG
    136.7 KB · Views: 19
  • IMG_1016.JPG
    IMG_1016.JPG
    152.2 KB · Views: 18
  • IMG_1018.JPG
    IMG_1018.JPG
    176.1 KB · Views: 17
  • IMG_1020.JPG
    IMG_1020.JPG
    149 KB · Views: 18
  • IMG_1028.JPG
    IMG_1028.JPG
    161.3 KB · Views: 19
  • IMG_1026.JPG
    IMG_1026.JPG
    192.7 KB · Views: 20
  • IMG_1023.JPG
    IMG_1023.JPG
    163.3 KB · Views: 19
Please tell me that lid had a liner. If so, you did a fine refurbish job on that grill. Should give you another ten years or so.
 
Bruce - yes. it has a liner. I just lightly wire brushed it to get the majority of the dirt and grime off. I know it will turn black again quickly. And thanks for the positive remarks. (y)
 
Looks good @Mark Worms.

Since you do not have a cut-out for the tank, I'll again suggest again moving it to the outside.

The decal will point to the backside but IMO that's the only downside. You gain easier access to the valve, it's easier to mount and unmount the tank on the hanger and easier to turn the valve on and off without burning your hand on the heat shield of the bottom pan.
Thats a great point. Never thought of that!! thanks
 
Looks good @Mark Worms.

Since you do not have a cut-out for the tank, I'll again suggest again moving it to the outside.

The decal will point to the backside but IMO that's the only downside. You gain easier access to the valve, it's easier to mount and unmount the tank on the hanger and easier to turn the valve on and off without burning your hand on the heat shield of the bottom pan.
You could even get a new scale meant for a Silver B and the markings will face to the front. I think you can find them in the $30 range.
 
Since i dont have a cut out, what do you suggest, just cut thru the side panel? or remove the cookbox and snake the line over the panel?

I recall I just disconnected the hard line from the mount on the inside wall and it easily fit to the outside.

When I did this the first time it went really fast to move it to the outside.


20230228_150434.jpg

second pic in this thread shows the mount on the outside.


Back
Top