Trouble Connecting to WIFI


I inherited a HeaterMeter and cooked with it for the first time on an Ugly Drum Smoker. All the controls seem to work, but I am puzzled as to how to connect the HeaterMeter to my laptop or my Smartphone. With the app installed on my phone, the following comes up under "Settings". Name: My BBQ; HM URL (incl. http://) _________________; HM root password: _____________________. I don't know what to put into the HM blanks. Is it referring to my WIFI? Or the HeaterMeter? There were 2 micro SD cards included, but I haven't opened the machine to see if there is one in there right now. My friend who previously owned this passed away unexpectedly at age 59, and his wife knew nothing about it, so she gave it to me. He used to send me graphs of his cooks, so I know it works. His post was Jerry H. on this site in about 2017, to give you an indication of the age of the HeaterMeter. Thanks for whatever help you can give me.
-Arnie
 
Gosh. What a way to remember a friend. So sorry for your loss.

You need to put the SD card into your computer and open up the coding to edit the password and wifi address inside the heater meter code. Whatever WiFi you want it to log into you type it out it exactly in the blanks. Be sure you have the wifi adapter plugged into the Pi and then insert the newly revised SD card with the updated password and wifi into the heater meter. That is the only way I know of to update the wifi/password.

That's the cliff notes version. I'm sure there will be much more clear instructions provided by others. Best of luck!
 
Thanks for your reply. I found the SD card that was inserted into the box. When I insert it into my laptop, it tells me that there is a problem with the disc and I need to reformat it to use it. If we reformat it, will it still work manually? Or is the SD card just for WIFI? Thanks.
-Arnie
 
Hmm. Quickly out of my realm of expertise. Reformatting will erase the card and all is contents. Then you would have to download the firmware for the heater meter source code and load it back onto the SD card after it is reformatted.

If I recall correctly the first time you load a heatermeter it flashes the firmware from the Pi memory card into the ATmega? on the heater meter board. And then the Pi utilizes a file in the SD card to utilize the web access/interface.

Test your heatermeter without the SD card inserted. I believe it will still work.
 
Yes it works without SD card like before. so without knowing what components I have, should I not mess with WIFI ? Or be satisfied with what I have? Or if I take a picture, could someone identify which components I have, or does it matter? Thanks very much.
-Arnie
 
Maybe it's time to take a short step back for some fundamentals......

To connect to a WiFi network, you'll [generally] need an SSID and a passphrase (passphrase required for secured networks, which should be any home network nowadays.)

You'll also need an admin/root password to make any changes to the HM configuration, such as temp sensor configurations, thresholds, fan & damper parameters etc.

Take the covers off, and post pics of both the front side & back side, so which specific version of the HM you have can be identified, along with what version of an rPi is installed.

The SD cards used by rPis are formatted using filesystems that Windows does not understand. While it's possible to download and write this stuff using Bryan's docs & download pages, on Windows, you cannot browse or edit any of the contents.
 
The sd card should show the /boot partition when inserted into a card reader on a windows or mac computer and you should be able to see the config.txt file in there to change wifi settings.

If the RaspberryPi has an ethernet jack on it, you should be able to connect it to your home network that way, without the need for wifi.

If it booted up properly and the unit is on the network, you should be able to go to http://heatermeter.com/devices/ and see the unit listed there

If you don't know the password to get into the config page to make changes, you can still get access to the HM configs by going to:
http://<ip-of-heatermeter>/luci/lm/conf

This will at least let give you something to work with after getting things up and running again should you need to overwrite the SD card
 
Thanks for everyone's help. You are talking to an old Iowa farmboy who has only had his Smartphone for a couple of years and is next to dangerous with technology. Here are pictures of what I have. So, if I choose the ethernet route, am I just connecting it directly to the router? Or do I need to download some other software? Thanks again for everyone's input. I can tell you have all been around the block on this type of thing. If you need a tractor rebuilt, I CAN do that! At least an older one...
-Arnie
 

Attachments

  • IMG_0737.JPG
    IMG_0737.JPG
    89.8 KB · Views: 8
  • IMG_0738.JPG
    IMG_0738.JPG
    103.7 KB · Views: 8
  • IMG_0739.JPG
    IMG_0739.JPG
    67.7 KB · Views: 8
  • IMG_0740.JPG
    IMG_0740.JPG
    71 KB · Views: 7
* It needs the SD card in the slot on the board with all the USB ports for any network access (wifi or ethernet)
* Do not reformat the SD card with Windows. Windows is complaining about things it doesn't know, but you should have a drive show up with it inserted either way. On that drive there is a config.txt. Open it up, scroll to the bottom, put in your wifi settings. Put it back in the HeaterMeter and power it up. After 1-2 minutes it should show an IP address on the LCD screen. Go to that IP address with a web browser and you're done!

I would not bother with the apps until you have everything running, and I never use an app. A web browser is the best way to use the HeaterMeter.
 
If your router has free LAN ports ( most I've seen have 4 LAN ports), plug one end of the network cable into one of the free LAN ports and the other end into the network jack of the Raspberry Pi


NZZabz3l.jpg


FXnBhj3l.jpg
 
Thanks very much for your patience, your knowledge, the details and the labeled pictures. I will work on it early next week. Going out of town. It is amazing that I can go to this site and receive so much helpful support. Thanks Everyone. You may hear more from me next week.:)
Thanks,
Arnie
 
OK, I'm at the location where I want to hook up the smoker. I've typed in the IP address for the LAN...the192.168.1XXX, but now where do I go from here? My choices are Status, Quick Start, Wireless, Utilities and Advance. By the way, the only address that shows on the HeaterMeter is the 192.168.200.1. Thanks
-Arnie
 
The page for HeaterMeter showed up username and password. It has face symbol and the word ROOT and password has a key symbol on it. But what I thought was the password from SD card wasn't recognized by the HeaterMeter sign in. this in front of password SSID (network name)#wifi_ssid=then the password
 
I'm guessing the Heatermeter config password is hidden.
This is what Steve_M said earlier in case you missed it:
"If you don't know the password to get into the config page to make changes, you can still get access to the HM configs by going to:
http://<ip-of-heatermeter>/luci/lm/conf

This will at least let give you something to work with after getting things up and running again should you need to overwrite the SD card"
 
Arnie,
This is what I would do to get this up and running.
You will need to down load a sd card formatter and an image writer app. I would also purchase a new sd card so you can start fresh and have the original sd card for backup.
https://www.sdcard.org/downloads/formatter/ for sd card formatter.
https://sourceforge.net/projects/win32diskimager/ for image writer

My opinion this is the easiest way to get going. You will not have to deal with hidden passwords and you can learn the process of getting the program installed on a new sd card.
here is a sd card link from Walmart
https://www.walmart.com/ip/16GB-microSDHC-Class-4-Flash/100296336
Here is a sd card reader example from Walmart again
https://www.walmart.com/ip/onn-SD-Micro-SD-and-CompactFlash-Card-Reader/940592168

Now with all this stuff in hand your now ready to get the sd card prepared and the software loaded on it.
Here is the link from Brian`s GitHub site that will walk you through this whole process and give you a lot more info about the project.
https://github.com/CapnBry/HeaterMeter/wiki

Go down to the "Installation" section and follow instructions.
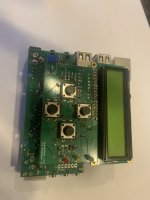
This should help you get your HM going and help you learn what this great project is all about. All your previous questions I hope can be answered in Brians GitHub link. When I first got started, I too experienced trouble getting this project up and running on the wireless connection side. I re-read the GitHub info and from there I posted a question which was answered and at that point I felt I was on the correct path. By following this path with a new sd card, you can make mistakes and with a little trial and error, you should get this up and running. If the HM doesn`t work, you just remove the sd card, reformat and install the image back on the card and start over. You will always have to connect to your router with an ethernet cable following this path the first time in order to set up your WIFI. I do believe it always comes up as 192.168.200.1
Once there you can get into the configuration page and go to the WIFI section in the GitHub instruction and then setup up your new password and then your WIFI connection. One other thought on the WIFI side, if you're not in a hi WIFI traffic area I would stick to the 2.4ghz band because you have better signal strength which will give you better connection. I have used both the 5ghz and the 2.4ghz bands and I just have better results with the 2.4ghz band.
Hope this helps.


Back
Top