Thermoworks Billows and WSM18 stability problems.


BradCoe

New member
Hi All,

I am using a WSM 18.5. Added a gasket kit to the door and lid.

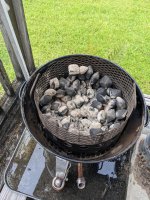
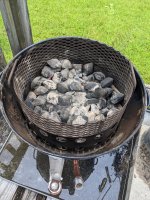
I have been using the coffee tin method to start (without the tin). Adding about 25 lit coals into a hole in the middle of a full coal bed (Kingsford Blue) with wood chunks buried. When running manually with a water pan (cold start) I get good temp control and usually need to stir the coals after 10 to 12 hours to deal with ash build up and get the fire perked up. When running manually I always leave the top vent open.

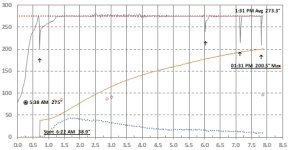
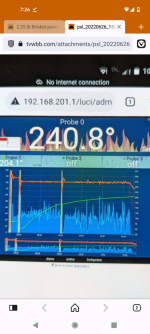
I recently picked up a Thermoworks Signals and Billows combo (with the damper). I am getting a repeating pattern across 2 smokes using the same coal method. and starting the temp controller after letting the pit get most of the way to temp. The temp fluctuated a bit at the start so I closed the damper to about 7 clicks and got a nice stable temp, but after a few hours the temp suddenly drops (fan is pulsing during the drop and never went constant). If I stir the coals and open the billows damper a little, I get the temp back up but the pattern repeats. I also tried opening the top vent a bit more (started at 1/8 moved to about 1/3) with minimal effect. Outside temp was 80f overnight.

Here's my temp trace from a recent cook.
Screenshot_20220810-225237.jpg


After the second dip I had a connection issue (flat line).

Based on other threads I am suspecting that my coal method or top vent setting isn't right for the billows setup. Any advice on what works for others would be greatly appreciated.
 
Last edited:
Too little air. Too few lit coals. Lit coals too cramped together

Instructions say 3/4 of a chimney. And spread the lit coals out. Instructions say spread coals around on a flat top of a plateau of coals.

Since the fan controls the fire, you don’t need to minion the coals to control the fire.

You may not have needed the gaskets. You may not need the damper either. Top vent should only be 1/8 or so.

Billows works better with a bigger less restricted fire than what you are using.
Thanks, I'll give more coals a try.

I think I got scared away from the coals on top method after having some early cooks smother the coals with ash as they burnt downward. Hence moving to the pile in the coffee can method. But perhaps that won't be an issue with the air movement the billows introduces.

(The gaskets were pre billows and helped with getting more consistent low temps manually, my door just didn't seal well)
 
Just spread lit coals out evenly on top of the rest of your coals. And use about 3/4 of a chimney and quit counting. How well you do will depend on how good your air distribution is. You will have a tendency to burn near your air entry point unless you do something to spread that air around . In a long cook that may actually make your fire go out eventually.

To solve the problem with the ash, make a bigger coal ring, extended using some expanded metal and add more charcoal. I never have to mess with Ash buildup. I would have to go over about 12 hours before it would become an issue. Occasionally it gets a little squirrely towards the end of a long cook but the controller handles it. I don't use a billows but here's a brisket I cooked a couple months back.
 

Attachments

  • Screenshot_20220814-192621.png
    Screenshot_20220814-192621.png
    501.6 KB · Views: 19
Last edited:
Success!

I tried a cook this weekend.

Target 275 (5 racks of St Louis cut ribs)
Water pan with cold water

Started with about 3/4 of a chimney. I left in the chimney a bit too long (kids needed attention too) so it burnt down to about 1/2 chimney before adding to the cooker. which I evenly spread over the top.

Cooker warmed up to 270 (manual air intakes) and I loaded the cooker and started the billows. It was holding 250 but just wouldn't warm back up.

So based on advice above more coals! Started another 3/4 chimney and added to a small area of the basket.

Cooker shot up to 310 and quickly dropped back down under billows control then it held stable for the rest of the cook with remarkable stability.

Screenshot_20220814-212941.jpg

So it looks like I just need to start much hotter. Billows was definitely better at regulating the hot coals than helping start new ones.

Interestingly at the end of the cook after having the lid off for an extended period it had trouble getting back up to 275. So this seems to support the billows working best with a sufficient load of hot lit coals.

I suspect 225 and 250 will be a bit easier to regulate. I'll have to think of something to test cook. (I have 16 lb of pork butt in my freezer already ;) ). Getting closer to my dream of a goods night sleep and a brisket ;)
 
Just spread lit coals out evenly on top of the rest of your coals. And use about 3/4 of a chimney and quit counting. How well you do will depend on how good your air distribution is. You will have a tendency to burn near your air entry point unless you do something to spread that air around . In a long cook that may actually make your fire go out eventually.

To solve the problem with the ash, make a bigger coal ring, extended using some expanded metal and add more charcoal. I never have to mess with Ash buildup. I would have to go over about 12 hours before it would become an issue. Occasionally it gets a little squirrely towards the end of a long cook but the controller handles it. I don't use a billows but here's a brisket I cooked a couple months back.
Thanks for the tip. Looks like I have some sheet metal work in my future on the basket ;)

I might try a small baffle to reflect some billows air towards the coals 🤔
 
Brad -- glad that worked out.

When running manual, the big fear is getting too much lit and having the fire run away from you. Hence the Minion method to physically contain the fire. Hence using the full water pan to act as a temp regulator.

With the Billows, you basically want an anti-Minion fire. So long as you have enough lit, the fan is able to easily increase/decrease oxygen to make small adjustments in temp within a fairly narrow band.

Since the fan is now in control, you don't need the water any longer to control temp. Many Billows users (including me) cook water free, thereby getting a significant increase in fuel efficiency. Keeping 2.5 gallons of water at 212F consumes a LOT of BTUs and charcoal.

IMO, water in the WSM is more about temp control and less about adding moisture to the cooking chamber. But that is an oft-debated topic on here.

But there's no question that ditching the water (or using a smaller amount of water) will improve your sleep on an overnight cook. I load up a full chamber, light up a full chimney, and then sleep like a baby. Without the drag of the water, a 225-250F fire will easily last until breakfast.
 
Last edited:
Thanks for the tip. Looks like I have some sheet metal work in my future on the basket ;)

I might try a small baffle to reflect some billows air towards the coals 🤔
Ive used one made out of a cup from a muffin pan from the dollar store for years, does well enough for anything I've ever cooked up to 20 hours . I still notice my charcoal was mostly burnedon the side near the air entry though. Finally im currently working on a air distribution pipe to distribute the air inside. Over on the heater meter forum some people call this an " air burner". Helps charcoal basket burn more evenly. Less air bypassing coals, less cooling affect too. The result is more consistent control.
 
Martin -- that sounds like a great solution to the coals burning more on the fan side.

But my low tech system works pretty well too. Use the Weber coal rake to move the coals around every once in a while. Which also does a good job knocking off the ashes off of the lit coals.

The rake also helps when I add additional unlit coals on a very long cook. I get the new unlit mixed in with some lit in a pile right in front of where the fan is. Helps the unlit get going faster. Of course the more fun way to do that is to use a leaf blower on said pile....
Extend your coal ring and you won't ever have to add coals. I've gone about 21 hours and still had several hours worth of coals left. It also helps with the ash problem.

I never add coals, I never have to mess with ash. Part of that is also using good charcoal. I used some cheap charcoal once before I extended my coal ring.... It became totally a pile of ash still standing...... And with a little movement it all collapsed suddenly.... Basically putting the fire out. I had to put more coals in that time.
 
What I care most about is being able to keep the fire going overnight so I can sleep.

I can do that using the billows and a standard ring full of either kbb or kpro (from Costco).

For me, not a big deal to rake and or add coals as needed. So long as I can do that in the morning.

Cheers!
 
Martin and Jim,

When you dump the hot coals into the basket do you let the fire grow for a bit (igniting more coals and starting the smoke wood) before assembling the cooker or assemble right away?

Cheers,
Brad
 
Martin and Jim,

When you dump the hot coals into the basket do you let the fire grow for a bit (igniting more coals and starting the smoke wood) before assembling the cooker or assemble right away?

Cheers,
Brad
I don't, I just spread the coal's out across the top of it, assemble it and then let it do whatever it's going to do for 30 to 45 minutes before I put meat on. Sometimes this means the controller shuts it down for a while to reduce the heat if I lit way too many coals by stupidity. In that case i got to be careful that it doesn't go completely out. This happens if I just carelessly use a full overflowing chimney that I would use for chicken in order to do a lower temp cook. I've had my head up my *** a couple of times and done just that....
 
What I care most about is being able to keep the fire going overnight so I can sleep.

I can do that using the billows and a standard ring full of either kbb or kpro (from Costco).

For me, not a big deal to rake and or add coals as needed. So long as I can do that in the morning.

Cheers!
Here's a cook I just did I left the smoker running afterward to cook some sides as it got closer to lunch time
I filled my coal ring about 80%... Not even all the way.
The controller handled it for 22 hours before it finally started getting a little wonky. I never added coals or touched Ash or did anything. Really not any ash to mess with with this charcoal. It's doing a pretty good job of falling to the bottom by itself.

And there's still a great deal of coals left after 24 hours. About enough for another 6 hours it looks like. I rearrange those and I'm going to let it see how far it goes....

I put an air distribution pipe underneath my coals which actually makes it more effective. It uses less air because less air is bypassing the coals. Because it's not also heating bypassed air it burns the coals slower overall.
 

Attachments

  • Screenshot_20220821-153014.png
    Screenshot_20220821-153014.png
    134.2 KB · Views: 31
  • PXL_20220821_203135082.jpg
    PXL_20220821_203135082.jpg
    288.8 KB · Views: 33
Last edited:
Decided to shut it down at 25 hours.... Still a little bit of coals left.
 

Attachments

  • PXL_20220821_231738002.jpg
    PXL_20220821_231738002.jpg
    279 KB · Views: 12
That’s pretty cool.

But what needs 24+ hours of cook time?

If I get 10-12 hours, that’s a good night’s sleep. And pretty easy to reload if needed. That’s why the door is there, right?
 
That’s pretty cool.

But what needs 24+ hours of cook time?

If I get 10-12 hours, that’s a good night’s sleep. And pretty easy to reload if needed. That’s why the door is there, right?
If you want to reload, knock yourself out. Unnecessary hassle imo
I had to do that with previous POS meco smoker, even on a turkey. Royal PITA.

The reason I extended my coal ring in the first place was because I was only getting about 7 hours or so with the WSM before I had to shake the ash down for it to keep running stable, without a controller at that time. Extending the coal ring and using more charcoal let me get that to about 11 hours and sleep all night without it crashing. Some of this depends on the charcoal used and how much ash it makes. I used the home Depot embers once, had a standing pile of ash..... Look like charcoal, it was mostly ash.... I had the door open and when I shook it a little the whole thing collapsed and put the fire out. I had to add a whole new chimney of coals. No desire to screw around with those kind of problems.

I have had brisket go 21 hrs before......try cooking at 225 .
Yeah....i normally use higher too.....and thats why.

But, cooking lower has benefit for sleeping all night. Maybe you dont want to get up and wrap at 3am?
Cook lower temp, you wont need to until 8 am...

Point is, set it and forget it. Low hassle is what I want. The whole reason for the temp controller, larger charcoal ring etc. If i want to babysit a cooker, id have a stick burner.😊
 
Last edited:
Just spread lit coals out evenly on top of the rest of your coals. And use about 3/4 of a chimney and quit counting. How well you do will depend on how good your air distribution is. You will have a tendency to burn near your air entry point unless you do something to spread that air around . In a long cook that may actually make your fire go out eventually.

To solve the problem with the ash, make a bigger coal ring, extended using some expanded metal and add more charcoal. I never have to mess with Ash buildup. I would have to go over about 12 hours before it would become an issue. Occasionally it gets a little squirrely towards the end of a long cook but the controller handles it. I don't use a billows but here's a brisket I cooked a couple months back.
What do you use Martin? That looks rock steady.
 
I load up the basket with more charcoal than I'll probably need, just barely get a few middle coals started with a torch, put the WSM together with the top vent cracked, and let the Billows do ALL the work. It takes about 30-45 minutes to come up to temp and for the smoke to settle down. Other than opening the lid, I never rarely see any temp spikes.

I've also had much better luck since I added a "dog bowl" manifold over a vent and connect the Billows fan to it, it slows the air velocity down (blowing through 3 vent holes instead of 1) so I think it smooths out the spikes in temperature quite a bit. If the temp starts dropping, I can usually bang on the charcoal basket to knock the ash off off the fire.

This one took 45" to go from unlit to 275 degrees with the Billows only, top vent cracked about 1/8".
 

Attachments

  • Pork Butt hot and fast.jpg
    Pork Butt hot and fast.jpg
    62.9 KB · Views: 9
I load up the basket with more charcoal than I'll probably need, just barely get a few middle coals started with a torch, put the WSM together with the top vent cracked, and let the Billows do ALL the work. It takes about 30-45 minutes to come up to temp and for the smoke to settle down. Other than opening the lid, I never rarely see any temp spikes.

I've also had much better luck since I added a "dog bowl" manifold over a vent and connect the Billows fan to it, it slows the air velocity down (blowing through 3 vent holes instead of 1) so I think it smooths out the spikes in temperature quite a bit. If the temp starts dropping, I can usually bang on the charcoal basket to knock the ash off off the fire.

This one took 45" to go from unlit to 275 degrees with the Billows only, top vent cracked about 1/8".
Can we get a pic of the dog bowl manifold?


Back
Top