Thermocouple Board Success (sort of)


Bryan Mayland

TVWBB Hall of Fame
I hand soldered in a AD8495 thermocouple chip into the included sub board. Success!


My thermocouple has the slowest dang response time, 10 minutes and it is still coming back to 70F from 100F (it came free with a PID unit so I didn't expect quality). Once it gets there, it reads less than a degree difference from my Thermapen, sometimes spot on. Now that I've got one assembled it makes me think I should have designed it differently so tell me what you guys think.

As it is now, the two big holes are the connections to the thermocouple. I designed it like this so it would sit on top of the existing jack holes and you could then use that jack to plug your thermocouple in. You'd cut the traces at the solder jumpers on the HeaterMeter v4.1 board then use the three other connections to attach 3.3V, Gnd, and output using some short jumper wires.

However, because thermocouples never come with 2.5mm mono jacks, I'm thinking it would make things easier to connect if I made the two big connectors output and Gnd, then used the 3 pin connectors for 3.3V and two connections to the thermocouple. This would mean no solder jumper cutting on the HeaterMeter board and you'd still run your two wires to a panel jack connector for the thermocouple.

For those who want to use thermocouples, does it make a difference?
 
The capacitors and resistors were surprisingly easy. Just melt some solder onto one of the pads, then heat it back up and apply the component using tweezers to it and line it up. Then solder the other side. The chip was sort of tough to get aligned, in fact I have my first try where it got cockeyed and now I can't easily remove it. I think I'm going to just put it on a hotplate and wait for it to unstick itself. I'd hate to lose a $5 part.
 
And a quick glimpse at noise versus the standard Ambient thermistor. The output actually has about 10-15mV of high frequency noise on it, which sort of helps HeaterMeter's oversampling/decimation. I've tried hooking it through an RC low pass filter too which might be worthwhile.


The ADC on the ATmega has 3.22mV resolution per ADC LSB which works out to 1.16F across the entire range of input. With the 13 bit oversampling we do, that takes the resolution down to 0.29F. That's not quite as good as the thermistor probes which have something on the order of 0.2F at their small optimal range.
 
Last edited:
However, because thermocouples never come with 2.5mm mono jacks, I'm thinking it would make things easier to connect if I made the two big connectors output and Gnd, then used the 3 pin connectors for 3.3V and two connections to the thermocouple. This would mean no solder jumper cutting on the HeaterMeter board and you'd still run your two wires to a panel jack connector for the thermocouple.

What's the likelihood that you are going to change this? I just put in an OSH Park order and can try to cancel it if you are.
 
I don't know, it doesn't make all that much difference. You've still got to run a few wires. Functionally it would be the same, and the HM v4.1 board wouldn't change. In any instance I won't have time to make a change until the weekend if it proves to be the more popular choice.
 
I could do that. I really need longer probes for my smoker. I have access to thermocouple wire. Could you explain the connections that need to be made on the 4.0 board? Thanks for the info.
 
Oh, you'll also need a thermocouple amplifier with analog output so you'll probably need a PCB similar to the one I've shown. Once you have that, you remove the pullup resistor for the probe you're replacing. The 5 wires are:
3.3V (one end of pullup resistor has 3.3V on it you can now use)
Gnd (from the probe pin header on the HM4 PCB)
2 to the thermocouple +/- (on the thermocouple addon board)
Amplifier output (from the thermocouple board) goes to the other end of the pullup resistor holes you've removed.
 
I used the thermocouple to measure my toaster oven temperature when I was trying to remove the AD8495 I botched the install on. Good news everyone! When the thermocouple braid touched the toaster it would go crazy wacky with the temperature all over the place. Maverick Probes 2.0. The TC worked all the way up to 500F no problem if I put some tape around where it touched the toaster.

At the same time I sat the device down on the counter and it touched the sink, frying the Raspberry Pi B it was attached to. Hooray!

I've ordered a couple different TCs from Auber Instruments (who also sells panel mounts and plugs) to see how they work. They sell some with regular fiberglass shielding that is non-conductive, is just a bare TC, and good up to like 1000F so I think that's going to be my jelly bean. Who needs all that metal? 3 probes and 3 connectors for under $40 shipped.
 
Last edited:
I used the thermocouple to measure my toaster oven temperature when I was trying to remove the AD8495 I botched the install on. Good news everyone! When the thermocouple braid touched the toaster it would go crazy wacky with the temperature all over the place. Maverick Probes 2.0. The TC worked all the way up to 500F no problem if I put some tape around where it touched the toaster.

At the same time I sat the device down on the counter and it touched the sink, frying the Raspberry Pi B it was attached to. Hooray!

I've ordered a couple different TCs from Auber Instruments (who also sells panel mounts and plugs) to see how they work. They sell some with regular fiberglass shielding that is non-conductive, is just a bare TC, and good up to like 1000F so I think that's going to be my jelly bean. Who needs all that metal? 3 probes and 3 connectors for under $40 shipped.

Sorry about the pi. Can you list the auber part numbers you are using?
 
The one I am using now is just a cheepie that came bundled with something else. The Aubers I've ordered are:
2 x K Type Thermocouple, Bare (TC-K5) = $12.88
2 x Panel mount connector for K thermocouple (TCCON) = $11.78
1 x K type Thermocouple, Washer Probe (TC-K-WS) = $14.95
Sensor Cable Length Option 6 ft cable

I went with these because they didn't haven any long thermowells to take up space inside my relatively small BGE. The alligator clip models were attractive but only good to ~500F. Ideally I'd have a slip-on bracket that could be slid around the rim of the egg to keep it out of the way of food but I'll probably just clip the bare probe to the grill grate, or something similar with the washer.
 
Hey, I'm a long time lurker and am waiting on this one last detail to get ironed out before jumping in. Personally I would like to see option 2 where we can use the standard connectors that come on the thermocouples. It just seems like too much hassle/fragility to attach a mono jack end on something that will most likely be integrated into a grill and be subject to some amount of weather. And in this case most people don't have a spare jack to attach anyway like they might have the component cable for the blower.

Just my 2 cents. Thanks for all of the hard work! I'm looking forward to building one soon.
 
Glad to see you working through the thermocouple interface and experimenting with various thermocouples. I just killed another Maverick "High Heat" probe last night, it died at 482 degrees which is a couple hundred short of what it was supposed to handle? I've used this same type of probe before for many pizza cooks in the 500-600 degree range so I dont know what is up with this one, maybe cause the probe was half in the pit and half out and it was around freezing outside, or just a bum unit? IDK, but what I do know is I am really sick and tired of buying new Maverick Probes.... So far I have been pretty happy with the thermoworks probes, but their units don't go up high enough in temp range for my pizza cooks...

So bottom line, I need to make the move over to a thermocouple for my pit probe otherwise I seem doomed to burning through these Maverick "High Heat" probes... I will be waiting to hear what you have to say about the Auber units you bought to test.....
 
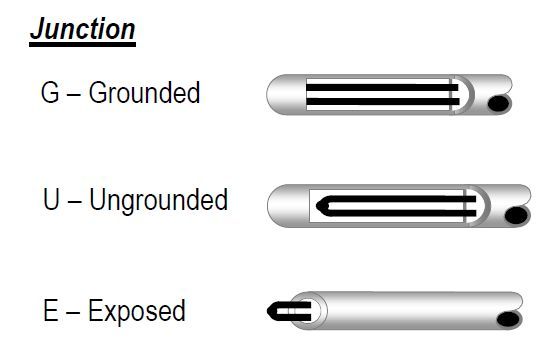
Bryan. When you are doing your checkout be aware that they make both grounded and un-grounded thermocouples. The un-grounded are compatible with most instruments, but they don't have quite as good of a response. The grounded on the other hand, have better response, but they can have some compatability issues with instruments. In our bbq application response isn't probably much of an issue (relative to the grounded and un-grounded probes), but you'll want to see if your converter can work with either style. In my work I occasionally deal with thermocouples and I've seen where some industrial controls won't work with a grounded thermocouple.

tc_zps41f48840.jpg
 
Yeah I'm aware of the different types of junctions. You don't get much of a choice though. Check Thermoworks's and Auber's web sites for their list of thermocouple probes and tell me which are grounded and which isolated. You just sort of get what you get.

Grounded probes are the most problematic in that they behave like ET-732 probes when you touch them or they touch anything. You get a ground loop and the reading gets all wonky. The only advice I can find on the internet about this is "Don't have a ground loop". Yeah thanks, Captain Obvious, how does one have a grounded probe and a grounded device and not have a ground loop? "Don't have a ground loop". There's apparently no way to electrically prevent this (for all practical purposes, without expensive isolators) so you need to prevent it mechanically. That is, don't let the wire or tip touch anything electrically conductive such as a BBQ grill or another probe. It seems entirely impractical. The other option is to run off of batteries, which isn't very practical either.

The exposed junction TC works fine as long as you don't ground its tip though.

Didn't someone here mention they design this sort of hardware? I seem to have lost that post. Input on how to avoid these ground loops would be appreciated.
 
Somehow my post is gone....

I made an offer to create a tc add on board. I am actually working on it right now....
I prefer to use tc for temp measurements.

Let me now if it is preferred to have a single tc board or to have a board that has 4 inputs for tc.

Bryan I can send you the prelim design to review.


Back
Top