RalphTrimble
TVWBB Diamond Member
I started out using the Heater Meter on a typical cheapo water smoker, with the air vents closed off and fan blowing through my "air burner" it worked like a charm, holds the temperature like magic!
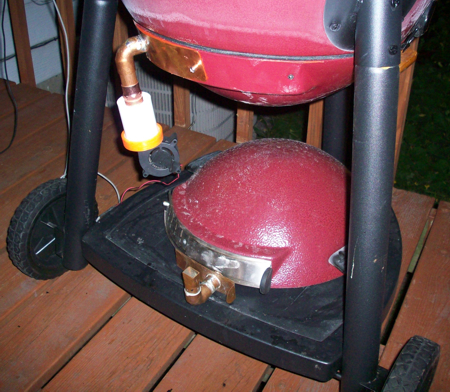
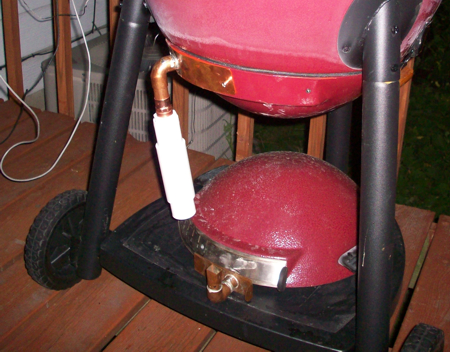
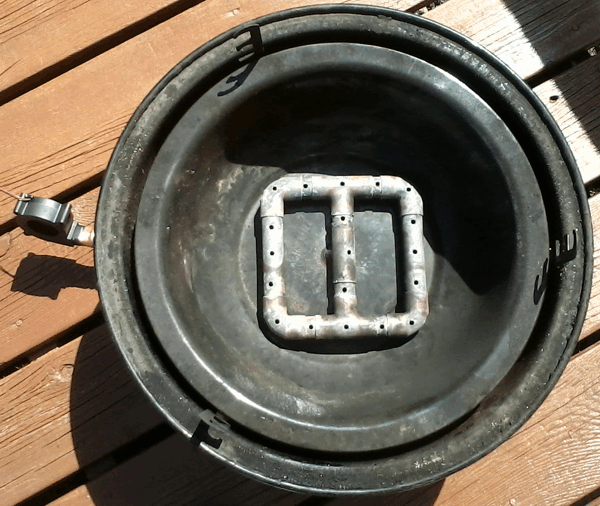
Here is a picture of my home made "air burner" that I made out of 3/4" copper.
I love this cheap smoker cause it holds temps rock solid, and it just takes a tiny piece of paper set afire with a lighter to get going. I like to amaze other grill cooks by ripping a small piece of the charcoal bag then crumble it up and throw it in the pan, then pile a bunch of lump coal on top and light just the smallest corner of the paper with a lighter. I immediately assemble the smoker on top and move on with prep, they always ask "Do you really think that's gonna light?". I point at the smoke and say "where there's smoke there's fire!" and a few minutes later the smoker is up to temperature thanks to the Heater Meter...
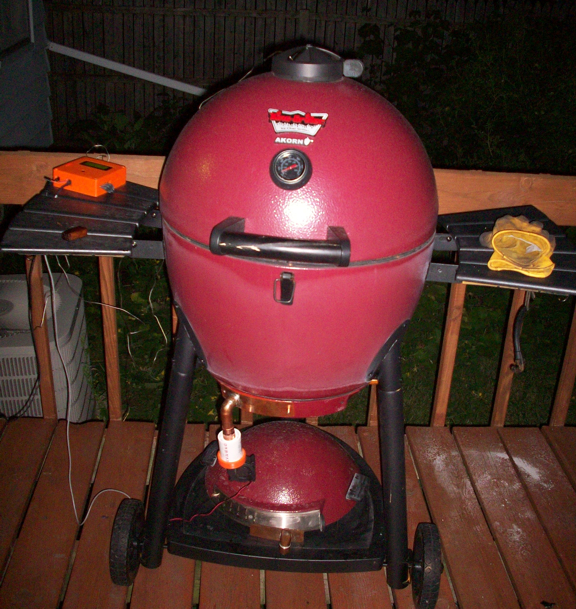
Then I got a Kamado grill, I tried to use the Heater Meter but I always ended up with runaway temperatures, even with the top vent nearly closed. (too closed...) I tried restricting the opening for the fan to reduce the pathway for draft, helped a bit but it was still difficult to maintain a low and slow cook temp....
So this week I setup a servo damper (instead of using the blower) and finally I can easily achieve and maintain low and slow temps in this Kamado grill. The servo damper does the job, however, bringing the grill to temp is painfully slow compared to the blower driven system. I guess I was just used to the fast response and hold with the blower on the cheapo smoker (that leaks heat and burns coal like a train going up a mountain!) and wanted the best of both worlds... Fast recovery AND the ability to maintain low and slow, or not so low temps...
I know the issue with maintaining low temps in a Kamado style grill is their incredible efficiency with the coals, just a little fire makes a lot of heat, a big fire makes TOO MUCH heat for low and slow cooking. Since the Heater Meter fan does not have a damper to stop convection draft of air when the fan is not blowing, the fire can continue to stoke itself and runaway temperatures result. I have heard the Auber fan has a gravity damper that is effective enough to control the draft and maintain low and slow temps in a Kamado grill, so I had plans to design and create a gravity damper with my new 3D printer.... Then something much easier and really cheap fell into place and it works like a charm! Check it out...
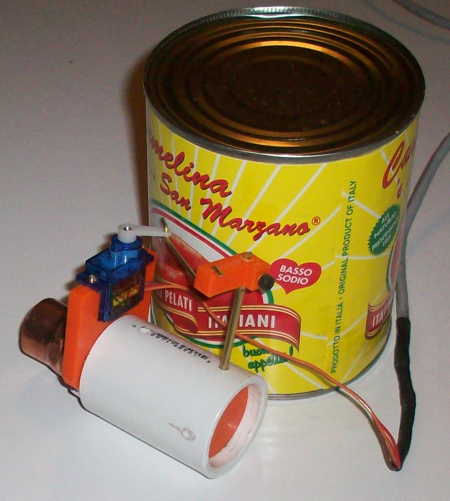
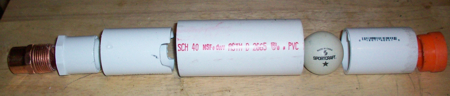
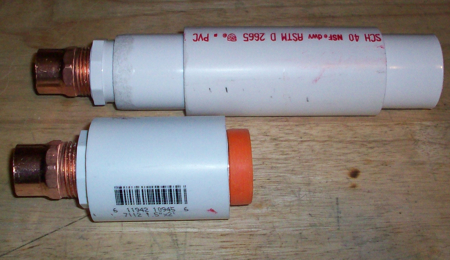
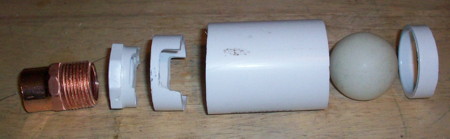
I went to Home Depot and bought two 1" PVC couplers, a 1" PVC to 3/4" threaded adapter and a 3/4" copper to male thread adapter as pictured below.

Total cost about $3.50.... I already had the short piece of 1.5" PVC pipe needed, add another buck and a half if you need to buy a stick, you're still only up to 5 bucks! Now just add a ping pong ball and push it all together and there you have it, a cheap and effective gravity damper valve!
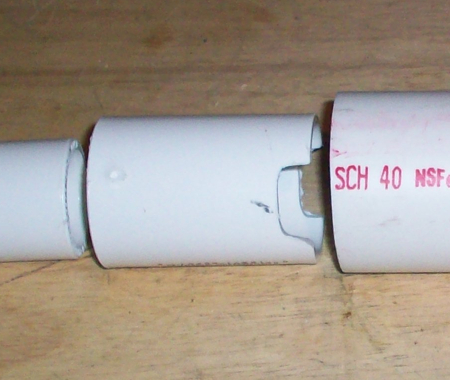
Here is an exploded view of the parts as assembled...
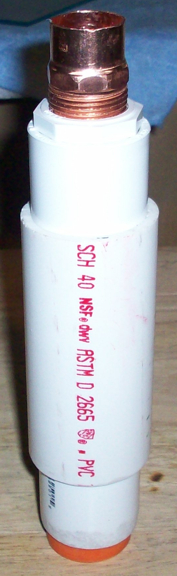
Here is a picture of the whole thing put together, the copper end goes to your grill adaptor....
If the ball gets pushed up high enough to hit the top coupler it will seal and stop the air flow (when it should be full blast), so I cut a couple slots in the top coupler to allow air to flow around the ball...
I found it only took a small amount of draft to lift the ping pong ball and allow air to flow, so I drilled a hole in the ball and put a little bit of salt inside to add some weight to help it resist the draft, then taped over the hole in the ball to keep the salt in. I am doing the first test with it now, with the current amount of salt in the ball I find it lifts up and air flows when the fan speed hits about 30%, so I set the minimum fan speed to 30%. When the fan goes off the ball drops and so does the temperature!
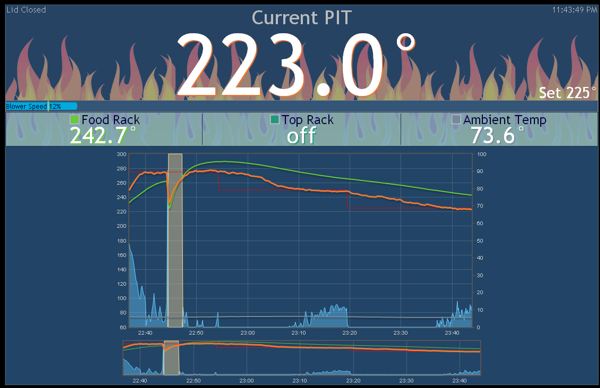
Here is a graph showing two swift recoveries to a setpoint of 275 degrees, then I ramp the setpoint down to 250, then to 225, response is pretty good I would say...
Here is a graph of then ramping up to 275, and then 350...
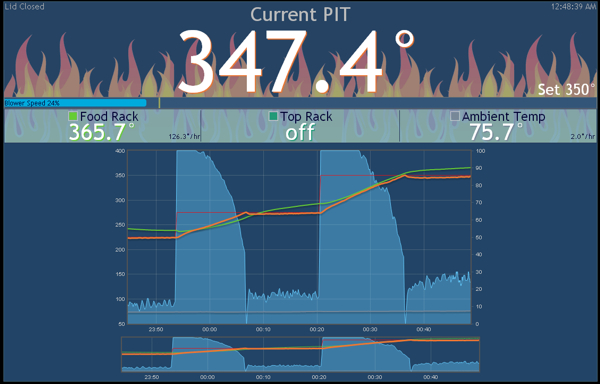
Gotta love that hard stop at the setpoint, no runaway temps here! If you have changed over from the blower to the damper system that swift upward turn right after the setpoint has changed is probably a sight for sore eyes! I know I was frustrated waiting for response with the damper system, however grateful the temperatures weren't getting away from me... but this new valve is just kickin butt!
Here is a graph showing the lid open and recovery twice, the grill comes RIGHT back to the target temp FAST....
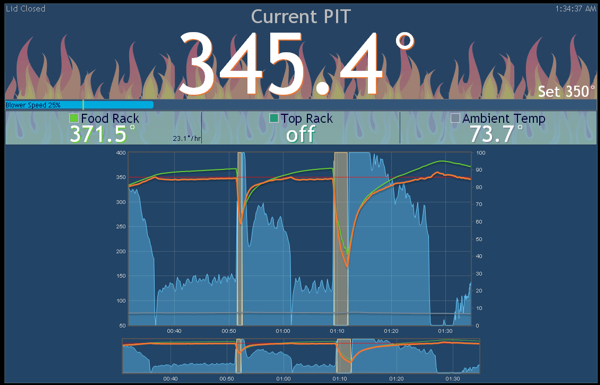
The second time I left the lid open a bit longer allowing air to flood the grill and get that fire stoking to see if that would cause overshoot. When I closed the lid I immediately turned off Lid Open mode and let the fan start stoking, what had been a HUGE No-No in the past as major runnaway temps always result. With this new valve leaving the lid open was no problem, it did overshoot the temp a bit but only 9 degrees max for a duration of less than 3 minutes, then it was right back on target....
The above graphs are from my first test which I did tonight, the top vent was opened to about 2 and the Heater Meter is using the stock PID settings. The results are astonishing, after much frustration I have conquered the Kamado and the Heater Meter magic is back! The temps rise rapidly to the setpoint and hit a hard ceiling, I dont think Ive seen 1 degree overshoot. It seems to level off a degree or two low actually, which is not really a problem, but it could probably be tuned up to be right on the nut with a little PID settings tweak....
I'm pretty sure this cheap and simple valve can be tuned to work on just about any grill, just add enough salt to the ping pong ball to overcome the draft of your grill and you are in business... The biggest negative seems to be that it is a tad long, and needs to sit fairly upright. My Kamado has plenty of room for it to shoot downward about 10-15 degrees off vertical and the valve still works great, if your grill doesn't have room you just need to make the tube go up first and then come down to the valve...
I connected the Heater Meter fan to the bottom 1" coupler with an adapter I made with my 3D printer (The orange thing you see in the pictures), but there are a million simple ways you can attach your blower... tape, wood, metal, or plastic hand fashioned and sealed up with some silicone would be easy enough. Or you could buy a second 3/4" copper end and hammer it square to fit the fan.... Plenty of other ways I'm sure, dig something out of the garage or basement and be imaginative....
..and that's about it. Pretty simple, very cheap and highly effective....
Hope some of you guys give it a try and get similar results...
EDIT:
I decided to give it a go and see how small I can make the unit. I got it down to less than half the size, the plastic parts on the small version pictured below measure just over 2.5 inches long. The original prototype was pretty huge at over 8 inches long. Here is a picture to compare them....
And here is an exploded view of the parts on the short valve....
I haven't tested the small valve yet but the theory is the same, I see no reason why it wouldn't function just like the longer one...
Edit: The short valve has been tested and does indeed function just as well as the long valve....
Here is a picture of my home made "air burner" that I made out of 3/4" copper.
I love this cheap smoker cause it holds temps rock solid, and it just takes a tiny piece of paper set afire with a lighter to get going. I like to amaze other grill cooks by ripping a small piece of the charcoal bag then crumble it up and throw it in the pan, then pile a bunch of lump coal on top and light just the smallest corner of the paper with a lighter. I immediately assemble the smoker on top and move on with prep, they always ask "Do you really think that's gonna light?". I point at the smoke and say "where there's smoke there's fire!" and a few minutes later the smoker is up to temperature thanks to the Heater Meter...
Then I got a Kamado grill, I tried to use the Heater Meter but I always ended up with runaway temperatures, even with the top vent nearly closed. (too closed...) I tried restricting the opening for the fan to reduce the pathway for draft, helped a bit but it was still difficult to maintain a low and slow cook temp....
So this week I setup a servo damper (instead of using the blower) and finally I can easily achieve and maintain low and slow temps in this Kamado grill. The servo damper does the job, however, bringing the grill to temp is painfully slow compared to the blower driven system. I guess I was just used to the fast response and hold with the blower on the cheapo smoker (that leaks heat and burns coal like a train going up a mountain!) and wanted the best of both worlds... Fast recovery AND the ability to maintain low and slow, or not so low temps...
I know the issue with maintaining low temps in a Kamado style grill is their incredible efficiency with the coals, just a little fire makes a lot of heat, a big fire makes TOO MUCH heat for low and slow cooking. Since the Heater Meter fan does not have a damper to stop convection draft of air when the fan is not blowing, the fire can continue to stoke itself and runaway temperatures result. I have heard the Auber fan has a gravity damper that is effective enough to control the draft and maintain low and slow temps in a Kamado grill, so I had plans to design and create a gravity damper with my new 3D printer.... Then something much easier and really cheap fell into place and it works like a charm! Check it out...
I went to Home Depot and bought two 1" PVC couplers, a 1" PVC to 3/4" threaded adapter and a 3/4" copper to male thread adapter as pictured below.
Total cost about $3.50.... I already had the short piece of 1.5" PVC pipe needed, add another buck and a half if you need to buy a stick, you're still only up to 5 bucks! Now just add a ping pong ball and push it all together and there you have it, a cheap and effective gravity damper valve!
Here is an exploded view of the parts as assembled...
Here is a picture of the whole thing put together, the copper end goes to your grill adaptor....
If the ball gets pushed up high enough to hit the top coupler it will seal and stop the air flow (when it should be full blast), so I cut a couple slots in the top coupler to allow air to flow around the ball...
I found it only took a small amount of draft to lift the ping pong ball and allow air to flow, so I drilled a hole in the ball and put a little bit of salt inside to add some weight to help it resist the draft, then taped over the hole in the ball to keep the salt in. I am doing the first test with it now, with the current amount of salt in the ball I find it lifts up and air flows when the fan speed hits about 30%, so I set the minimum fan speed to 30%. When the fan goes off the ball drops and so does the temperature!
Here is a graph showing two swift recoveries to a setpoint of 275 degrees, then I ramp the setpoint down to 250, then to 225, response is pretty good I would say...
Here is a graph of then ramping up to 275, and then 350...
Gotta love that hard stop at the setpoint, no runaway temps here! If you have changed over from the blower to the damper system that swift upward turn right after the setpoint has changed is probably a sight for sore eyes! I know I was frustrated waiting for response with the damper system, however grateful the temperatures weren't getting away from me... but this new valve is just kickin butt!
Here is a graph showing the lid open and recovery twice, the grill comes RIGHT back to the target temp FAST....
The second time I left the lid open a bit longer allowing air to flood the grill and get that fire stoking to see if that would cause overshoot. When I closed the lid I immediately turned off Lid Open mode and let the fan start stoking, what had been a HUGE No-No in the past as major runnaway temps always result. With this new valve leaving the lid open was no problem, it did overshoot the temp a bit but only 9 degrees max for a duration of less than 3 minutes, then it was right back on target....
The above graphs are from my first test which I did tonight, the top vent was opened to about 2 and the Heater Meter is using the stock PID settings. The results are astonishing, after much frustration I have conquered the Kamado and the Heater Meter magic is back! The temps rise rapidly to the setpoint and hit a hard ceiling, I dont think Ive seen 1 degree overshoot. It seems to level off a degree or two low actually, which is not really a problem, but it could probably be tuned up to be right on the nut with a little PID settings tweak....
I'm pretty sure this cheap and simple valve can be tuned to work on just about any grill, just add enough salt to the ping pong ball to overcome the draft of your grill and you are in business... The biggest negative seems to be that it is a tad long, and needs to sit fairly upright. My Kamado has plenty of room for it to shoot downward about 10-15 degrees off vertical and the valve still works great, if your grill doesn't have room you just need to make the tube go up first and then come down to the valve...
I connected the Heater Meter fan to the bottom 1" coupler with an adapter I made with my 3D printer (The orange thing you see in the pictures), but there are a million simple ways you can attach your blower... tape, wood, metal, or plastic hand fashioned and sealed up with some silicone would be easy enough. Or you could buy a second 3/4" copper end and hammer it square to fit the fan.... Plenty of other ways I'm sure, dig something out of the garage or basement and be imaginative....
..and that's about it. Pretty simple, very cheap and highly effective....
Hope some of you guys give it a try and get similar results...
EDIT:
I decided to give it a go and see how small I can make the unit. I got it down to less than half the size, the plastic parts on the small version pictured below measure just over 2.5 inches long. The original prototype was pretty huge at over 8 inches long. Here is a picture to compare them....
And here is an exploded view of the parts on the short valve....
I haven't tested the small valve yet but the theory is the same, I see no reason why it wouldn't function just like the longer one...
Edit: The short valve has been tested and does indeed function just as well as the long valve....
Last edited: