Results of dyeing plastic end tables


RioAmmari

New member
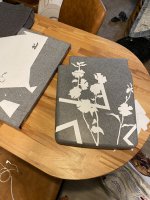
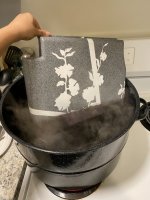
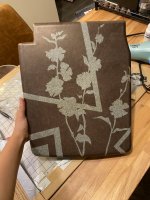
Hey everyone! So I dyed the plastic end tables of my Genesis Silver B. I used Dyemore in the black (graphite) color. It did not turn out black, unfortunately. I used vinyl sheets to cut out a design and stick it on before dying so the dye wouldn’t penetrate those areas. I think that came out pretty good. Still dyeing the other table piece so we’ll see how that one turns out. I’ll attach photos I took along the way. Probably a lil too feminine for most of your tastes haha but thought I’d share in case anyone else is interested in personalizing theirs.
 

Attachments

  • D35DA0CB-EE6E-4A09-A092-91720EF7CB4F.jpeg
    D35DA0CB-EE6E-4A09-A092-91720EF7CB4F.jpeg
    213.9 KB · Views: 33
  • 6E9756CE-302C-4F15-9ABE-3DFDBD6DF65A.jpeg
    6E9756CE-302C-4F15-9ABE-3DFDBD6DF65A.jpeg
    157 KB · Views: 32
  • AC752F83-B2D1-4648-AE61-C08482F5AE8E.jpeg
    AC752F83-B2D1-4648-AE61-C08482F5AE8E.jpeg
    219.6 KB · Views: 33
  • AF1BE14D-6C5A-4E80-B3F1-5EF196D27480.jpeg
    AF1BE14D-6C5A-4E80-B3F1-5EF196D27480.jpeg
    206.7 KB · Views: 34
Last edited:
Oh, I forgot to include what happened to the knobs I dyed. So I also used the vinyl to block out the little stripe on the top. Unfortunately, I took one knob out 20 or 30 minutes before the other two because I was having trouble finding them in the big pot of blackness. Even though they still came out lighter in those spots, the one I took out earlier turned out the best and now looks different than the others :/ may paint a little white stripe on instead so they match
 

Attachments

  • 68E7C04F-BDC8-42B6-A7D1-1D8FB084A203.jpeg
    68E7C04F-BDC8-42B6-A7D1-1D8FB084A203.jpeg
    123.9 KB · Views: 19
I gotta give you props for originality and creativity!!!! You are definitely making that your own grill!

After decades of barbecuing, and having a fair share of messes to clean up afterwards, I would forever be trying to wipe off a spill that isn't there...it would drive me nuts eventually. But you are really thinking outside of the box here!

Thanks for sharing!
 
I have thought about using white enamel Testors paint for that little indicator on the knob after I have dyed it black.
 
Awesome job!
What temps and soaking times did you use on the parts?
did you use just dye and water or acetone also?
I like the alternative design idea, maybe not floral😜,but maybe old school Weber logo or just the Weber kettle would be cool.
I found this one online.
image.jpg
trying to make a stencil like it to transfer on my grill cover😁
 
Rio,
Thanks very much for posting your results! I would say it was successful enough to encourage people with badly faded tables to try it. I think your design work is very creative and opens all kinds of possibilities. You can count yourself a pioneer on this board😎!

Like the others, I would be interested in hearing more about the details and how long you let the parts sit in the dye.
 
IDK I think the results look pretty decent IMO. What prep work did you do to the parts prior to the dye job?
 
This is so cool. Thanks for sharing. I love it. It would be interesting to see how it holds up under sun light. But anhow that has given me some idea for a project.
 
Awesome. I like the stenciling idea on the tables. I wonder if a guy could put a Weber design on the table. Like maybe a duplicate of the lid badge. I would like to see more details of the process used as well.
 
Thanks, everyone! For prep, I used a 50/50 mixture of bleach and water and scrubbed the tables with 0000 steel wool. I heated up the water to about 200 degrees. Added dish detergent and one bottle of dye. I later added a second bottle because I thought it would help make it black but it didn’t affect the color so I think one is sufficient.

For the design, I bought vinyl sheets from Michael’s . I honestly should have either doubled up by sticking one sheet on top of another and then cutting out the design or maybe using the 651 which is made for outdoor use, so I’m assuming stronger. I say this because on my knobs you can see it still penetrates through the vinyl if it sits in the dye too long. I soaked it for about 40 minutes on each side but could have done less. I was just hoping it would darken up. The first knob I only did 20 minutes and the other plastic pieces I also did 20 minutes each side. I didn’t use acetone because I was afraid it would take the vinyl off. I used a pencil to draw my design on the vinyl and then used an x-acto knife to cut it out. If you want to put a logo, I’d suggest getting the vinyl printer sheets and printing the logo on it—that way you get the logo perfect when cutting it out.

My second table didn’t turn out as well. I’ll post photos later. So my top table was lighter than the swing table to begin with, probably from sun exposure (in one of my photos you can see the second table popping out under the vinyl sheets and see how much lighter it is). I figured it wouldn’t really affect it. Well, the dye didn’t penetrate as well, and honestly seemed to come out a little splotchy. To try to remedy this, I left it in the water for a reallyyyyy long time. The underside came out the exact color of the swing table, so I don’t think it was due to lack of dye. I think the sun exposure makes the top absorb the dye differently. Because I left it in the dye for so long, the dye penetrated under the vinyl enough to make the design look brown in some areas (but the design was still crisp, which is why thicker vinyl/a double layer would have fixed this issue). I’m going to try to take some bleach on a q-tip and see if I can clean up the discoloration on the design.

I think I answered all the questions but if I didn’t, let me know! If anyone ends up trying it, I’d love to see the results!
 
Oh I forgot to mention, after I stuck the vinyl on the plastic I used a hair dryer to heat it up! And then really pressed down all the edges to make sure the vinyl was on there really well.
 
I bought a RH table set for my Silver C and the tables were stained, faded, and roughened from the sun...you could run your hand along the surface and feel the roughness. I followed this How-To over at WKC
and sanded out all the stains and roughness. Maybe this prep work would help improve your results? Thinking that a smoother surface would prevent the stain from soaking in from the edges of your stencil...
Omg yeah I think that’d totally help! I’ll definitely try that. It looks like the sanding got it back to the original color. Thank you for sharing!

Just to clarify, the dye didn’t seep in through the edges but the vinyl overall just started absorbing the dye. It’s the same thing that happened with the knobs where the knob taken out earlier was brighter but the other two came out darker because the vinyl started absorbing the dye. The lines still came out very clean and crisp. But doubling or using a thicker vinyl I think would help with that. I’ll add a photo. You can see that the parts that I had overlapped the vinyl came out lighter. If I didn’t soak it so long, that would have helped. I’ll let everyone know how the sanding goes!
 

Attachments

  • 48536AE6-B197-469B-B412-60FEA32E5678.jpeg
    48536AE6-B197-469B-B412-60FEA32E5678.jpeg
    195.2 KB · Views: 8
Rio, the splotches might have been caused by oil or grease being spilled on the table preventing the dye from soaking in. Using a really good degreaser before the bleach or the restoration that Ed posted should be a help.


Back
Top