Dominick
New member
Excuse my additional questions here but this thread touches on two issues I'm looking at with my Genesis E-310 LP Blk, Model 93741001, 06/2008 as I look to replace the burner tubes.
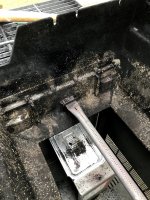
1st pic, It was this thread or another that mentioned don't try to remove the screws (Thank you!). The middle tube is still shown in the pic but it is now loose with a little persistence.
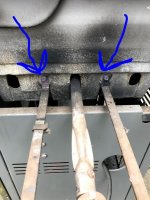
2nd pic, blue arrows show the bolts that MUST be removed? I believe that was said but I was able to slide two of the tubes out but the middle tube doesn't seem possible. Sorry for looking for confirmation but those bolts may be difficult. I have no impact gun as I've seen suggested.
Thanks for any additional insights you can provide.
Dom
1st pic, It was this thread or another that mentioned don't try to remove the screws (Thank you!). The middle tube is still shown in the pic but it is now loose with a little persistence.
2nd pic, blue arrows show the bolts that MUST be removed? I believe that was said but I was able to slide two of the tubes out but the middle tube doesn't seem possible. Sorry for looking for confirmation but those bolts may be difficult. I have no impact gun as I've seen suggested.
Thanks for any additional insights you can provide.
Dom

")