Pizza on the Weber Summit Kamado


DanHoo

TVWBB Olympian
I want to collect ideas, recipes and techniques around cooking pizza on the WSK. My goal is to learn, and follow what others are doing well.

I know @Brett-EDH has cooked some on his E6, and I've seen conversation with @EricV around flour and Dough. I thought if we had a thread to showcase or link to the winning ways, I'll be following and working toward improving my game.

If you know of a great cook, or recipe and technique on the WSK, please share it.

And, if you've tried and had less successful results, its OK to share those too. We all learn that way.

Parla come mangi !

🍕


edit: I plan to Link threads here. This is mostly so I can find them in the future.

 
Last edited:
My first question is how best to position a pizza stone. I'm not set on using these, but I have these now from my BGE so I think I'll experiment with them.

First pic is a platesetter from a large BGE, ceramic feet from the BGE which I've used many times as stone spacers, and a 14 inch stone. It moves the stone up which should be hotter ( right? ) and the stacked stones will keep the cooking stone from seeing extreme heat.


20220420_181419.jpg

This is a little sketchy and not as stable, yet it moves the stone to the top of the dome. I didn't measure it yet, but I think there is about 2 inches of clearance on the outside edge of the stone to the inside of the dome.


20220420_171121.jpg

Is raising the stone up in the dome worth doing ?
 
Last edited:
The rectangular stone that I've used on my gas grill and my indoor hotbox fits on the E6.

This is temporarily sitting on char baskets, but I would probably use fire bricks.

Do I need a second stacked stone to control heat? I think I'm going to have to test this.

I like the ability to add more fuel from the sides.

20220420_182700.jpg
 
I want to collect ideas, recipes and techniques around cooking pizza on the WSK. My goal is to learn, and follow what others are doing well.

I know @Brett-EDH has cooked some on his E6, and I've seen conversation with @EricV around flour and Dough. I thought if we had a thread to showcase or link to the winning ways, I'll be following and working toward improving my game.

If you know of a great cook, or recipe and technique on the WSK, please share it.

And, if you've tried and had less successful results, its OK to share those too. We all learn that way.

Parla come mangi !

🍕
i'll get back with a few recipe choices later this eve or tomorrow. a bit slammed at work.

on coals placement: i've found that lowest rack, two full CB's and a center runway's worth (KPro, B&B) or any briq was fine. I found adding chunks of oak enhances the flavor as it burns and smokes inside the E6. it will burn as you;re at burning temps, not low and slow temps.

running at full wide open generates too much heat on my steel, for my cooks. i shoot for a steel temp of 650F or so or lower. i am cooking using aluminum pizza screens. i will be experimenting next cooking on the steel deck from start to finish.

first time i used the steel, it was on my gasser, and the steel was clearly TOO DANG HOT. i scorched a pie in 90 seconds. as in carbonized the pizza bottom. so super high heat isn't needed, nor desired. a dome temp of 450-550F should be enough to produce a good crust, depending which style you're cooking, Neapolitan or NY.

The two are close but not the same.

i place my steel dead center of my grates and on my grates. Coal is in lowest position. I wear silicone hot gloves if i need to add more oak to the coals. i'd recco NOT using a full oak split (14-18"). i DO recco using oak chunks, softball sized to better manage the smoke output and heat output.

dough composition and dough hydration play key roles in making E6 pizza. i can offer up what i've learned, both good and bad. and i've experimented with a few different hydrations over time.

looking forward to going deep into a E6 pizza thread. hopefully we can build an excellent resource guide. and with many other cooks experimenting, we can achieve more and better results in less time.

here's a good knowledge point to start with. there's a lot of science in Adam's cooks. some of this directly translates to the E6 as a cooker and applicable methodology.

 
The Kamado Joe "DoeJoe" is an interesting device, I am not sure if it works on the Summit:

very interesting but ridiculously expensive.

i'm thinking of buying this and taking my angle grinder to it to make an opening in the "front" so i can slide pizza's onto the steel and the dome will keep the heat in and be an excellent reflector to hold smoke and heat for a more even top of pie cook.

the issue i am experiencing on the E6 is when I open the lid, i lose that heat which is needed to brown the top of the pizza and pizza shell edges.

i'm thinking this would be a good fix and for the price, i'm willing to experiment and have some fun.

https://www.amazon.com/dp/B001VZAL4S/?tag=tvwb-20
 
Last edited:
very interesting but ridiculously expensive.

i'm thinking of buying this and taking my angle grinder to it to make an opening in the "front" so i can slide pizza's onto the steel and the dome will keep the heat in and be an excellent reflector to hold smoke and heat for a more even top of pie cook.

the issue i am experiencing on the E6 is when I open the lid, i lose that heat which is needed to brown the top of the pizza and pizza shell edges.

i'm thinking this would be a good fix and for the price, i'm willing to experiment and have some fun.

https://www.amazon.com/dp/B001VZAL4S/?tag=tvwb-20
My point being the "DoeJoe" is substantially less expensive than the KP rig I purchased 5-6 years ago, $450. The KP via a kettle can be a PITA to keep temps upwards of +650-700 & it requires doming the pie with the peel constantly turning to ensure proper heat for browning the top, not to mention feeding it fuel, however with practice it does work. I don’t have a problem paying what seems to be somewhat higher prices for technology that works, in this case we don’t know about the "DoeJoe" via the Summit. After all we are in some way a unique group of individuals pursuing the upmost in taste profiles. We know ahead of time the material cost in these things doesn’t equate to the selling price, hence we are paying for R & D, engineering, intellectual properties etc.

I have said it before & I continue to stress making pizza via the grill can be fun yet extremely challenging, with the most emphasis on the dough!
 
Here is a link from Weber's website:


The only thing I continue to see on the Weber link you posted, as well as with other posts, is I do NOT understand why on earth you build a high-heat fire, and then cover it up with the diffuser and force all the heat to the sides.

Makes way more sense (and seems safer and easier on the equipment) to simply place the diffuser up on the main grate and/or a platesetter type setup like @DanHoo posted.....

@DanHoo , I fully support your #2 post setup and have used similar many times successfully.
 
I want to be part of the E6 super duper pizza experiment make amazing thread too.....
I have most things I need to experiment and the bbq's go out back on the deck either this weekend or next so I would love to add any help that I can. :cool:
 
Here is the setup I'm going to try.

It will allow me to add more fuel without removing the stones.

The rectangular stone should shield the round cooking stone from too much heat allowing the top to cook before the bottom burns.

I can temp check the upper stone temp with an IR thermometer with the lid closed through the top vent.

Moving the stone up to the top of the dome may? Or should? Help the top cook before the bottom burns.

Time to make some dough for a Saturday or Sunday cook.

20220422_144420.jpg


I put two foil balls on the stones to check clearance to the dome. there's enough room.

20220422_144720.jpg

The fire bricks were $4.07 each at Lowes.
 
Last edited:
Here is the setup I'm going to try.

It will allow me to add more fuel without removing the stones.

The rectangular stone should shield the round cooking stone from too much heat allowing the top to cook before the bottom burns.

I can temp check the upper stone temp with an IR thermometer with the lid closed through the top vent.

Moving the stone up to the top of the dome may? Or should? Help the top cook before the bottom burns.

Time to make some dough for a Saturday or Sunday cook.

View attachment 49545


I put some foil balls on the stones and I have a couple of inches clearance.

View attachment 49546

The fire bricks were $4.07 each at Lowes.
Corning Ware was discovered by accident. We will await your experimental results. It's not like you're going to be far off.
 
Corning Ware was discovered by accident. We will await your experimental results. It's not like you're going to be far off.

Your use of the word "accident" got me thinking, what if the rectangular stone breaks... I think I'll add a 22 inch grate over the fire bricks, under the rectangular stone so the weight is more evenly distributed and if the rectangular stone cracked it would not tumble down. I just happen to have an extra 22 inch grate.

Edit. A 22 inch grate was too large. I used the 17 inch coal grate from a 22 inch kettle.
 
Last edited:
NY style dough recipe. Can be modded in a few different ways, by flours, ratios and hydrations.

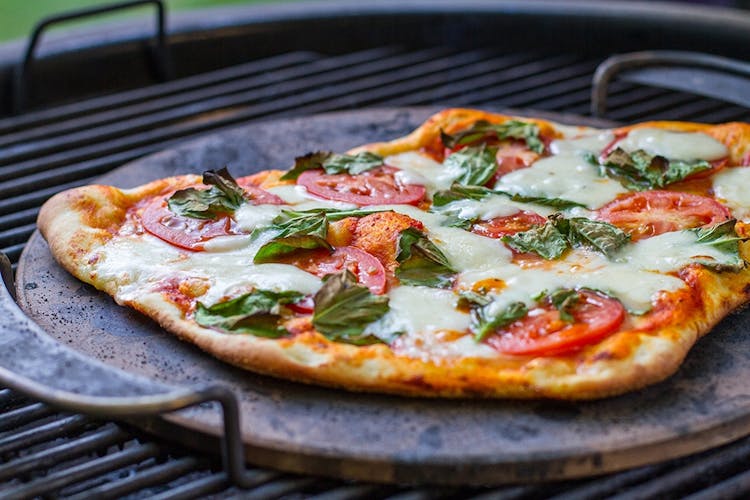
Base recipe of which i've cooked over 30 pies to get to this stage on the E6, using a 3/8" A36 steel plate, 14.25" x 16", seasoned over time with cooking oil. all versions of pizza have been cooked on an aluminum screen with an approximate cook time of 4-5 minutes, and 1 minute to 90 seconds decked onto the steel directly for browning the bottom all with a dome temp around 450-500, steel temps at the corners of 550-650F.

feel free to mod this, take notes, and report back your findings, please.

this is a single pie recipe which yields a 12"-14" shell, depending how far and flat you stretch your dough. this is a cold-ferment recipe which can also be a countertop ferment for same day cooking. cold ferment of 1-3 days yields a tastier dough as the yeast eats the flour and ferments.

62% hydration recipe
152 g 00 flour
43 g semolina flour
121 g cold water, not iced, but cold water
2 g EVOO
3 g Morton kosher salt
1 g ADY - active dry yeast, not instant yeast - my costco usually sells this one: https://www.amazon.com/dp/B003EE0CHA/?tag=tvwb-20

1 dough ball is approximately 323g once mixed

combine all ingredients EXCEPT the flours in a stand mixer bowl (or you can do it by hand but i don't)
use the dough hook to incorporate the yeast into the liquids
in a separate dry work bowl, combine the two flours and mix to incorporate them
combine the mixed flours, 50% of it, into the wet ingredients and use dough hook to make the flour wet
add the remaining 50% of your flour into the mixture and again use the dough hook to gently incorporate into the wet dough
you're incorporating the flours into the wet ingredients so the flour doesn't explode out of the bowl when you mix using the dough hook and stand mixer. just incorporate to make it all moist. the mixer will do the mixing.
insert dough hook into stand mixer and and raise your work bowl if you have a lift bowl mixer type
on slowest mixing setting, level 1, mix all dough for 5 minutes.
at end of 5 minutes, take a small piece of the dough ball and stretch it to see if the gluten has developed. you're looking for a window pane of dough where you stretch a small, 2"x2" dough square, to see if the dough can stretch without breaking. if you get to the window pane, an easy and smooth stretch, your dough is mixed.
if you're not at the window pane, mix again for 2-3 minutes and you should then be at the window pane.
DO NOT OVERMIX your dough. you're looking for an incorporated dough the even and beginning to become stretchy.

if making more than a single recipe, remove your dough ball and weigh it on a scale in grams. then divide the doughball by how many recipes you made.

oil a container that will allow your dough ball to rise, not too small and not too big. i use these as they're perfect size for this recipe, cheap, easy to clean, stack well for storage and have covers: https://www.amazon.com/gp/product/B07X2TD1SD/?tag=tvwb-20

LIGHTLY oil the container and lid. don't over oil it as doing so will jack up your dough when you make pizza pies.

round up each divided dough ball, tucking in the bottom to create a smooth and rounded ball.
place you ball or balls in each container and seal them.

if countertop proofing them, keep the closed containers in a cool area out of direct sunlight. as the room warms up during the day, your dough will rise and proof in each container. proofing should be around 6 hours in a 70-72F kitchen. dough ball will have expanded and reached the lid cover fully when done proofing

or place in fridge and cold-proof your ball(s) for at least 24 hours. best flavor, IMO is 3 days, 48-72 hours.

remove from fridge 2-3 hours before using to room temp and make dough ball malleable.

place flour in a work bowl and invert an opened dough container and let the dough flop into the flour. gently flip dough ball to cover the bottom of dough ball. flip back to top side up of the dough and form your pie.

the rest is on you to learn to make pizza pies.

OPTIONS on this recipe.
go to 100% 00 flour and not use semolina. the semolina in this recipe gives the dough a slight crunch and some bite. this is in lines with NY style texture.

100% flour, you can mix 50% 00 and 50% bread or AP flour. this will yield a doughy-er pie without the semolina bite. try it, you might like it.

this recipe works well at 65% hydration too. that would mean moving your water to 127 ml water. 65% hydration makes for a lighter crust with more air bubbles as the water steams inside the dough (crust) when it's heated.

let me know if you have any questions. i'll post a few done pizza pics so you can see what this recipe makes when i cook it.

1650667905811.jpeg

1650667926176.jpeg

1650667948917.jpeg

1650667985688.jpeg

1650668017213.jpeg

1650668064166.jpeg

1650668118769.jpeg

1650668172054.jpeg
 
Last edited:
I started with frozen pizzas on a stone placed directly on the grates of the Genesis at low to medium settings.
After experimenting and learning how they cooked, I experimented with fresh not frozen pizzas till I got the
hang of things. With practice you will be able to grill pizza with ease.


Back
Top