LinkMeter v9 Release


Lookin good, Ralph!

I kinda wanted to switch to the barrel jack for the blower connection because that's what comes on the auber blowers, and use a standard 3-pin servo connector (JST?) for the servo. That way all off-the-shelf cabling could be used. I can also appreciate what you're saying about having one cable for everything though. We actually need 5 pins (the ground can not be shared as the fan's ground isn't always grounded) but that would still fit inside the same footprint as the RJ-14 4 conductor plug (RJ25 6P6C).

That said, I still like having the off-the-shelf connectors and will almost definitely be using them. If I can fit in a phone jack header to make it an either/or though, I think that would be great.

I like the either/or idea, however, would like to point out that a phone cable is about as off the shelf as it gets, they have 'em at the grocery store! Granted you would have to either cut one end and wire direct to the fan and servo, or you could wire in a phone jack on the fan/servo end and put a connector there that would plug into the servo so as not to require cutting off the servo connector, if that is a deal breaker. I just don't like the idea of bare pins with both +5v and gnd on them hanging outside the heatermeter for the servo, seems like a recipe for failure to me. That's why I cut the female end off my servo anyway and soldered it to the HM board, so at least a female end connector is hanging out which can not short out on anything...

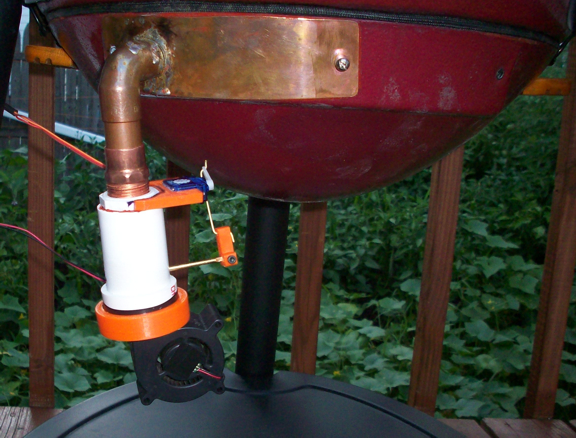
As for the Auber fan and the industry standard connector... it HAD been almost a requirement for HM builders that own Kamado style grills to use an Auber fan because it has the damper to control the draft (or another fan with a damper).... but now with the option to use the cheap ping pong valve with a the standard HM fan or use the servo damper in conjunction with the fan, Kamado owners have two good options that are much cheaper and/or more effective than the fans that are commercially available. I'm thinking more people might opt to go with the cheaper DIY fan system now that it is as good or better than the more expensive bbq fans on the market.

Not to mention that I think we are really onto something with the Servo + Fan combo, and think companies might start moving in that direction with commercial units soon enough. It would be ironic if this setup becomes common and the phone cable becomes the new standard... I've seen quite a few companies that make devices that use cat5 cables for things other than LAN cables (guitar effect foot switched come quickly to mind), and why not go with something cheap and commonly available, I think its a great idea instead of requiring custom cables for everything...
 
Last edited:
I meant off-the-shelf as in "using the connectors that are already on the parts when purchased", but I totally see your point. The biggest thing is the exposed pins with power on them. I guess in standard servo uses, the controller board is exposed so the pinheaders are all fixed in place, which prevents them from being able to flop around and short. I was thinking we'd just have a right angle pinheader on the PCB the servo cable would connect to, the case would just have a rectangular hole the servo plug would slide into. They do make servo extension cables too, which is why this idea seemed to just click in my mind.

The most important thing for me is the most common use case, which is fan-only operation. I think the majority of users will still just be using only the fan and may just purchase the auber blower for simplicity, so I still kinda want to include the barrel jack output.

I really do like the phone jack idea, and like you say the cables are still ubiquitous despite the decline of landlines. Looking at the phone jack footprint, there's a possibility that I can squeeze a normal 3 pin servo pin header into the same space to make that an either/or sort of deal. Maybe even fit one of the blower jack pins into it as well.

So all in all I think the phone jack is a good idea, I'm just not totally convinced to abandon the barrel jack for the blower. This may change when I get to the PCB design and run into the inevitable space issues. The LCD just takes up too much darn space!
 
Bryan, I just wanted to thank you for making the change allow both the servo and fan to work at the same time. I used it tonight for the first time and this setup is outstanding! The best of both worlds, the fan stokes up your fire for you, once the pit starts approaching the target temp the fan turns off and the servo takes over using the natural convection of the fire to gracefully land on the target temp. The ping pong valve works nice, but the servo damper is a much simpler and more natural way to manage a pit that is sealed up tight and insulated. I think the eagle landed on this one, I am extremely happy with how this system works!

I also like that you allow the opposite configuration as welll, use the fan to control the fire and the damper basically as a choke valve (smart ping pong ball! LOL) This mode should come in handy for high heat pizza cooks to keep runaway temps in check.

This setup seems to have all my requirements covered and I think the fan/servo combo makes it the most unique and versatile controller available... Is there any other controller out currently that has this? If not I would bet one will crop up sooner than later...

Here is a pic of my servo valve with the fan installed on my FauxMado grill...
ServoFan.jpg


I know I have asked before about the possibility of changing the rca header for the fan to something that could possibly work for the servo or the fan, now we have both and the wiring is getting a little more out of hand. As far as I can count we need 4 wires for this system, +5V, GND, Servo Control, Fan Control. (servo and fan sharing the same ground) I know you were looking for commonly available wiring when you choose the RCA cable, while using this setup for the first time tonight I thought perhaps a telephone jack would work well for the fan and servo connection? It's small, commonly available, has 4 wires.... My initial thought was Cat5 but 8 wires is overkill and makes the plug too bulky. But a phone jack is nice and small. I know you were thinking of moving to some sort of industry standard plug, but I kinda like the idea of all the wires for my servo and fan coming down one small phone cable...

Ralph,
Do you have more information on the adapter you built that holds the servo/fan combo?

Thanks,
John
 
I think we're all using the cheapest possible 9g micro servos. After stripping my servo gear out, I've ordered the same with metal gears. I've tested with a 30 year old Futuba servo too, but it was too big to mount on my existing setup. Just need to make sure you don't over-draw on current. I think the 5V regulator is good to 1.5A, so you've got maybe 500-700mA spare on an Model B with wifi.
 
I think we're all using the cheapest possible 9g micro servos. After stripping my servo gear out, I've ordered the same with metal gears. I've tested with a 30 year old Futuba servo too, but it was too big to mount on my existing setup. Just need to make sure you don't over-draw on current. I think the 5V regulator is good to 1.5A, so you've got maybe 500-700mA spare on an Model B with wifi.

When the code for the servo was screwed up in the initial V9 release it was sending the servo all the way to one end and kept on going like it was never gonna stop. This happened a few times before I figured out what was going on, surprisingly it didnt strip out any of the gears or melt on me, though it did warm up a bit. I'm still using it on my valve now, so they are not that bad for cheapo servo's. However, I do appreciate the link to the better servo's with metal gears. I will probably order one because I REALLY like this setup with the servo and the fan both enabled, I'm pretty sure I will be using it on all my cooks when I use the HM.....
 
I meant off-the-shelf as in "using the connectors that are already on the parts when purchased", but I totally see your point. The biggest thing is the exposed pins with power on them. I guess in standard servo uses, the controller board is exposed so the pinheaders are all fixed in place, which prevents them from being able to flop around and short. I was thinking we'd just have a right angle pinheader on the PCB the servo cable would connect to, the case would just have a rectangular hole the servo plug would slide into. They do make servo extension cables too, which is why this idea seemed to just click in my mind.

The most important thing for me is the most common use case, which is fan-only operation. I think the majority of users will still just be using only the fan and may just purchase the auber blower for simplicity, so I still kinda want to include the barrel jack output.

I really do like the phone jack idea, and like you say the cables are still ubiquitous despite the decline of landlines. Looking at the phone jack footprint, there's a possibility that I can squeeze a normal 3 pin servo pin header into the same space to make that an either/or sort of deal. Maybe even fit one of the blower jack pins into it as well.

So all in all I think the phone jack is a good idea, I'm just not totally convinced to abandon the barrel jack for the blower. This may change when I get to the PCB design and run into the inevitable space issues. The LCD just takes up too much darn space!

Yah, I've been pushing for the phone jack because I am pretty sure it will fit into the same space as the RCA jack, and will work for both blower and servo, and/or one or the other. And becuase you had already told me there was no room on the board to mount a servo header in the past. So I figured the phone jack sitting in place of the RCA jack might give us room to have the servo header on the board. If you did put a 3-pin right angle header on the board for the servo that would be much better, though you could still plug the wire in backwards, would be pretty hard to tell how to plug it in, guess you would have to know from memory? ...and you would still need two cables to run the servo and the fan....

My thinking is it would be better to encourage people to use the technology and parts we are coming up with over here with the HM rather than making it easier for them to use 3rd party products by putting a header on the board that matches the Auber fan? Why bend to some other companies convention, why not set your own standards based on what is most commonly available and works best for the HM in every mode? In other words, why cater to the people that buy some other product instead of catering to people that are building and using the products that are chosen for your project? It's not like soldering is a problem, everyone who owns a HM has done plenty of soldering before it's ready to use, so changing the plug on an Auber fan should be no biggie to them. Unless the company starts giving you a kick back or something I would say go your own way, use the connectors that work best for the parts you are working with....
 
The same thing occurred to me about having to know the servo plug orientation as well because there'd be no marking externally.

The reasoning behind the barrel jack is that some people just want to get up and running. Fashioning your own fan mounting system is great but if you don't have the tools to cut metal or want to spend an hour wandering around Home Depot looking for just the right part, just buying something you know is already done is pretty attractive. This coming from a guy who used a cardboard cereal box fan mount for two years after failing to make a working adapter out of metal several times. If the Amazon sales report is any indication (14 Pis and 20 wifi adapters), there's a lot more people building HeaterMeters than post on this forum and I think they're probably completely fine with just the blower. There may be space for all 3 connectors so why not?

The board is going to be bigger next iteration because I'm moving all the bottom connectors to the sides, the power will come in on the left and the output will be on the right. This is so the device can sit on that bottom edge, which is an attractive option when space is at a premium. I'm hoping that I can also arrange things so they mate with the rPi with fewer tight fits too. Might be able to shrink the overall size a bit too? Who knows!
 
Wow, seems like a major sea change, it seems just a few weeks ago you said there would be no room for a servo header on the board....

I have also thought it would be better to move the connectors off the bottom edge (so it can sit on the bottom), I had planned on making a little stand for it to sit in (like smaller routers and cable modems come with) that would allow room for the power and fan cables. I never got around to it because after using the HM a while I realized I like it sitting flat on my grill side shelf. Besides, it would probably tip over and fall pretty easily when sitting on the bottom end with all the wires connected, and would be harder to read from that angle as well.

I do like the idea of moving to a bigger board and removing the jacks from the bottom edge though. One way or another you need to get a header on the board for the servo... May I suggest if you have the option, change the color of the board from the purple to a standard light green circuit board. It is MUCH easier to inspect the solder work on a lighter colored board, I had a hell of a time seeing some of the solder joints clearly with the naked eye on the purple HM board.

On the fan adapter, I guess I don't understand the perspective of the mechanically challenged individual very well, cause I have never had a problem fabricating stuff by hand myself. To make my fan adapters I use a few very common tools and materials. I start with thin copper plate that I purchase at Ace hardware (in the section where they have small brass/copper rods, sheets etc). I use some quality tin snips to cut the plate to size. I use a stepper drill bit to make the hole (they look like pyramids, available online or in most hardware stores, I know Menards has them cause I've seen them there recently). I like stepper bits cause you can make a wide range of hole sizes with one bit. I use 3/4" copper water pipe and elbows, and just step down with the stepper bit until the hole matches the pipe. Then I sandwich the plate between two connectors so there is a little lip there to mate with the copper plate. You will probably need a bastard file to smooth over the edges of the holes after they are drilled. Once the pipe and fittings are all fashioned to mate with the plate properly I solder the whole thing together using a torch and standard water pipe flux and solder. If you dont need a damper on the fan for your pit you can actually hammer a 3/4" copper pipe square and it will fit into the opening on the HM fan snug enough to hold it in place. A bench vise comes in handy for this. If you need a valve you can buy the PVC parts to make a Ping/Pong valve and then buy the 3/4" threaded to copper adapter to connect to the 3/4" copper pipe on the grill plate. I built my servo valve out of the same parts used to make the Ping Pong valve, all from Home Depot plumbing isle. These parts are extremely cheap (less than a buck each) and easy to manipulate with common tools.

Here is a picture of a removable fan adapter I made with the tools and parts as detailed above, the square end will fit into the fan specified on the HM build materials list snug enough to hold it in place:
FanAdapter.jpg

The plate in the above adapter does not have connectors pressed tight against it, the copper pipe is simply soldered to the plate. This worked but it was a little tough to get the solder to seal the whole circumference at the same time (though I got it done). I later realized if I just sandwich the plate between two connectors it is much easier to solder them together and get a good seal due to the extra lip from the connectors. The plate shown on my FauxMado grill above is constructed with the sandwich concept and it soldered together very easily...
 
Last edited:
I understand what you are saying Ralph. I have a pretty extensive workshop in my garage and built nearly every piece of furniture in my house. However, sometimes you have to weigh what is worth your time and what isn't. An hour of my time is pretty expensive. If I can buy something comparable to what I would make myself so that I can devote time to something I can't buy, I will.
 
I understand what you are saying Ralph. I have a pretty extensive workshop in my garage and built nearly every piece of furniture in my house. However, sometimes you have to weigh what is worth your time and what isn't. An hour of my time is pretty expensive. If I can buy something comparable to what I would make myself so that I can devote time to something I can't buy, I will.

I get your point of view as well.... but... I wonder how much time you have into building the HM itself when there are off the shelf solutions you can just buy? I figure this is a DIY community, if you wanted to buy a BBQ controller off the shelf you can, so people building their own might be more into building their own fan adapters too. DIY'ers can't be TOO worried about spending the time, otherwise they wouldn't be doing it themselves... The very nature of DIY projects is time consuming at its core, you must spend the time to DIY....

Keep in mind, up until a week ago I found no real way to control the draft on the fan with the HM system so it will work on a Kamado style grill (other than buying a commercially available fan with built in damper). In the last two weeks TWO really good options have emerged, so there IS a solution(s) available for a DIY blower system on a Kamado grill now....
 
Last edited:
There is nothing off the shelf comparable to the heatermeter, in my opinion. The cyberq is probably the closest and falls well short. I was reluctantly about to buy one before stumbling on this site almost one year ago.

Also, just because you like DIY doesn't mean you have to waste your time. I almost have my cnc mill up and running and I can assure you I won't be using it to make aluminum brackets and other such things that I can readily buy. That would be silly.

Well, I guess to each his own. I don't feel I have wasted my time making my own fan adapter at all... I guess it's best if we just leave it up to each individual to decide what route to take. Since this is a DIY open source project I figure I will share my ideas and if you dig 'em then great, if not then no harm no foul, right?
 
Don't get me wrong, I like your valve. I was just defending Bryan's point of maintaining compatability with existing products. Not everybody wants to build every single aspect of the system while others may want to.
 
The same thing occurred to me about having to know the servo plug orientation as well because there'd be no marking externally.

The reasoning behind the barrel jack is that some people just want to get up and running. Fashioning your own fan mounting system is great but if you don't have the tools to cut metal or want to spend an hour wandering around Home Depot looking for just the right part, just buying something you know is already done is pretty attractive. This coming from a guy who used a cardboard cereal box fan mount for two years after failing to make a working adapter out of metal several times. If the Amazon sales report is any indication (14 Pis and 20 wifi adapters), there's a lot more people building HeaterMeters than post on this forum and I think they're probably completely fine with just the blower. There may be space for all 3 connectors so why not?

The board is going to be bigger next iteration because I'm moving all the bottom connectors to the sides, the power will come in on the left and the output will be on the right. This is so the device can sit on that bottom edge, which is an attractive option when space is at a premium. I'm hoping that I can also arrange things so they mate with the rPi with fewer tight fits too. Might be able to shrink the overall size a bit too? Who knows!

Hi Bryan, first thanks for all your work, one of the recent Pis from Amazon should have been me. Have not posted on the number of HeaterMeters link yet because still waiting for Mouser backorder parts. Never soldered a pc board before so picked up a $10 fm radio kit from Radio Shack to practice on first, Getting better as I go :). I am one that will probably start off with just the fan and Ralphs ping pong ball valve for now. The servo thing would be phase 2. Nice that it is there for the future though.
 
Bryan,
I have a suggestion, don't know how hard it would be...

I'm doing my first cook with the HM4, an overnight pork butt.

Is there a way to be able to add notes by clicking on the graph and have it logged?
I was thinking it would be nice to log when the meat went in, maybe when you mop, foil, etc.

Thanks for creating and standing by such a wonderful device!!!
KUDOS

John

I kinda thought the same thing at first, but after using the HM a while I was able to tell when I did basting by the LID OPEN marks on the graph, and the food probes always dip down when you put them in the meat which marks the starting point for you. If you put in a target temp for the meat probe the HM will eventually start to estimate the amount of time til it hits the target temp, though I haven't found that estimate to be very accurate in my cooks thus far, though I havent cooked many large chunks of meat where you can place the probe ideally for measurement.


Back
Top