LinkMeter v2 Homebrew BBQ Controller - Part 1


Status
Not open for further replies.
I used my LinkMeter last Saturday and the cook went really well. I didn't have all of the holes cut in the router case so I just hooked everything up in kind of a big ball of wires. Sunday I went to cut holes in the case and fit everything in and I noticed something strange (to me anyway). If the router power cable (12V end) is plugged into the router and then the brick is plugged into the wall the LCD instantly comes on and the blower will start working right away. If you plug the brick into the wall and then plug the 12V end into the router the LCD, blower etc don't come on until the LinkMeter has fully started up (approximately 2 minutes). Is this normal? Everything appears to work fine either way it is connected. If I disconnect the serial cable between the HeaterMeter and LinkMeter while it is starting up the LCD/blower instantly come on. Does anybody have any thoughts on why this is? Thanks
 
Hi,

I'm now starting to plan my 'build' and wondered whether anyone had a high-level summary of the recommended order in which to do things?

I'm thinking something like (I know the steps below will be in the wrong order!):
1. Label all components
2. Flash Router and get working (without HM)
3. Build 'core' of the HM without integrating into router (this needs a list of the core comonents)
4. Power-up HM... Get LCD up and running
5. Integrate into Router
6. Flash Atmega
7...
8...
9. Run test (with probes and fan attached)
10. Drill holes in case
etc

I'm happy to take any input and (if it's helpful) create a summary which can be put on the Wiki.

Thanks
 
Originally posted by Andrew Meimann:
If the router power cable (12V end) is plugged into the router and then the brick is plugged into the wall the LCD instantly comes on and the blower will start working right away. If you plug the brick into the wall and then plug the 12V end into the router the LCD, blower etc don't come on until the LinkMeter has fully started up (approximately 2 minutes). Is this normal?
It isn't supposed to work like that but I have seen that scenario. For some reason it stays in the bootloader until some serial data is received or something along those lines. The solution I had found was to update my Optiboot to the 4.4 version because there was a bug where it wasn't initializing a register properly and I haven't seen the problem since then. The bootloader version can be checked with the fusebytes sketch.
 
I've seen something similar on my build. Sometimes I plug in the barrel connector and it springs to life. Other times I have to replug a few times to get the HM to fire up. The barrel connector power line isn't flaky as far as I can tell either.

Not a dealbreaker for me, but might be irritating to some.
 
Originally posted by N Waring:
I'm now starting to plan my 'build' and wondered whether anyone had a high-level summary of the recommended order in which to do things?
Because there's two parts to the device (HeaterMeter and the Router) it really depends on what order you've got the parts needed.

Router Prep:
1. Install openwrt firmware snapshot
2. Configure network/wireless

HeaterMeter:
1. Assemble base board/components
2. Assemble LCD wiring harness
3. Flash bootloader
4. (If you have an FTDI cable) Install HeaterMeter software via Arduino. Verify LED blinks twice / LCD operation.

Merge:
-- Connect HeaterMeter to Router
-- (If you don't have an FTDI cable) Install HeaterMeter software via hmdude / reset button. Verify LED blinks twice / LCD operation.
-- Test communication by changing the setpoint from the web interface.
-- Assemble probe jack, blower jack, button jack wiring harnesses.
-- Configure probe types and verify temperature reading / blower operation.
-- Mount jacks / LCD in router

Obviously you can mix the steps based on what parts and tools you have.
 
Thanks guys. I was more curious than anything why it works that way. I have two WRT54GV2 with LinkMeter installed. On one LinkMeter it works this way 100% of the time. On the other sometimes when you plug in the barrel connector the LCD fills with random symbols, sometimes it will put the number "1" in front of no pit probe, and the rest of the time it doesn't fire up until LinkMeter is up and running. I will check the bootloader version. Not a big deal, just more curious than anything.
 
What is the limit on the amount of current a blower can pull? I'm going to need a fan that moves a little more air to keep up with my offset smoker. Does anyone have any suggestions for any blowers that are working for them?

Thanks
Justin
 
Originally posted by Justin:
What is the limit on the amount of current a blower can pull? I'm going to need a fan that moves a little more air to keep up with my offset smoker. Does anyone have any suggestions for any blowers that are working for them?

Thanks
Justin

I am using this fan:

http://search.digikey.com/us/e.../603-1571-ND/2560694

After I finished the build, I measured current draw at 100% fan and the total system draw was around 350 mA.

I also have an offset smoker, and this fan does a much better job of controlling the charcoal than the fan shown in the parts list which works much better for smaller fire boxes.
 
Thanks for the info. I have one on the way. Would it be possible to get a picture of your mounting system?

Thanks
Justin

Originally posted by Brian J Wilson:
<BLOCKQUOTE class="ip-ubbcode-quote"><div class="ip-ubbcode-quote-title">quote:</div><div class="ip-ubbcode-quote-content">Originally posted by Justin:
What is the limit on the amount of current a blower can pull? I'm going to need a fan that moves a little more air to keep up with my offset smoker. Does anyone have any suggestions for any blowers that are working for them?

Thanks
Justin

I am using this fan:

http://search.digikey.com/us/e.../603-1571-ND/2560694

After I finished the build, I measured current draw at 100% fan and the total system draw was around 350 mA.

I also have an offset smoker, and this fan does a much better job of controlling the charcoal than the fan shown in the parts list which works much better for smaller fire boxes. </div></BLOCKQUOTE>
 
I thumbed through the entire thread and the wiki, great work on all of this.

I have an old WRT54G ver6, but it's only 8mb/2mb. If you guys were to build a linkmeter, what's the preferred route, WiShield, order a new WRT54GL for $50, or something else?

Besides the hardware, what else do I need make this? I pretty much only have a soldering iron. I'm also unsure which route to go for bootloaders (and do I need anything separate to flash?). I'm interested in starting some more Arduino based projects later this year, so an investment is no problem.

Thanks, I'm an MSME that's wanting to expand into more mechatronic projects. All of my micro-controller experience was in labs, so I didn't have to think about the equipment I needed.
 
Originally posted by Justin:
Thanks for the info. I have one on the way. Would it be possible to get a picture of your mounting system?

Thanks
Justin

Here is a picture of the mount. It is a large sort of round plate to cover the vent holes and another piece of sheet metal to provide the mount for the fan. I attach the fan to the mount using some machine screws. It is kind of a pain to have to screw in the fan each time I want to use it, but it is really secure.

FanMount.jpg
 
Well that's a coincidence. I have the same smoker. Or at least the same firebox. Do you not have a problem with the fan melting being that close to the firebox? On mine that door gets so hot that it has taken my finger prints off several times when I got careless.

Thanks
Justin
 
Originally posted by Justin:
Well that's a coincidence. I have the same smoker. Or at least the same firebox. Do you not have a problem with the fan melting being that close to the firebox? On mine that door gets so hot that it has taken my finger prints off several times when I got careless.

Thanks
Justin

I am using a Brinkmann Smoke n Pit or whatever they call it now.

The fan doesn't very hot. I have replaced the guts of the firebox so that the grate level is elevated about 5 inches from the bottom. I have an expanded steel box that is around 12 inches by 12 inches to hold the charcoal. The charcoal is about 4 inches from the door when it is inside the box.

When I used the smoker before having the controller set up, the door was too hot to touch and adjust the vents with bare hands. Since "sealing" off the vent door and having the fan control the air inlet, the door still gets warm, but not enough to burn me or damage the fan.

One thing I would suggest is that you remember to put the fan in "lid open" mode before opening the door to clear out the ash. I made the embarrassing mistake of scooping the ash out while the fan was running. It gave my patio a nice ash layer.
 
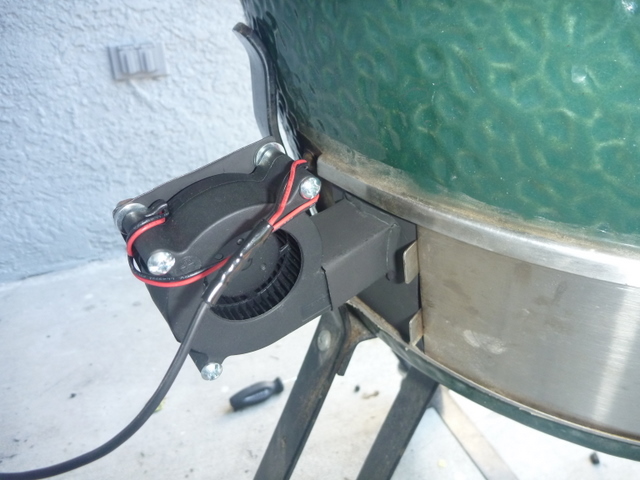
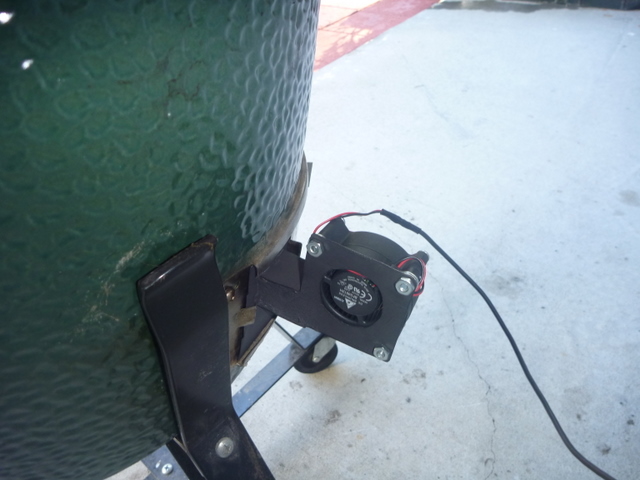
I'm also interested in the different methods used to attach the fan. I have a large big green egg.

I recall reading that someone had bought a commercial blower attachment but looking into this it becomes quite expensive as I have to pay for shipping from the US.

I have a sketch of what I want thiink I need - essentially an new vent door with a hole and a rectangular section attached to 'slide' the fan (difficult to describe but I can upload the sketch if required).

Does anyone else have any other 'home made' attachment methods for a BGE?

Thanks

Nick
 
Originally posted by N Waring:
Does anyone else have any other 'home made' attachment methods for a BGE?
I'm *still* using my cardboard mockup which I cut 2 years ago from a piece of cereal box and a template like this. That piece is taped to a square piece of cardboard that slips into the door track. You can sort of see it in this photo.

The 4-sided fan enclosure works fine for cardboard but is overkill if you're doing it in metal. Here's one I did for my Dad's version which just is flat with a second piece shaped like a U that forms the tunnel.
fanmetal-1.jpg

fanmetal-2.jpg


I suck at braising though so that fell apart and he made a new one out of a metal threaded conduit adapter or something that he hammered to make it squarish then filled with epoxy. The threaded end then screwed into the plate. Sorry, no picture of that.
 
Originally posted by Andrew Meimann:
Thanks guys. I was more curious than anything why it works that way. I have two WRT54GV2 with LinkMeter installed. On one LinkMeter it works this way 100% of the time. On the other sometimes when you plug in the barrel connector the LCD fills with random symbols, sometimes it will put the number "1" in front of no pit probe, and the rest of the time it doesn't fire up until LinkMeter is up and running. I will check the bootloader version. Not a big deal, just more curious than anything.
[Referring to the delayed startup]Yeah I'm not sure what causes it or even what it is doing during that time because it pauses before the first line of my code executes (the first LED blink).

The LCD has always been somewhat hit or miss though. I've had 0 display problems with my V3.2 board but the V3.1 design seems to depend on the weather for some folks.
 
Originally posted by J Davis:
I have an old WRT54G ver6, but it's only 8mb/2mb. If you guys were to build a linkmeter, what's the preferred route, WiShield, order a new WRT54GL for $50, or something else?

Besides the hardware, what else do I need make this? I pretty much only have a soldering iron. I'm also unsure which route to go for bootloaders (and do I need anything separate to flash?). I'm interested in starting some more Arduino based projects later this year, so an investment is no problem.
The WiShield is pretty much a dead idea I think. It was pretty slow and really limited in capability and then they stopped making them so that's pretty much the final nail in the coffin.

I'd recommend just keeping an eye out on craigslist or eBay for a used WRT54GL (I got mine for $20 shipped I think) and when you get one you're good to go.

As far as tools go, I think most people here just had a soldering iron when they started the project. That's all I had. If you think you'd like to play with more AVR development, you're definitely going to want to have some sort of SPI-based programmer for flashing a bootloader like the USBtinyISP. You'd use that for programming the bootloader for the HeaterMeter too. Also helpful is an FTDI cable which is just a USB->TTL serial converter. That's used for flashing programs you've written once it has a bootloader on it. In a LinkMeter configuration the router is used as the serial connector, but that's pretty inconvenient if you're going to play with other microcontrollers.
 
I built one using conduit, the advantage is that
you can drill a round hole rather then
dealing with square holes and sheet metal
bending (an art which clearly others in this forum
are way better then I am at it!).

Here's a link to a post in another twbb forum:
http://tvwbb.com/eve/forums/a/...301049616#4301049616

I use high temp gasket/silicon to bond the fan to the pvc conduit and the pvc to metal conduit.

Its been working well for about a year. My goal is to use this same fan setup for a linkmeter instead of the
pid temp controller...maybe this summer!

Neil


Originally posted by Justin:
Thanks for the info. I have one on the way. Would it be possible to get a picture of your mounting system?

Thanks
Justin
 
mmm... thanks for the replies.

Interesting reminder of different materials (cardboard, sealant, tape!) and wsith the wealth of information in the forum and github I'd forgotten about Bryan's 'cut-out' fan attachment.

Admittedly I had thought that the heat would be an issue but it's making me wonder. I guess that the low temperature cooks for which this is aimed at may not cause a problem.

Looks like I'll run a test with the cut-out version in cardboard before thinking about fabricating out of something else.

Nick
 
I was just wondering if anyone has had problems with their ET-732 probes dropping out every few seconds? I'm almost positive its the probes as I verified that this doesn't happen with some non ET-732 probes. Every dip in the graph is where the pit probe dropped. I've only ever smoked with these probes once and they've never been exposed to water. I'm thinking maverick may owe me some new probes. The food probe does the same thing but much less frequently.
graph.jpg


Thanks
Justin
 
Status
Not open for further replies.


Back
Top