INTRODUCING: the "Roto Damper"


The cat5 distance limitations only apply because of the fast signaling rate being transmitted across the wires.
Quoting this because it is cool and I finally actually get to use a fact from my college education (which never happens). It isn't a CAT5 limitation it is a 100Mbit ethernet limitation. Before any ethernet frame is transmitted the physical layer transmits 56 ones and zeros, on off on off on off on off. At 100 mbit at the speed of light, a client on the far side of a 100m connection is guaranteed to see the first on off transition before the transmitter finishes the 56 bit preamble. This prevents anyone else from transmitting at the same time. CDMA - Carrier Detect Multiple Access

Anyway, the distance of the CAT5 cable isn't a big deal when added in series to the thermistor because even at 500F the resistance is still in the kiloohm range and 100ft of cat5 wire is like 2 ohms.
 
Good to know, I wasn't sure how low the resistance of the probes went, sounds like a couple ohms shouldn't be an issue.
I'm doing a test print of the housing with the probe jacks now, if all goes well I will be scrounging around for filament to print a new top half, it might have to be multi-color.... I'm really looking forward to testing the HM with everything running over 1 CAT5 cable... one small step for BBQ kind... lol
 
Ralph,

I was thinking round for the grill adapter.... any color would work (the blue seems cool though) i am now interested in the "remote probe" option also....
 
It would be nice to have a small PCB with 3 probe jacks on one side, and a cat5 jack on the other side, and a couple of through hole spots for soldering the blower/fan wires to. And then find a spot in the plastic housing to locate this.
 
I've worked out the design to hold the CAT5 jack and 3 probe jacks, the test print of housing went well last night, everything fits just right. I am printing a top end of the valve now that will have all these features integrated.

T Hayes, I see no real need for a circuit board, the CAT5 jack I am using is a punch down style made to work with wires so a circuit board would be inconvenient. Perhaps if I was using a board mount CAT5 jack a circuit board would be more appropriate, but then I would have to worry about fitting the board into the small space and having it in position where the CAT5 jack can mount and the probe jacks can mount while all of them meet their respective holes in the enclosure, which would be difficult cause the CAT5 jack has to snap into the side and the probe jacks have to screw into the back. It's just easier to do with wires IMHO and I can't see any drawbacks from using wires instead of a circuit board.
 
Last edited:
OK, it took every scrap of filament I had laying around but I got a print of what I hope to be the final prototype of the "Roto-Damper" printed up and assembled last night. It's a funny multi-color unit but I think it looks kinda cool that way, at least I won't have trouble remembering which one is the prototype! Since I printed the parts onto Kapton tape the mating surface(s) are much more flat and smooth than the first valve, and I didn't need to print the parts with the rectangular base pad to keep them flat. This valve closes even tighter than the first valve, there is very little leakage even when quite a lot of air pressure is applied.

I have the three probe jacks integrated and working through the CAT5 cable now, it's really tight in the wiring cavity but everything fits, barely... I have tweaked the opening for the CAT5 jack a little bit to make the fit just right and reinforce that corner a bit as well. Finally, I added a mount for the blower that I think worked out really nice. I had thought of using a screw to hold the blower in place, but to do that I would need to either extend an arm out beyond the radius of the cirlce or all the way up to the screw hole on the top of the fan, which would just about double the size of the print. I ended up settling on a press-n-fit design that holds the fan really well, beauty is you just press the fan in there and you are good to go! I've put the fan in and out of the prototype a dozen times and it still holds firm like the first time, and I have plugged/unplugged the CAT5 jack dozens of times to test for durability, everything remains solid after putting it through those paces...

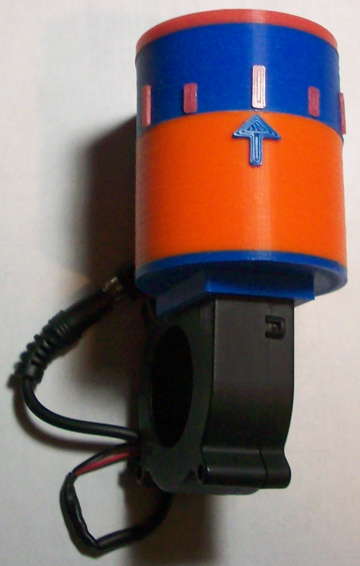
Here's a pic of the latest prototype valve:
RotoDamperFront.jpg

Just to give you an idea of the scale, the valve measures 3 inches from top to bottom, not including the blower.

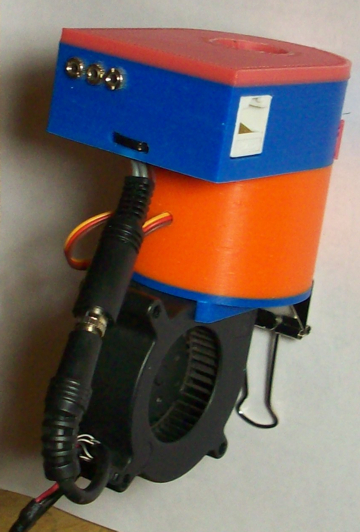
Here's a pic of the back of the valve showing the CAT5 and 3 probe jacks:
RotoDamperBack.jpg


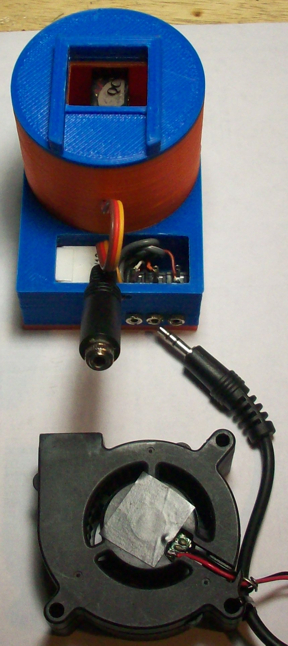
Here's a pic of the bottom without the fan installed, and you can see the inside of the wiring cavity:
RotoDamperBottom.jpg


I've got a wide roll of Kapton tape on order (along with more filament) so early next week I will print it out again in a solid color and will be updating the initial post in this thread at that time to reflect these developments, hopefully including a better video to showcase the "Roto-Damper" in action...

...looking back over this post I get to thinking I should have ordered some red and white filament along with the blue, cause I can see a "US Patriot" model of Red, White & Blue looking really slick. Although I made this one muti-color only because I didn't have enough of one filament to print a complete part, as it turns out a multi-color unit looks pretty slick....
 
Last edited:
My Orange and "glow in the dark" Blue filament was delivered today, still waiting on the roll of wide Kapton tape for the printing bed. Once I get he Kapton tape I can start printing up the parts. So far with the last prototype I haven't run into any issues so I think the design is good to go....
 
Here is a tricky question:

Given my experience with my WSM 22.5", I seriously doubt that only one damper / vent being manipulated would be able to sustain enough oxygen for a consistent 225. I reason that is why Weber puts three vent holes around the charcoal bowl.

Would it be possible in the current heatermeter board configuration, power and control wise, to daisy chain three of these dampers together and have only one of them loaded with a fan?

Sounds like a little overkill, but I am curious nonetheless.
 
If that is a problem, couldn't you just crack one or both of the other vents a little to supplement the air?

Here is a tricky question:

Given my experience with my WSM 22.5", I seriously doubt that only one damper / vent being manipulated would be able to sustain enough oxygen for a consistent 225. I reason that is why Weber puts three vent holes around the charcoal bowl.

Would it be possible in the current heatermeter board configuration, power and control wise, to daisy chain three of these dampers together and have only one of them loaded with a fan?

Sounds like a little overkill, but I am curious nonetheless.
 
I've considered this too and in theory it is possible that you can just use a phone jack splitter to daisy chain them together. The power is the real problem though because servos can pull a lot of current and if the voltage dips too low it will brown out the Raspberry Pi or wifi or HeaterMeter. You could add a second 5V power supply for just the servos if that were an issue.

If you've got the blower, you don't need more than one servo though.
 
Do you really need to more adjustment than one vent can provide? If having one open isn't enough, then open a second and still just control the first. If not then open the third, while still controlling just the first. I've never heard anyone with a WSM 22.5" have any issues with only using controlled vent.

For example if each vent lets you control the temp by 100F, and you want 225F, then you would open two vents 100%, and control the second vent. That would let you control the temp from 200F to 300F in this hypothetical situation. If you want to have better control open one 100% and the second 75% giving you control from 175F to 275F.

That is how all the UDS folks do it.

dave

Here is a tricky question:

Given my experience with my WSM 22.5", I seriously doubt that only one damper / vent being manipulated would be able to sustain enough oxygen for a consistent 225. I reason that is why Weber puts three vent holes around the charcoal bowl.

Would it be possible in the current heatermeter board configuration, power and control wise, to daisy chain three of these dampers together and have only one of them loaded with a fan?

Sounds like a little overkill, but I am curious nonetheless.
 
I would have to agree with Bryan, if you've got a servo damper WITH a blower then you shouldn't need to operate more than one vent. I guess if you wanted to simulate the manual operation of the WSM with natural convection then a servo damper on all 3 vents with no fan would be the way to go. I would also concur with Darren, if you need more air flow than the one vent can provide then just crack the other two vents a bit and allow the HM to supply the rest, just make sure the other vents are closed enough that the temperature drops when the servo closes on the 3rd vent.... but that's just an opinion from the non-scientific vocal minority... lol
 
A quick note to those I have shared the files with....

When you install the servo in the bottom half, first insert it from the valve side (not inside the unit) to test the fit... Depending on how your printer is setup the opening may be tight on the servo, if it is too tight it will make the servo struggle and bind and the valve will be tight and sluggish. If you have to force it in then just clean out the mount hole a little bit until the servo doesn't require much force to insert it. Snug is good (it makes it easier to assemble with the other half) but tight is NOT good... The bottom half of the valve should rotate very easily when assembled and tightened down, you should feel and hear the servo rotate like when you rotate a new servo manually by the lever when you rotate the valve.

I've left the prototype roto-damper outside in 40-50 degree weather for a couple days now, with probes dropping off in the cold (running through a long CAT5 cable through my basement into my kitchen where it connects to my HM). When the HM picks up the probes it snaps the roto-damper to life, when they drop off it closes... I did this to test the valve, the constant opening and closing for several days in the cold has been one hell of a test. So far so good, the servo is fine and the valve is just like when I printed it....
 
Here is a tricky question:

Given my experience with my WSM 22.5", I seriously doubt that only one damper / vent being manipulated would be able to sustain enough oxygen for a consistent 225. I reason that is why Weber puts three vent holes around the charcoal bowl.

Would it be possible in the current heatermeter board configuration, power and control wise, to daisy chain three of these dampers together and have only one of them loaded with a fan?

Sounds like a little overkill, but I am curious nonetheless.

I actually did this. By daisy chaining 2 Y-harnesses (available at hobby store) I drove 3 servos no problem. I made variable opening dampers, I will try to find the pictures which are around here somewhere. My first attempt was actually with just 1 and as you
guessed was not enough air. I then made two more and had one on each vent of my WSM 22. It did work OK but response/control was not as good as with my fan unit. Also as others have found out the heatup time went from maybe 10 minutes with fan to 45 minutes with damper only. I then as you mention thought of putting a fan in one for heatup then damper only after that but in the end I decided my little experiment, while fun and kept me busy for a while, was no longer worth the effort. Why fool with three
devices on the smoker when one with a fan and a full open/close damper worked perfect. But, to answer your question, the Heater meter had no problem operating 3 servos with a 5 amp power supply. Dan
 
Yah, the truth is the HM is so versatile and can be setup so many different ways that it is easy to over think the situation and complicate things. I had to laugh when the flap on my first servo valve broke and I had to cook with the old ping-pong valve... Just the blower and the ping pong valve (or any effective gravity/flap valve) does a great job running the pit, the cook graphs look great...

I do prefer the natural draft method to control the pit but waiting 45 minutes to warm up is not acceptable (for someone that has a HM). That's why I advocated heavily to get the blower and servo working together and it really is the best of both worlds, the blower stokes the pit FAST and the servo damper can handle it from there. Once you have them both you have countless ways to setup your system with a multitude of software and hardware options. I lean on the damper for long slow cooks, and switch it to an on/off valve and use the blower for high heat cooks, if you need the pit to change temps the blower is there to make it happen NOW!
 
Last edited:
I really was just curious. It seems as though:

1. It IS possible with the current configuration (with some caveats)
2. I still need to get to know this smoker a bit.

I have spent the past decade smoking with my Weber kettle. I can keep that sucker pegged at 225 for 14 hours at a time using only a lot of manual dampening and a Maverick ET-73(2). I built my HM before buying my WSM and never cooked on it without having the insane amounts of control / feedback that this project delivers. So, I have never gotten as intimate with the beast as I am with my kettle. In fact, I have probably spent just as much time watching graphs, tweaking PID settings / building air burners / employing new coal strategies as I did opening and closing the dampers on the OTG.

One other thing is that I cook with lump charcoal. The burn profiles of lump changes with every cook and the amount of oxygen that a WSM can suck in a short amount of time is breathtaking. Crack the lid? A good 15 mins of overshoot awaits. (Had to turn my lid-detection wait up to 5 minutes)

So, the idea of cracking open the additional two vents is okay in theory, but I'm now back to futzing with the thing manually as the lump burns through its course.

My last cook is here:

BBQ-20131020-ShortRibs.jpg


By far the smoothest line yet. Since that time I have added nomex gaskets and am on airburner version 3 but wont have a chance to cook with the newer setup for a while.

However, during the cook I was watching Bryan's and noticed that his setup (wholly different with his BGE) relied less on spikes of the fan and provided a more consistent "Air Flow."

I guess my ultimate goal is to get that flat-line with less, or more even, starts-and-stops from the fan and / or more control of the natural airflow. I feel like my charcoal burn time would benefit from it and ultimately smooth things out. The nomex will probably result in a pretty drastic change as the WSM has been very leaky around the lid and door.

Then again, this is *really* nit-picking. I am very happy with the results that have been obtained thus far.
 
So, the idea of cracking open the additional two vents is okay in theory, but I'm now back to futzing with the thing manually as the lump burns through its course.

The idea here is to open the two manual dampers a very small amount and leave them that way, then allow the HM to supply the variable amount of additional air that is needed to maintain the proper temp. You shouldn't have to fiddle with the manual dampers at all. Although I prefer to seal up the bottom vents and run as much air through the HM as possible, this gives you better control of overshoot.

The BGE and the WSM are two different beasts for sure, you're are gonna burn more coals to heat a thin walled smoker vs a thick ceramic kamado, and that's gonna require more air... I don't think you said if you are using the blower or a damper with the HM? If it's just a blower you might want to try lowering the max speed a bit. Also, if you are getting a lot of overshoot when your lid is open maybe you're building too big a fire for your target temp? Are you using some form of the minion method with the coals?


Back
Top