Brock Gingery
TVWBB Super Fan
How to Understand A Weber Kettle
Pictures at the end.
So Yesterday I fired up my Kettle after getting home from work. I found some beautiful fresh bone in pork chops the day before and had them in a light garlic herb marinade when I left for work. An issue came up recently asking about hotter moderate temps using the Weber Baskets for cooking cuts of meat a little faster, so I thought the piggies who came home with me from market would be an ideal way to show how this works. (Please forgive me in advance, I can be very “Wordy”. That’s why most of my other comments I try to condense to as short as possible)
First, I need to explain the process of why the Kettle works the way it does to those who are new to it.
To those unfamiliar with a Kettle Grill, it can take a little getting used to. It’s a skill to use one effectively and get it to do exactly what you want it to, in no small part thanks to a set of variables outside of your control. I’ve been using the Weber 22 for over 15 years now, and have fired them up from a mile above sea level out west, to humid swamps around the Great lakes, to the Green country side of Maryland outside of DC. These variables are as follows no matter where you go:
1. Air Temperature
2. Humidity/Pressure
3. Wind
It should also be said that each kettle may act a little differently. The variables we can control are our dampers on the Grill, our fuel source/type, and the number of lit Coals we begin with. If you like to think about it mathematically here are a few equations for you that explain the process of the Weber Kettle.
1. X# Coals = Starting Temperature
2. Lit Coals + Airflow = Burn Rate
3. Burn Rate = Energy Release/Reaction (AKA Heat)
4. Burn Rate + Fuel Supply = Duration of Cook
Less airflow means less burn rate (Lower Heat), More airflow means more burn rate (Higher heat)
This is the process of the Weber Kettle.
Now these equations are the same no matter how you arrange your fuel supply. In baskets or a SNS, banked, split (aka double banked), or spread out evenly on the charcoal grate. One issue does deserve mention based on my experience, but people still ask about using them. The Weber baskets are set up for multi-zone cooking, low and slow, or high heat searing. They are not ideal for indirect, large footprint cuts of meat like brisket, ribs (laid flat) and other similarly sized foods that cover a large portion of the cooking grate when you are attempting a hotter faster cook. The reason is you trade fuel capacity for lit coals to get your initial starting temperature correct. More simply put, you lose a lot of duration and can go through your fuel faster while losing a lot of cooking space to make them fit. For Jobs like that most people use SNS units, Fire Bricks stood on end, or even smoke wood cut to length as a buffer to bank all the fuel and lit coals on one side of the grill.
That said, it can be done as long as you understand the process of the Weber Kettle. Why do I use the term process? Because of the variables that we cannot control that affect how are charcoal reacts in the grill, There is not one standard “Use this number of briquettes with the dampers oven to such a precise measurement…..” That is not how the Kettle works. You have to adjust what you are doing in order to work with your surroundings.
Yes it seems like a lot to try and learn for many people. Don’t worry, that adjust-ability is precisely what makes the Kettle so versatile no matter where you go. You are not limited by a predetermined range on a control dial being choked off by a flow regulator that may or may not go into “Bypass” mode if you open your gas valve a half second too quickly. You get to cook on the fire, on the size of that fire, that you set up.
The Chops!
Ok, so to cook these Chops I set the grill up knowing today was almost 90 degrees fahrenheit outside. 20 hot coals (10 per basket with the rest of the space filled with unlit) will get my kettle to register at or slightly over 400 Degrees on the thermometer. I know on my grill that puts me at 290 to 325 at the grate on the farthest side from the heat with the dampers 2/3s open.
The grill is hot, so the Chops marinated lightly in a garlic herb mixture went on the grill for indirect cooking, hit with a sprinkle of SPG, and the lid is on. The chops act as a heat sink and drop the temperature, so I leave them sit for 30 minutes away from the fire. I burp the lid, and flip them quickly. Lid back on for another 20 minutes. At this point I usually check the internal temp. Today they registered around 127 Degrees each.
Lid off, I move them directly over the coals and cover with the lid.
Keeping your lid on your Kettle prevents flame flare ups that can scorch your meat. Control the fire, control the cook.
About 3 minutes on each side above a direct 450 to 500 degree heat source sears things quick even when the meat is very wet. As each chop hits 147 Degrees (+/-) they are pulled and moved indirect again, then off to rest.
Any areas on the surface of the chop that look dried out get a few drops of Worcestershire Sauce on them as they rest. 10 minutes later I am cutting into a very juicy, succulently tender pork chop that is bursting with flavor.
The Warning.
The times and Amounts listed in the above cook happened because of the environment on the day I cooked the meat WITH MY GRILL. With a Kettle you sometimes have to make adjustments based on your surrounding environment. What worked in a given time one day may not work the next week when the temperature drops over 35 degrees outside. And the results may be slightly different on the same grill type in your next door neighbors yard. Dont approach the Kettle as a numbers based grill, because that is not how it likes to work. Learn the process, not the numbers. That is the key to success.
Its nothing to worry about, just adjust your equations to suit your needs and start learning how your kettle reacts. One of the best things you can do is start a BBQ/Grill Journal and make notes on Temperature, Humidity, time and setup. Classify them by the month in which you did them. After a year or two you have one heck of a resource on how your Kettle responds to different fuel loads, temperatures, and you can always reference it to get you in the ball park for your startup cook on a given day depending on what time of the year and the weather you are in. I use my Kettle year round through the winter.
If you are experienced and have a different method or methodology, by all means take everything I said with a grain of salt. Use your grill in a way that is comfortable to you to achieve results that are acceptable to your taste. Grill for the fun of it as well as the savory goodness that is the reward at the end. I hope I was able to describe this in a way that is easy to understand for anyone, and I am sure there are a great many who are much more knowledgeable or experienced compared to myself. If you decide to get one, don't give up on it if you have a bad first cook. Hang in there and it will be an amazing tool if you learn how to fully utilize it.
Best Wishes all, and safe Grillin’.
The Pictures!
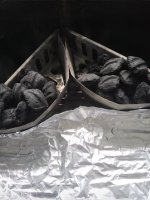
The Basket setup, because it can be done.
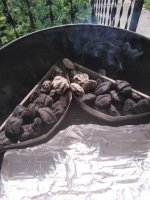
Hot coals added in (10 per basket)
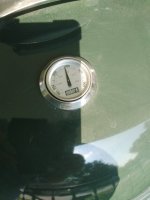
Heating up. Yes, the Dome registers at 400 Fahrenheit over the coals
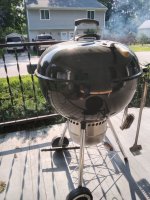
Vents open at 2/3s to start, love to see such pretty blue smoke rolling rolling out from the daisy wheel. (Notice, no lid leaks!)
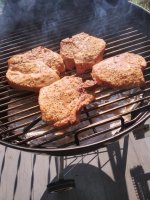
Indirect Cooking for a little while. I start out this way so the outsides dont get too dry.
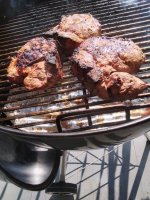
And Finally, just before the came off to rest inside the oven as I finished up my side dishes.
Pictures at the end.
So Yesterday I fired up my Kettle after getting home from work. I found some beautiful fresh bone in pork chops the day before and had them in a light garlic herb marinade when I left for work. An issue came up recently asking about hotter moderate temps using the Weber Baskets for cooking cuts of meat a little faster, so I thought the piggies who came home with me from market would be an ideal way to show how this works. (Please forgive me in advance, I can be very “Wordy”. That’s why most of my other comments I try to condense to as short as possible)
First, I need to explain the process of why the Kettle works the way it does to those who are new to it.
To those unfamiliar with a Kettle Grill, it can take a little getting used to. It’s a skill to use one effectively and get it to do exactly what you want it to, in no small part thanks to a set of variables outside of your control. I’ve been using the Weber 22 for over 15 years now, and have fired them up from a mile above sea level out west, to humid swamps around the Great lakes, to the Green country side of Maryland outside of DC. These variables are as follows no matter where you go:
1. Air Temperature
2. Humidity/Pressure
3. Wind
It should also be said that each kettle may act a little differently. The variables we can control are our dampers on the Grill, our fuel source/type, and the number of lit Coals we begin with. If you like to think about it mathematically here are a few equations for you that explain the process of the Weber Kettle.
1. X# Coals = Starting Temperature
2. Lit Coals + Airflow = Burn Rate
3. Burn Rate = Energy Release/Reaction (AKA Heat)
4. Burn Rate + Fuel Supply = Duration of Cook
Less airflow means less burn rate (Lower Heat), More airflow means more burn rate (Higher heat)
This is the process of the Weber Kettle.
Now these equations are the same no matter how you arrange your fuel supply. In baskets or a SNS, banked, split (aka double banked), or spread out evenly on the charcoal grate. One issue does deserve mention based on my experience, but people still ask about using them. The Weber baskets are set up for multi-zone cooking, low and slow, or high heat searing. They are not ideal for indirect, large footprint cuts of meat like brisket, ribs (laid flat) and other similarly sized foods that cover a large portion of the cooking grate when you are attempting a hotter faster cook. The reason is you trade fuel capacity for lit coals to get your initial starting temperature correct. More simply put, you lose a lot of duration and can go through your fuel faster while losing a lot of cooking space to make them fit. For Jobs like that most people use SNS units, Fire Bricks stood on end, or even smoke wood cut to length as a buffer to bank all the fuel and lit coals on one side of the grill.
That said, it can be done as long as you understand the process of the Weber Kettle. Why do I use the term process? Because of the variables that we cannot control that affect how are charcoal reacts in the grill, There is not one standard “Use this number of briquettes with the dampers oven to such a precise measurement…..” That is not how the Kettle works. You have to adjust what you are doing in order to work with your surroundings.
Yes it seems like a lot to try and learn for many people. Don’t worry, that adjust-ability is precisely what makes the Kettle so versatile no matter where you go. You are not limited by a predetermined range on a control dial being choked off by a flow regulator that may or may not go into “Bypass” mode if you open your gas valve a half second too quickly. You get to cook on the fire, on the size of that fire, that you set up.
The Chops!
Ok, so to cook these Chops I set the grill up knowing today was almost 90 degrees fahrenheit outside. 20 hot coals (10 per basket with the rest of the space filled with unlit) will get my kettle to register at or slightly over 400 Degrees on the thermometer. I know on my grill that puts me at 290 to 325 at the grate on the farthest side from the heat with the dampers 2/3s open.
The grill is hot, so the Chops marinated lightly in a garlic herb mixture went on the grill for indirect cooking, hit with a sprinkle of SPG, and the lid is on. The chops act as a heat sink and drop the temperature, so I leave them sit for 30 minutes away from the fire. I burp the lid, and flip them quickly. Lid back on for another 20 minutes. At this point I usually check the internal temp. Today they registered around 127 Degrees each.
Lid off, I move them directly over the coals and cover with the lid.
Keeping your lid on your Kettle prevents flame flare ups that can scorch your meat. Control the fire, control the cook.
About 3 minutes on each side above a direct 450 to 500 degree heat source sears things quick even when the meat is very wet. As each chop hits 147 Degrees (+/-) they are pulled and moved indirect again, then off to rest.
Any areas on the surface of the chop that look dried out get a few drops of Worcestershire Sauce on them as they rest. 10 minutes later I am cutting into a very juicy, succulently tender pork chop that is bursting with flavor.
The Warning.
The times and Amounts listed in the above cook happened because of the environment on the day I cooked the meat WITH MY GRILL. With a Kettle you sometimes have to make adjustments based on your surrounding environment. What worked in a given time one day may not work the next week when the temperature drops over 35 degrees outside. And the results may be slightly different on the same grill type in your next door neighbors yard. Dont approach the Kettle as a numbers based grill, because that is not how it likes to work. Learn the process, not the numbers. That is the key to success.
Its nothing to worry about, just adjust your equations to suit your needs and start learning how your kettle reacts. One of the best things you can do is start a BBQ/Grill Journal and make notes on Temperature, Humidity, time and setup. Classify them by the month in which you did them. After a year or two you have one heck of a resource on how your Kettle responds to different fuel loads, temperatures, and you can always reference it to get you in the ball park for your startup cook on a given day depending on what time of the year and the weather you are in. I use my Kettle year round through the winter.
If you are experienced and have a different method or methodology, by all means take everything I said with a grain of salt. Use your grill in a way that is comfortable to you to achieve results that are acceptable to your taste. Grill for the fun of it as well as the savory goodness that is the reward at the end. I hope I was able to describe this in a way that is easy to understand for anyone, and I am sure there are a great many who are much more knowledgeable or experienced compared to myself. If you decide to get one, don't give up on it if you have a bad first cook. Hang in there and it will be an amazing tool if you learn how to fully utilize it.
Best Wishes all, and safe Grillin’.
The Pictures!

The Basket setup, because it can be done.

Hot coals added in (10 per basket)

Heating up. Yes, the Dome registers at 400 Fahrenheit over the coals

Vents open at 2/3s to start, love to see such pretty blue smoke rolling rolling out from the daisy wheel. (Notice, no lid leaks!)

Indirect Cooking for a little while. I start out this way so the outsides dont get too dry.

And Finally, just before the came off to rest inside the oven as I finished up my side dishes.
