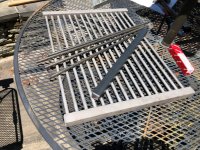
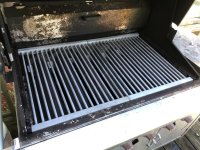
Home built stainless grates


Nice work!

What grade stainless?

I made a similar grill grate for my Wolf gas grill.

I used 1” square solid stock for the frame. It was drilled to receive the rods. Only the end rods were welded to the bar.

I need to make a new one as I was stupid and did not use stainless rods.
304 SS.

Wait.... 1" SOLID??????? Holy cats, that'd be a heavy set of grates. 1" square 14ga tubing for mine.
 
I wish I had space for a real shop! Oh, and I wish I knew how to weld!
When we first looked at this house 15 years ago, there was a Ford Model T parked in the back garage (where all of these pics were taken,) fully restored with immaculate paint and upholstery, parked on jackstands and with a tag hanging from the radiator cap detailing everything that'd been done for storage. It was magnificent. Years later, my g/f told me she knew we'd end up here when I saw the back garage.
 
Places that speak to you right away are always good! My wife and I bought this house after walking in the back door and seeing the lovely redwood paneled back room with a fireplace! After that the thirteen steps up to the bathroom seemed to not matter, thirty years later, I wish we had thought that through a little more carefully!😁😁
 
We were under contract a couple hours after we saw pictures of our place.
Other than those pictures we never saw the place, we just knew it was the right place for us.
We flew there a couple days later to finally see the property at the home inspection and closed the deal a few weeks later.
We didn’t get no restored Model T ;), but we really like it here.

I’m not very religious but I said a prayer to bless the house thanking Preggy Moon (the original owner who just passed).
I also promised her that I would be a good docent of the land.
 
Wow - Amazing job and really nice welding setup! If you don't mind, what was the cost of materials for future reference? Thanks
 
Wow - Amazing job and really nice welding setup! If you don't mind, what was the cost of materials for future reference? Thanks
Lessee..... over $100 just in the 1" tubing, and another couple of hundred in the bar stock. Small orders like this are just plain expensive. The shop I bought this from is an hour & a half away, and made it worthwhile going there. For the 3/8" bar stock, I figured out roughly what I was going to need, then the order page showed me the next price break. I think I doubled the order for another $20.

I already had most of a 20lb spool of .030 SS wire, as well as a bottle of TriMix. I did need the right electrodes (#14 instead of #11,) that was only about $10.

All in all... yeah, there's quite a bit there.
 
Still very impressive.
I’ve seen people booger up welds before and this ain’t dat.
Okay..... I guess I'm gonna have to accept that. :)

When I cleaned out the ash this morning (20 lb bag of B+B Competition Logs.... do NOT like this stuff to cook with,) I did find a loose bar. When I touched it up, I did take a quick look down that edge. Yeah, those spot welds actually do look sort of all right. Almost magic when you get a good setup going, everything just flows into place (pun intended.)
 
304 SS.

Wait.... 1" SOLID??????? Holy cats, that'd be a heavy set of grates. 1" square 14ga tubing for mine.
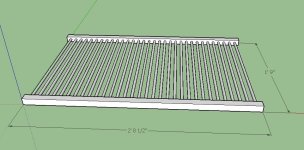
My next one will have 304SS rods. I still have extra 1" square carbon steel bar stock so will reuse that.

Yeah I used 1" solid on the ends to receive the rods which floated. Only the end rods were welded to the solid bar end. I was concerned over distortion. Hollow end tubing with floating rods would not have worked for me. I made mine in 2 sections
Grille Grate Fabrication Drawing.jpgBefore and After Blast Cabinet.jpgAfter.jpg
 
My next one will have 304SS rods. I still have extra 1" square carbon steel bar stock so will reuse that.

Yeah I used 1" solid on the ends to receive the rods which floated. Only the end rods were welded to the solid bar end. I was concerned over distortion. Hollow end tubing with floating rods would not have worked for me

In all honesty.....given the temps that grills run at, I'm not sure I'd worry too much about heat distortion. I checked my grill yesterday during burn-in, the lid was registering around 670 F and the front face around 480 F. I'll probably check the grate temp during a future cook.

You do have the advantage in that your grates appear to not have to move in use. Mine have to come up to load charcoal, hence the handles. Hrrrrm. Might be possible to drop 2 pieces of tubing (parallel to the grates, but welding down the bars a little better. Then again..... this should be the last grates I make for this grill. The SS grates I made for my previous charcoal grill ran for 5+ years without any discernible corrosion or other issues (and still have them in the garage.) I am going to rework the charcoal tray (way not enough airflow,) but that's just going to be mild steel angle for the frame and mild steel expanded sheet for the bottom. For what stainless expanded sheet would cost me, I'll have 25+ years in mild steel sheet that I already have in the garage.
 
I already had most of a 20lb spool of .030 SS wire, as well as a bottle of TriMix.
I should have looked this afternoon. I'm pretty sure that it's ER70 or some such.
Did you use the stainless wire or the ER70? Seems contradictory, or maybe I need more coffee!

I did need the right electrodes (#14 instead of #11,) that was only about $10.
Electrodes on MIG? Again, I'm confused, but that's nothing new.

Great job!! I like these DIY projects!
 
Did you use the stainless wire or the ER70? Seems contradictory, or maybe I need more coffee!


Electrodes on MIG? Again, I'm confused, but that's nothing new.

Great job!! I like these DIY projects!
Hrrrm. I'll have to go check the box. I'm pretty sure the box said stainless filler, it's what I got years ago from the LWS for stainless work.

There's a replaceable copper electrode in the nose of the MIG gun that the wire is fed through and is one side of the electrical connection. I had #11 .030 electrodes (Tweco style Barnard gun,) that were not long enough for the gas shroud. I should have had #14 electrodes, about a quarter inch longer, so that the electrode is even with the end of the gas shroud. When using the #11 electrodes, there is far too long of a stick-out from the electrode to the work piece, and the wire was melting, then freezing before contacting the work piece. This leads to what @Andy Kaminski refers as goobered welds, a lot of us call them bird<BEEP> welds, because that's exactly what they look like. They rest on top, and there's practically no penetration or melting of the work pieces.

As I said before, when I get the right gear, and the right settings on the machine, get set with the gun, squeeze the trigger, and watch the weld puddle form and join the pieces together.
 
Last edited:
@JKalchik what spacing did you use?

My last one I had rods at 15/16" centers which for 3/8" rods, netted 9/16" gaps (0.5625" gap). Next one I think I am planning on 3/8" rods and 3/8" gaps.
I had a local machinist cut me a couple of jigs on 1/2" angle iron. 3/8" wide and 3/16" deep notches with 1/2" spacing, should be 7/8" center to center or some such. I don't think that I'd want to go narrower, and even after only 1 cook, I'm happier with the 3/8" rod than the 1/4" rod I'd used several years ago on a previous cooking grate.
 
Corrections.... this getting old thing is for the birds.

It's a Millermatic 200 welder, not a Miller 400. And I can get replacement parts for everything except for the roller drive motors (apparently have just never failed in service.)
ER308L filler.
 
There's a replaceable copper electrode in the nose of the MIG gun that the wire is fed through and is one side of the electrical connection. I had #11 .030 electrodes (Tweco style Barnard gun,) that were not long enough for the gas shroud. I should have had #14 electrodes, about a quarter inch longer, so that the electrode is even with the end of the gas shroud. When using the #11 electrodes, there is far too long of a stick-out from the electrode to the work piece, and the wire was melting, then freezing before contacting the work piece. This leads to what @Andy Kaminski refers as goobered welds, a lot of us call them bird<BEEP> welds, because that's exactly what they look like. They rest on top, and there's practically no penetration or melting of the work pieces.
Thanks for the explanation! I'd never heard it called an electrode (technically, that is what the wire is). I've always called it a contact tip. Semantics.

EDIT: I've always adjusted the nozzle and bought the same length contact tip. I didn't know there was a number designation for the length!
 
Last edited:


Back
Top