Help! Testing thermocouple on v4.3 board


Juho A

TVWBB Member
I finally got the SMD parts soldered, and now it would be time to test. However, I noticed that the board on the wiki is different, I guess it's the 4.2 board in these testing instructions: https://github.com/CapnBry/HeaterMeter/wiki/Thermocouple-Amplifier-Testing
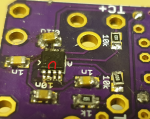
Mine is the 4.3:
20200704_182802.jpg
Based on the different board layout, I cannot find the pins where I should apply power. My multimeter says the 5v pins on the board are not connected to any foot on the amp chip. Or at least there's no continuity from any of those, and I just cannot figure out what pins I should put voltage on, and I don't want to kill the chip with using wrong pins either...


4h of frustration with the SMD parts, it was quite a challenge to solder the amp on and get the pins free of extra solder. Would be great to get this tested and get on with the easier part...
 
Last edited:
Wonder if I am the only one who tries soldering the SMD parts themselves... definitely wouldnt have even tried if the heatermeter store had been open at the time. :(

I really need to know if this works, so I wont waste the rest of my components on this board. It is possible that the amp was fried, but I have no way of knowing if i cannot test it. :( :'(
 
No, I've done it, and it's a PITA :)

Based on the TC Testing info here: https://github.com/CapnBry/HeaterMeter/wiki/Thermocouple-Amplifier-Testing

I labelled the 1,2,4,5,6 pads on the HM 4.3 board diagram you can use as a reference.

35i3H4A.png
 
Million thanks, Steve! Much appreciated, interpreting those was way above my skills, although I did try. :) I'm just firing up the kamado to bake some pizza, but as soon as I have a moment I will try testing it with this info.
 
I guess I will have to admit defeat. :cry:

I tried testing it this way, and via the probe header pads as adviced by Bryan by PM, but I just get 0.0v. I suspect I have fried the amp, or just screwed up soldering some part. I have no way of knowing, I cant figure out how to determine if the caps are making proper contact and if voltage is flowing through them or not. At least theres no reading on any ohm setting across any of them on my multimeter.

20200706_180451.jpg

Wish I had just waited until the heatermeter store is open again instead of spent hundreds of euros on ordering all the components from various places to have them quickly and still end up not having a working system this grilling season. Very frustrating.:confused:
 
I've found the TC amp to be pretty resilient. Take a few more hi-res photos of the TC area and post them up.

Some of the pads look like they're lacking some solder. If you can't get the TC working you can still use it as a 4 x Thermistor board. If your soldering skills are rusty, maybe you can use this board as a practice/learning board.
 
Juho,
Not is all lost. You can still use the board. Just remove parts for the thermocouple mod and add the thermistor jack and i believe 10k resistor. I`m sure, buti think there is a link on the wiki page to make this change. You can still use what you have to enjoy being a heatermeter user. Your just going to use thermistor for the pit probe.
 
Thanks guys. In my frustration I pulled two pads off with my power test leads, so I guess this board is done. But now that I have calmed down a bit, I was thinking maybe I could try desoldering the amp and soldering it and the spare SMD parts I have onto another board, as I have three of each board. That was the minimum order from OSH park. :unsure:
 
Just because you destroyed a couple traces on your board doesnt mean its toast... You'll just need to add some jumper wires to make the circuits that were lost when you broke the trace(s). You can look at the images of the HM board Bryan posted on the HM Hardware page to make following traces easier, and can also consult the schematic diagram to see how the traces should be running from the components in question.

On the TC amp, SMD soldering isn't easy, so give yourself credit for trying... I have found a magnifying visor like the one linked below is very helpful in doing a good job with SMD soldering... it's hard to work on stuff you can barely see!


When I build a TC circuit I generally test the connection from the various legs of the IC over to the next component in the circuit for continuity with a multi-meter, and make sure adjacent legs on the IC are not shorted out. I've never done the pre-assembly battery testing of the TC circuit and mine have always worked out.

I did a quick build guide for the RDTC board, which has basically the same TC circuit as the HM board but the layout is a bit different. You still might get some good tips from reading through my RDTC guide starting in post #55 in the following thread.


I guess the point of my post is, DON'T GIVE UP, these things can be fixed up with some patience....
 
Thanks Ralph, your RDTC guide was actually very helpful and having that nudged me to getting started in soldering the circuit, and I also looked for visor like that before getting into it, based on your tip, but unfortunately such a thing was not available here locally, so I have the magnifying lens and a LED light on my forehead.

I guess I was a bit too tired yesterday evening to be working on this kind of a thing (too low on patience), but I just wanted to test the circuit as soon as I had time, after having it soldered for a couple of days. Bryan informed me that the circuit should work without at least some of the caps, so that actually partially helps, but partially reduces the options even more. If I understood correctly, the 0.1u cap is the only one that needs to be there to successfully test it, so I guess that has to be the culprit as I have checked for continuity through all the legs of the amp to their destinations, and over the resistors as well. And no shorts/solder bridges on the amp.

I will continue with a dumb question; is there really no way to test with a multimeter that my caps are soldered on correctly? I don't get any ohm values over any of them, even though some web sources say I should.
 
Before finally giving up, I decided to check once more for continuity and shorts. Equipped with a tip from Bryan, I used my test power to supply 1-2v to the board and measure voltage over the caps / their leads to see that current is passing through them, and it was. I re-checked continuity and ohms over all the resistors, and all the pins according to the schematic kindly posted above by Steve. In the end I found that the middle two pins on the upper side of the amp are shorting. I didn't actually see this with my magnifying lens, but I think I see it in this picture (red line drawn above the pins) that there is a short between the middle two pins of the amp. I need to go back and see if I can get any visible short removed there and then test the board again.

The soldering job certainly isnt pretty but I think it is passable, as I had continuity from all joints. I think the 0.1u cap is the only one I need to resolder once more (already did once) as it seems to be sitting on top of a solder blob.

Hope I will get this to work. Already checked with Bryan and he does have boards ready for shipping, so that's certainly an option even though any expedited shipping seems to be very expensive, and non-expedited does seem to never arrive (there's an envelope shipped with "USPS international mail" from the states to me in end of April, and it still hasn't arrived).
 

Attachments

  • smd.png
    smd.png
    1.1 MB · Views: 9
Last edited:
Oh well. After desoldering the amp from those pins I determined that even though the schematic doesnt show that, those pins are connected to each other on the board... only after noticing this I thought of measuring this from an unused board, and this seems to be the case. Wonder if I finally killed the amp.
 
Ok, so now, having checked all the continuity and shorts, I still have 0.0v coming through to probe 0. :(20200709_184402.jpg
 
I would clean up all of that flux I see in your most recent picture with a soft brush and some isopropyl alcohol, excess flux can make the tc amp wonky... and the one cap is pretty twisted, I would straighten that out to make sure it isn't shorting on anything.
I've soldered a few of these TC amps, I've found it almost impossible to solder each leg one by one and get it done perfectly, so I have learned to go another route... I first put a light coat of flux on the board, then orient the IC and solder one leg lightly and inspect. If its not sitting perfect I reheat that leg and adjust the position. Once its sitting right solder in place another corner or two, then quickly flood solder over all the legs of one side, let cool, then flood the other side. Now take some solder wick, coat with flux to make it more attractive to the solder, then quickly use the solder wick to pull up the extra solder on each side. I was skeptical the first time I did it, but it usually comes clean pretty easily. This may not help with the board you've done already, but I see you have spare boards....
It is totally possible to burn up that IC or other components with too much heat during soldering, so always make it quick. That said, I never give up easily and have seen situations like this work out fine, I personally wouldn't give up, I would continue to clean up that solder work....
 
Thank you for your encouragement and further efforts in helping me, Ralph. It is much appreciated. I did actually clean it once more with isopropanol after that pic, but the results were the same. I know I have been a bit high maintenance here, and I appreciate all the help, but I really must conclude that my initial thoughts were right - SMD soldering is beyond my skills, as over the last twenty years the only soldering I have done has been soldering some copper wires together, and replacing a power connector on a laptop motherboard. As I don't expect to solder SMD components after this either, it just doesn't seem worthwhile spending any more time on this with all of the other DIY projects lined up (building a larger CNC etc) for this summer. Still got to figure out what is wrong with my 3D printer, too, to make a casing for the heatermeter and attachments for led lighting on my patio etc.

So, I've decided to call it quits trying to get this done myself. I am ordering a fully assembled heatermeter 4.3 with TC from Bryan, along with hopefully an extra main board with SMD soldered, so that I would have a full kit (with extra SMD components except the amp) to pass on to somebody more skilled in electronics here in Europe. I also have a few extra boards without any components on them, in case someone is interested. Looking to sell all that at around what I have invested myself, preferably all at once, I will throw this butchered board in for free as well, in case someone can get something out of it.


Back
Top