Hello pro's! I come with questions.....Questions to little puzzles that I have yet to figure out


JimV

TVWBB All-Star
Hello all.....I hope everyone is doing well. I have been resto'ing like a mad man since I am still between jobs. So much so that I was thinking of starting a band called " Steel Wool and Razor Blades " kinda catchy huh :) kidding of course. Would be a cool name for a motorcycle gang too.....
Well as I have said before, you guys taught me so well that I rarely come across things that I cant figure out but I am never too humble to ask even the dumbest of questions. So there are a few things I will just run by you and maybe I will draw one step closer to having all of the answers.
1. I rarely flip an old school Silver B or 1000 anymore but the question remains. When replacing the red button starter on them the ones without the nut screwed up from underneath.....they have side push tabs that I always assumed are supposed to be pushed in until the push tabs on the starter " click " it into position. My other theory was to set the starter in flush and twist so the metal from the control panels ring will lock the starter into place. Well I will assume that one of those options are correct but over the years I have broken of the push tabs using the twist technique and I can never seem to get the starter to seat using the push down and snap in technique. So please tell me the correct way to install the very simple and basic starter on sayyyyy a Silver B.
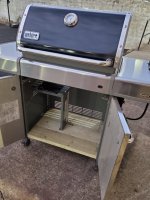
2. I resto a lot of Genesis 300 series grills and I will throw out this latest repair that I have been doing for the old rusty bottom shelf. I use kiln dried pressure treated 2X6's screwed from outside in. It cost $15 and u can paint the kiln dried version. If you use the wet version you just leave it bare. It is possible that the bare version could eat away any metal that it comes in contact with so the dry version is best. In the end it will last a good long time, its inexpensive, and it dont look half bad. So here is my question about the 300 series. Have any of you guys figured out how to restore the hood emblem on the 300's? That darn peeling chrome crap! I thought I read here once that someone just used a bench grinder and zipped them all the way back to bare metal then hit them with high heat.
3. I have yet to try this but I am getting tired of snapping manifold bolts on old 300 series sidewinder and even front knob versions. Are any of u guys just bending the end of the old burner tubes to remove them or cutting them out vs having to remove the manifold??? Then of course the follow up question is.......It looks to me like the end of a burner tube is stamped and sealed very well. Can one ear of a new burner tube be bent back for installation around the guide screw then bent back down once the burner tube clears the screw? I know I should have already tried this with a bad burner tube but I cant be the only one out there snapping manifold bolts trying to replace burner tubes the correct way. The time savings with a workaround would be welcomed.
4. Have any of you guys discovered a good paint for the hoods with gray endcaps??? They dont make high heat gray as far as I know.

Well thats all of the rambling nonsense I can think of right now.......
 

Attachments

  • 20231115_171405 (1).jpg
    20231115_171405 (1).jpg
    145.8 KB · Views: 12
Hey Jim,

#2. Just sand the chrome off and leave it brushed aluminum. The chrome is plated on top of a copper coating. I did mine a year ago and it still looks good without any clear coating on it.


1701224956633.png

this pic was after 10 months

1701225031653.png
 
#4: I haven't found any that matches.

I blacked out my cookbox and end caps.

1701225132960.png


edit: here is a thread on gray paint for the 300 series

 
Your grill looks great! Yes I remember now that you posted this before. So what method of sanding the emblem did you use? Also regarding the black lettering I guess we could use the same method that we use with the older Silver B's. Once I have the emblem sanded down to brushed aluminum I could then paint the whole emblem with black high heat then sand it once more until it is shiny but the black remains behind. As for the end caps.....I love the black but thats a full reto which takes a lot of time. I am looking for a good high heat gray for end cap touch ups....quickies. Thanks for the reply!!
 
Your grill looks great! Yes I remember now that you posted this before. So what method of sanding the emblem did you use? Also regarding the black lettering I guess we could use the same method that we use with the older Silver B's. Once I have the emblem sanded down to brushed aluminum I could then paint the whole emblem with black high heat then sand it once more until it is shiny but the black remains behind. As for the end caps.....I love the black but thats a full reto which takes a lot of time. I am looking for a good high heat gray for end cap touch ups....quickies. Thanks for the reply!!
I've done two of the emblems. First one was with an orbital sander and 220 grit. It sucked and was a pain and took forever.

second one I used a belt sander and bought some 220 and 400 grit. Went much faster. just kept working it. the chrome layer was thick, and then had a copper layer and then it went down to bar aluminum. I did not bother painting the black part of the emblem, I just cleaned it with dish soap and a Q-tip.

As far as painting the cookbox and lid, yeah its a bit of work but it really looks good when its done.
 
Cool....thanks.....I will try the belts sander method. I will let u know how it works out.
I use my workmate to hold the sander, turn the belt sander upside down and clamp it in so I don't have to hold it . I meant to take pics when I was doing it but...

And, be careful with the corners of the emblem. If you look at the upper left corner on the closeup pic, you can see where it got away from me and I took off too much metal.
 
Ha! Thanks for the tip.....I see you made it more aerodynamic. Yep....I have a belt sander and I will flip it and rip it.
 
I don’t like drilling out manifold mounting bolts.

#3 - maybe sacrilege to some - I either remove the screws that hold the burners down or shave down the screw heads with a multi-tool leaving a pin or stud sticking up. I pull the burners up through the firebox leaving the manifold in place. I hold the new burners down with the original screws if I get lucky. If I am not lucky I either cut a washer and use it like a c-clip over the protruding stud or just drill and tap a new hole to hold the burners down using a washer to catch the

The other trick for front burner 300 series with crummy looking mounting bolts is leave the manifold in place. Do not attempt to remove manifold - leave manifold in place. Drill 2 through holes near the original mounting bolts through the manifold mounting plate and firebox where you have plenty of firebox meat. Install new nuts and bolts in your new holes securing the manifold to the firebox. Now cut off the heads of the original mounting bolt heads flush to the manifold mounting plate. Now remove the new nuts and bolts. You should be able to remove the manifold with a gentle pry or a little wiggling. Once the manifold is off you can dry fit it back on with the old headless bolts in place or cut the old headless bolts flush to the firebox. At this point You should now be able to reinstall the manifold using the new nuts and bolts having the proper alignment to the burner tubes.
 
Thanks for the reply. Yes I have dabbled with removing guide screws....drilling out guide screws......washers on guide screws. I am trying to avoid any drilling out of hardened steel screws......I have done it so many times that I am just over it. Now you made an interesting point about basically relocating the manifold bolts. I have been known to through bolt some of my repairs through the cook box. Example being the front inside cook box shield on a Genesis 335. I fabricate a stainless steel shield and through bolt it in place. Then I paint the bolt head gray and you never even notice it. I wonder about any holes drilled through the cook box where Weber has not designed extra support in the box. Your example of new manifold bolts through the box assuming above the old location might not have any additional support in the box....do u think it matters? Did I even understand your repair correctly...I think I did :) You did mention drill where there was firebox meat......I will look at it today.
Ultimately I know there are people out there bending ears on new tubes and sneaking them in that way.....there has to be a safe way to do this.
 
#1) I have done a lot of the Silver B's. And like you have experienced the exact same problems with the snap in style igniters. What you can try is to try to file off a little of the tips of the clips on each side to give them that little extra clearance. I think the screw on igniters are the ones designed for most of the Silver B's and I have a bunch of spares, so if I have to replace one, I just grab one of those usually. But, I have finagled a few of the clip in ones in place as well. Broke a few of the clips doing that as well. But, I think just shortening the tips of the clip arms might give it the little extra clearance they need.
 
Ahhhhhhhh thanks Bruce.......makes me feel so much better knowing that I am not the only one that has come across this issue. Ironically I am using Weber brand starters as well but they just dont snap into place. Good call on filing away just a little bit of the plastic....I will give that a try next time.
 
Thanks for the reply. Yes I have dabbled with removing guide screws....drilling out guide screws......washers on guide screws. I am trying to avoid any drilling out of hardened steel screws......I have done it so many times that I am just over it. Now you made an interesting point about basically relocating the manifold bolts. I have been known to through bolt some of my repairs through the cook box. Example being the front inside cook box shield on a Genesis 335. I fabricate a stainless steel shield and through bolt it in place. Then I paint the bolt head gray and you never even notice it. I wonder about any holes drilled through the cook box where Weber has not designed extra support in the box. Your example of new manifold bolts through the box assuming above the old location might not have any additional support in the box....do u think it matters? Did I even understand your repair correctly...I think I did :) You did mention drill where there was firebox meat......I will look at it today.
Ultimately I know there are people out there bending ears on new tubes and sneaking them in that way.....there has to be a safe way to do this.
Hi Jim, on the genesis 300 series front controls grills the firebox has a thicker part of the casting in the area of the manifold mounting bolts. It has a vertical “rib” (Pardon the meat references but this is a grill forum) Weber uses a blind hole, I don’t see why they didn’t use through holes and nuts and bolts.

Btw - the genesis II has tool less burner replacement scheme….
 
Thanks BP. Ya I dont know why they didnt through bolt either. Yes I am aware of the G2's having the lift up and out burners.....I love that feature!!!! I love resto'ing the G2's.....sooooo easy!!!!
Ironically the day after I asked u guys my questions I ended up answering one myself. I am not sure yet if this will be applicable across the board but for this example I am working on a approx 10 year old Genesis 335 front controls. The sear burner tube was spent so I wanted to remove all of the burners and inspect. I also like having all of the burners out because it is a lot easier to clean the cook box without burners in the way. Long story short.....to remove the burners on the 335 without removing the manifold bolts or the guide screws........ at the guide screw end of the burner use a pair of needle nose vise grips or tool of your choosing to bend the right tab of the burner end downward. Once you have done this just wiggle the burner out from under the guide screw. When reinstalling just do the reverse and there is really no need to bend the tab back up when u are done because it is locked in place with the tab bent down. Please try this method and let me know if it works for you. This is gunna save me a ton of time going forward. Now I wonder if this will work on a sidewinder.......I dont think it will because the burner tube ends lay flat with no valley beneath them.


Back
Top