Genesis 1000: How to remove/replace rusted bottom tray rail screws in firebox


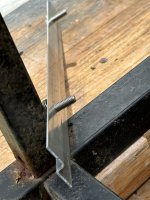
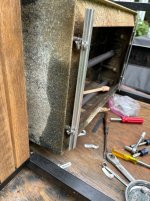
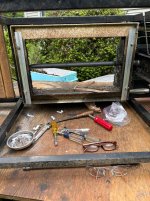
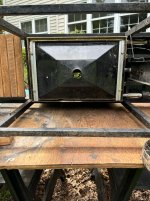
A week ago I removed the storage cover from my Weber Genesis 1000 LX to prepare for summering grilling only to discover that the Bottom Tray was sitting at the bottom of the cart. I quickly discovered that one of the rails on the bottom of the Burner Box had partially disintegrated and no longer held the Bottom Tray to the bottom of the Burner Box. I called Weber and, bless their heart, they offered to send me replacement rails and screw at no charge! True to their word, the parts arrived a few days later. Now my trouble began. I carefully laid the Genesis on its back and saw the the original four screw were covered with corrosion. I assume it isn't rust, but I can't be sure because one of the original rails is partially missing. I think the new rails, and hence the original ones, are aluminum. The slotted hex-head screws, I just don't know. They are colored gray, but I can't determine their composition.

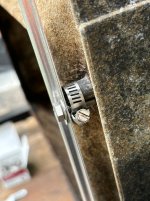
Obviously, the simple repair is to remove the two screws for each of the rails and just screw on the two new rails. I throughly soaked the screws with Liquid Wrench and tried to unscrew just one of the screws. I quickly discovered it would budge. Next, I attempted to use a hex-socket screwdriver and, instead of turning, the screw head started to deform. As a last effort, I tried a pair of Vise-Grips. No dice! Once again I called Weber for help. The support person placed me on hold and consulted with other members of the team. The only other suggestion they could offer was to use an Ez-Out tool. I started searching online to buy one and found a common complaint with virtually any brand was that when a great deal of force was applied the Ez-Out would snap, leaving part of the extractor embedded in the screw. This made the problem far, far worse.

So, can anyone suggest a means of my removing the old four screws so that I may replace the rails? Unless I can hold the Bottom Tray in place the Genesis cannot be used. If I could post attachment, evidently am not allowed to do so, I could show the Forum members the condition of the original screw and original rail. One original screw is still intact but the head is rounded. The remaining screws are intact and won't budge either.

Any and all suggestions would be greatly appreciated! For the want of removing the four old screws my Genesis 1000 LX is headed to the trash!
 
Last edited by a moderator:
Can you borrow a handheld torch from someone? Preferably a mapp gas one. Heat around the screws, not the screws themselves.

heat + vice grips.
 
I like JKim's seasoned recommendation. If all else fails, look for a donor firebox before you trash the whole grill.

p.s. Welcome to TVWBB forum! My family spent 7 special years in Asheville in the late 90's early 2000's.
 
If I could post attachment, evidently am not allowed to do so, I could show the Forum members the condition of the original screw and original rail. One original screw is still intact but the head is rounded. The remaining screws are intact and won't budge either.

You can post a picture to imgur.com and then paste the link in this thread. You don’t need to use the attachment feature.
 
Heres what the remains of my Genesis 100 LX screw looks like

Can you borrow a handheld torch from someone? Preferably a mapp gas one. Heat around the screws, not the screws themselves.

heat + vice grips.

With great thanks and appreciation to BillSmith, here is a photo of what remains of the screw at the bottom of my Genesis 1000LX

Lda8pQN.jpg
 
If you have to, you can grind the stub flush with the grill box. Then, drill out the remaining screw. If you have to, you can drill down along side the old screw to make a new hole. Do that for both screws. It won't matter if the slide rail is off by 1/8". I have done it a couple times before.
 
Bruce:

Much thanks. I've been thinking along the same lines. I was thinking of drilling a slightly smaller hole and using some other screw(s). Do you have any suggestion of what material to use. I'd think that stainless steel would be the way to go. I'd love to know what material Weber uses for their screws; the ones included with the new rails they sent me.
 
Stainless would be preferable, but in the end, it will probably be another 20 years before you feel the need to remove the tray rails again. So, if you have trouble finding a SS solution, then go for a galvanized screw.
 
Success in repairing my Genesis 1000 LX gas grill - screw removal

Success! I managed to get my faithful Genesis 1000 LX up repaired. I thought I'd post what I did in case someone else encounters a similar problem. I'm sure that similar issues can arise in many other models of other Weber Gas Barbecues. First, what didn't work. I tried heating up the post with my BernzOMatic MAP torch. I heated it for several minutes and still could not get the screw to turn. On to plan B. I used a Dremel abrasive cutoff disk and cut off what remained of the screw and the rail. I then started with a center punch to mark the center (or thereabouts) of the screw. Then I used a 1/16-inch drill bit to drill down through the screw, following up with slightly larger successive drill bits. I discovered, using some test blocks of wood for determining the best diameter drill bit that would make a slightly undersized hole for the Weber screw. The proper drill size turned out to be 13/64-inch. I found that using a hex drive - I don't suggest using a blade screw driver on the slotted hex-head Weber screw - it would be too easy to damage the screw head. After many anxious moments I managed to get the screw started in the new hole and the new rail easily mounted on the underside of the box. Reassembly and cleaning of all parts of the Genesis was the only proper thing to do. The grill now looks close to new again! I hope this helps others who encounter frozen screws in the bottom of their Weber.
 
Ken, that is the proper way to fix that problem. I am glad you took the time and effort and glad it all worked out for you. Thanks for the update.
 
Substitute those Weber screws for some stainless ones and hit them with some Never Seize as well and you will never again have an issue
 
I totally agree with Larry on the Never Seize and the stainless. The Never Seize (silver) worked great on heavy truck brakes (hydraulic & air) in the salt air environment along the RI coast. Kept things from rusting and none of those parts were stainless.
 
I know this thread is old but wanted to share my successful solution here. My grill is a WEBER 1000 also according to what Weber had told me (deep box with double layer of flavorizer bars) Underneath looks just like Ken W's picture up above. Same situation with the rusted slide rails and mounting screw heads. I tried everything including several applications of Kroil overnight and dremel cutting disc to deepen the screw head slots and Map gassing several times and no way the screws would turn and the heads just broke off. Tried drilling into one screw as Ken W did above and was a quality new bit but it was not boring into the screw. And figured even if was patient and kept at it I could see a drill bit breaking off inside the screw the same way an easy-out can and then it would be an even bigger challenge. So slept on it and this solution worked great for me. First with the dremel I cut off the screw heads and slide rails' remnants flush with the end of the posts (posts being what the screws screw into) and was careful not to also remove any of the posts' ends. The holes in the replacement rails that I bought from weber are a perfect fit for a 6mm diameter bolt (close to 7/32"). At the hardware store bought 4 stainless steel bolts 6mm diameter by 20mm long and some 1/4" stainless steel washer and 4 small stainless steel radiator clamps (#4 size?). Envision the following as if the grill is standing in its normal on the ground position: I put two washers on the bolt and then inserted the bolt in the rail hole (same orientation as if it was an original mounting screw) and then positioned the threaded end of the bolt on the SIDE of the post (right up against it). I already had the clamp fully opened, but still engaged, and positioned around the post and so now the clamp was around the post and the threaded end of the bolt. Tightened the clamp a bit so things stayed in place and then mounted the other end of the rail the same way to its post and tightened both clamps securely. Worked like a charm and is very secure and the rail is positioned exactly as it originally was except the rail is now slid about 1/4" towards the front of the grill. Then did the other rail the same way. In reality I had the grill laying on its backside on top of a table as I did all of this so it was easy to work on. A couple of key items: I used the two washer to in essence shorten the bolt because otherwise the end of the bolt would hit the underside of the grill just before the rails butted up against the posts' end. The other thing was the size of the clamps. If I had used a bigger clamp I think it would have been tough to position it to avoid the angled firebox and to also make the clamps' screw heads accessible by a socket. Right now the clamps are all easily accessible so they are easy to remove if I ever need to replace the rails again. The above process was actually very quick and easy to do, once I figured out the right size of bolts/clamps, etc. And really nothing needed to be stainless I guess except for the radiator clamps.
Can add a picture or two later if anyone would like. Hope the above helps someone.
Sounds like a good solution as long as everything holds. I can picture what you did by your explanation, but pictures are even more helpful.
 
The clamps really seemed to bite into the posts and bolt threads well. Based on light weight that the rails hold I think will hold as long as the rails don't rust away again. Will try and attach some pics now:
 

Attachments

  • IMG_4466.JPG
    IMG_4466.JPG
    152.9 KB · Views: 11
  • IMG_4472.JPG
    IMG_4472.JPG
    181.1 KB · Views: 11
  • IMG_4479.JPG
    IMG_4479.JPG
    247.6 KB · Views: 11
  • IMG_4483.JPG
    IMG_4483.JPG
    267.4 KB · Views: 11
  • IMG_4484.JPG
    IMG_4484.JPG
    248.9 KB · Views: 11


Back
Top