General 3D Printing Thread


I thought of those but they're pretty expensive ($40+) compared to just a 7AH UPS battery ($20). The capacities are a bit misleading too, since a 7AH 12V battery gives you 7AH at 12V and the lithium jump starters are at 3.7V, so an 8000mAh pack is actually 2466mAh at 12V and probably closer to 2000mAh after boost efficiency conversion. They also might have built-in cutoffs to prevent them from being used continuously at 12V output. The problem with the 12V UPS battery is that you need a lead-acid charger as well so there is a definite advantage on the jump packs there.
 
Last edited:
Do you have the fusion link for "adapter.stl" ? I was gonna make a little tpu plug so I can remove the damper when I am done cooking, and plug up the intake to snuff out the fire.

I do not, but I could set it up pretty quickly this afternoon. I'll update once I have it made.
 
Bryan,
Your right. Those jumper packs are good for surge but maybe not continuous as we need. I bought a bunch of different connectors for them. The main one that comes with it to jump the car is ill suited as it has safeguards in it that will probably interfere with low power, continuous.
I switched from the SLA jumper boxes to the smaller LiPo ones. I park old cars in airport parking lots. Nothing worse than a dead battery late at night with no one around.
 
I have a question that is undoubtedly way off topic, but it involves thermistors and the guys on farcebook are utterly unhelpful.

I had a heater cartridge break the wires, and I fumblefingered the thermistor on the hot end of my Ender 3 Pro.
This has the SKR Mini E3 V2 board if that helps.

I bought some new thermistors and heaters off Amazon. These are the thermistors:
Amazon weirdness

It says it's a drop in replacement. It isn't.
The actual vs readout is roughly half in printing temps. Meaning, if I select 200 for PLA, it ends up being 99 actual as measured by my IR temp gun and also the frying sound of the skin on my finger.

So, I thought to myself, "Who would know a bunch about thermistors and 3D printing?" and I am here!

I have tried using different tables in marlin firmware, but none work. I took measurements at room temp, 100C (boiling water) and 200C wrapped it up with my soldering station iron in foil (ala Heatermeter thermistor calibration process) and got the following values
116200 ohm at 18.5C
6750 ohm at 100C
1500 ohm at 200C

When I try one of the python based table generators I get out of domain errors.
However, I get this to work and generate an S-H curve:
Curve Calculator

That doesn't give me ADC values, so I am trying to manually map it, but the ADC values are going way low, to the point I have no resolution at printing temps. By 265C, there isn't one ADC count resolution per 5C.

Am I missing something here? I am at wit's end. I bought more thermistors and even a new board.
 
It's been a while since I used Marlin and have never used an SKR board, but the one encouraging thing I see is that the three temperature/resistances you posted calculate out to a beta of ~3800. That's really close to the stated 3950 beta the thermistors are supposed to be, so I would guess they are correct. That makes it sound like it is strictly a Marlin configuration issue. I'm sorry I can't be more help but at least it seems like the thermistors are what you should expect. I assume you've already tried just setting Marlin's thermistor type to "1", right? Maybe `M305 P0 R4700 T100000 B3950 C0.0` would fix something?
 
So what does the configuration.h look like for Marlin?

Everything I am reading looks like thermistor 1 is the correct one so the correct value in configuration.h would be:

#define TEMP_SENSOR_0 1
 
I have tried thermistor 1 and 11 (and almost all the otjers to be honest)

The problem is that the higher temp part of the curve is so flat that there's not enough difference between the readings above about 220°c for Marlin to know what's up.

If I do a manual temp vs adc table, the values plummet then the curve drastically flattens out after about 175ish. By the time I get above 220 or so, the printer just errors because anything from 240 to 210 is within the settling tolerance.

I am horribly confused.
 
Here is my custom map made by reading the ADC values in octoprint and using an IR thermometer to get actual temps. Not completely accurate, but the best I have

// Updated thermistor table for Amazon thermistors
const temp_entry_t temptable_16[] PROGMEM = {

{ OV(11), 190 },
{ OV(12), 185 },
{ OV(13), 180 },
{ OV(14), 175 },
{ OV(15), 170 },
{ OV(16), 165 },
{ OV(17), 160 },
{ OV(18), 155 },
{ OV(19), 150 },
{ OV(19), 145 },
{ OV(24), 140 },
{ OV(28), 135 },
{ OV(36), 130 },
{ OV(49), 125 },
{ OV(58), 120 },
{ OV(66), 115 },
{ OV(74), 110 },
{ OV(80), 105 },
{ OV(126), 100 },
{ OV(147), 95 },
{ OV(153), 90 },
{ OV(187), 85 },
{ OV(230), 80 },
{ OV(337), 75 },
{ OV(307), 70 },
{ OV(369), 65 },
{ OV(435), 60 },
{ OV(553), 55 },
{ OV(633), 50 },
{ OV(712), 45 },
{ OV(784), 40 },
{ OV(846), 35 },
{ OV(896), 30 },
// { OV(810), 25 },
{ OV(978), 23 },//,
// { OV(988), 15 },
{ OV(994), 10 } //?
// { OV(1000), 5 },
// { OV(1005), 0 }
};

As you can see anything above 145 is extrapolated just to get the block to hit 150. There's no way I could get printing temps like this.

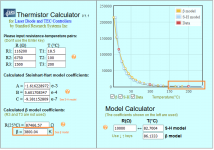
In the attached picture, the flat curve explains the problem. I understand thermistors aren't linear in nature, but it would seem this one is more suited to temperatures under 100C. Also, it shows 3800 beta like Bryan said, but, and I may be wrong, there are different betas. I.e. based on 25/50 spread, 25/100 spread etc. I wonder if these aren't a 25/50 and need to be a 25/100 (or something like that)

Is there any way to "adjust" the curve so there is more slope above 150C?
 

Attachments

  • Untitled.png
    Untitled.png
    47 KB · Views: 6


Back
Top