You don't necessarily need 110. I find 110 to be too hot and can actually cause warping of the print on my machine. I experimented with lowering the temp 2.5F in successive prints until I achieved a desirable result. I now keep my bed at 95F. You need to check what works for your setup.
You are using an out of date browser. It may not display this or other websites correctly.
You should upgrade or use an alternative browser.
You should upgrade or use an alternative browser.
General 3D Printing Thread
- Thread starter Bryan Mayland
- Start date
RalphTrimble
TVWBB Diamond Member
Pizza sauce is subjective to taste, I really liked the last one I made...
I started with tomato paste, the smallest can, I used paste made from San Marzano tomatoes which are the BEST! If you have a store with a good variety look for one that tells you what kind of tomatoes it's made from, roma or marzano are good. To the paste I added (to taste) oregano, basil, rosemary, salt, pepper and crushed red pepper (if you like it spicy). I always use the imported oregano that is still on the stalk (dried) usually greek or italian origin, it makes a big difference. The basil was run of the mill dried/bottled and not that great tbhwy, room for improvement here, the rosemary was fresh and chopped. Be careful with fresh rosemary cause it can be overpowering, but the right amount does play a role in giving the sauce that pizza taste (you can use dried rosemary as well). I crushed about 4 nice garlic cloves into the sauce with a garlic press, then add a little bit of water and whisk it all together, I add water until the sauce just reaches the point where it falls out of the whisk instead of balling up inside it. You can add a little sugar if you prefer sweeter sauces but I prefer it a bit on the sour side so no sugar for me. Then refrigerate the sauce for at least 2-3 hours to let the flavors meld, overnight is better.
I learned to cook by watching my grandmother, who's measuring spoon was the palm of her hand! I cook the same way so I can't give you exact measurements, I cook more from ratios rather than measurements anyways. I'd say maybe start with 1 TBLSP oregano as 100%, 50% basil, 10% fresh rosemary (double if dried), 50% Black Pepper, 25% salt, 50% Crushed Red Pepper and 4 cloves of garlic. Bend the ratios to your taste, I obviously love oregano, garlic and black pepper, not so much salt, and no sugar cause I prefer sour red sauce over sweet. Give it a taste test, adjust the amount of seasoning to match the sauce volume and your palate. LET THE SAUCE SIT so the flavors meld together. Some grated Parmigiano-Reggiano or Romano cheese can be a nice addition to the sauce as well, but I prefer to sprinkle while making the pizza rather than putting in the sauce... I say Parmigiano-Reggiano instead of Parmesan because if you buy the green can of Parmesan at the grocery store your sauce will end up tasting like Spaghetti-O's... LOL
1. Extruder motor replaced, up and running again
2. Sauce recipe. This is very simple. When my mother cooks, she doesn't really measure things and just goes from memory and taste. I have watched her many times and done my best to translate into quantitative measures over the years:
1. 2x 28 oz cans of whole peeled tomatoes
2. 1x 28oz can crushed tomatoes
3. 18 oz tamoto paste
4. 1 large white onion, diced
5. 1-1.5 oz fresh basil, chopped
6. fresh garlic (see below for amount), crushed
7. crushed red pepper
8. fine crystal sea salt
9. olive oil
10. 1/4 cup grated Romano cheese
1. Saute the onions in 2-3 tablespoons of olive oil just until they become translucent. At this point I add the crushed garlic. The problem with specifying an amount of garlic is that there is never any consistency with clove size within the bulb, so I generally just take about a quarter of the whole bulb. Bear in mind, I absolutely love garlic. I then peel the garlic and crush it on a cutting board with the side of my vegetable knife, and then mince into small pieces. Add this to the cooked onions and cook for about one minute over medium heat while constantly stirring. YOU DON'T WANT TO BURN THE GARLIC OR ONIONS.
2. Add all of the cans of tomato products. Use your hands to squeeze the whole tomatoes into small chunks and stir, reduce to low/medium heat. You may ask, why didn't you just use all crushed tomatoes? The reason is that the whole ones taste much better and you are able to get nice chunks after hand crushing that add to the consistency of the sauce. Another thing, tomato paste adds sweetness to the sauce. If you want it less sweet, use 12 oz instead of 18 oz.
3. Add 1 tsp black pepper and all of the chopped basil while stirring.
4. Add salt, 1 tsp at a time, while stirring and tasting.
5. Add crushed red pepper to taste. The key is to stir, taste, add, stir, taste and repeat as needed.
6. Add Romano cheese and stir.
Let this simmer over low heat for about 45 min to 1 hour, covered, to let the flavors develop. Make sure to stir often so as not to burn the sauce. Then let it cool on the stove. I usually store it as 2 or 4 ladles full in Tupperware and freeze. This way I can just thaw and have exactly enough for my pizzas.
RalphTrimble
TVWBB Diamond Member
Tom,
Looks like nice recipe, I'll have to try it next time. Made me remember that I forgot to mention putting some olive oil in the sauce (in my post above).
You seem to have it down, these are a lot of the things I have to tell my cousins when I teach them to cook grandma's sauce. I learned to tell them to "sweat" the onions and garlic rather than saying saute, cause they always seem to over do it and brown them. To most people saute means "fry". I'll never forget my youngest cousin calling on her first sauce mission, said her onions were brown and I could hear them frying. I told her, turn off the heat, throw away your onions and garlic, wash the pot and start over! She was like, "REALLY?" I said for sure, you don't want to start out your sauce with caramelized onion and garlic, it'll ruin the flavor of the whole pot of sauce....
Thanks for sharing...
One question for you, every Sunday my Grandma made spaghetti, usually with meatballs and another meat, sausage, pork hock, sadasede (sp?) etc to flavor the sauce. We called it "sauce" but other Italians call it "gravy". So, sauce or gravy???
Bryan Mayland
TVWBB Hall of Fame
I'm just happy there are people out there that know not to fry garlic for 10 minutes giving you burnt garlic taste that never goes away how many other ingredients you add.
In other news I took all the end connectors off my wiring, put sleeving and heatshrink on them, then put the connectors back on. I did this thinking how neat and tidy it would look. Welp, long story short:

My printer looks like it graduated Magna Cum Laude from a rasta clown college thanks to using a different color for each axis. The issue being because so many parts are moving parts, you can't really tie down their wires. Some could be shorter but I don't have any of those minimolex pins to put new tips on. Didn't someone say they've redone all their wiring several times?

I also spent an hour or two struggling with slic3r because my prints were all coming out from 10mm/s up to a whopping 20mm/s regardless of the speed settings. Turns out "auto cooling" takes any layer that takes less than 30 seconds to make will be extended to take at least 30 seconds. I think the calculation might be bunk because when I tried to print a HeaterMeter case just as a large print example, it was going to take hours just to lay down the first layer (out of, what a hundred layers?). Turned that off for the time being and the speed is normal again. Still need to calibrate it, this is all testing from work while on conference calls.
In other news I took all the end connectors off my wiring, put sleeving and heatshrink on them, then put the connectors back on. I did this thinking how neat and tidy it would look. Welp, long story short:
My printer looks like it graduated Magna Cum Laude from a rasta clown college thanks to using a different color for each axis. The issue being because so many parts are moving parts, you can't really tie down their wires. Some could be shorter but I don't have any of those minimolex pins to put new tips on. Didn't someone say they've redone all their wiring several times?
I also spent an hour or two struggling with slic3r because my prints were all coming out from 10mm/s up to a whopping 20mm/s regardless of the speed settings. Turns out "auto cooling" takes any layer that takes less than 30 seconds to make will be extended to take at least 30 seconds. I think the calculation might be bunk because when I tried to print a HeaterMeter case just as a large print example, it was going to take hours just to lay down the first layer (out of, what a hundred layers?). Turned that off for the time being and the speed is normal again. Still need to calibrate it, this is all testing from work while on conference calls.
Andy Snider
TVWBB Fan
. Still need to calibrate it, this is all testing from work while on conference calls.
Each & every one of my harebrained ideas over the last 8 years (since college) have been hatched while on conference calls, before that, alcohol was to blame. The amount of money & time spent due to conference calls is staggering.
I actually built my HM while listening in on a call. Forgot to mute & had to explain a bit when I burnt myself with soldering iron.
RalphTrimble
TVWBB Diamond Member
FINALLY...... PRINTING!!!
To say I had a rough go would be an understatement...
My assembly actually went really well until I slid the bed on out to the y-idler and they hit. The design leaves very little clearance here and a combo of a few things made them interfere. The holes for the smooth rods on that side were a bit loose letting the rods sag/vibrate, the bed design having the bearing just biting a wood slot isn't very accurate on the side with a single bearing. My bed ended up a bit low on the outer left corner (200,200). I compensated for this using thin plastic as a shim, cut a small strip, zip tied it to the smooth rod (to make it hug the rod) and then slid it down into the wood hole on the bottom side. This worked well, it pushed the rod up and made them nice and snug. I also put a stip of the plastic under the single bearing to lift it there a bit. In the end the bed looks pretty level. I asked why springs weren't used for bed adjustment I was told they had been known to rattle loose and have the bed come out of alignment. My bed looks good right now, lets hope it stays that way!
After I get the bed all set I continue to build without issue, until I get around to electronics power-up, more bad luck... I plugged in the USB and turned on my 12VDC, have MINTEMP error on screen, and the first time I unplug the USB I notice the text goes away from my LCD (but it still glows blue). At this point I realize the printer will not power up on 12VDC alone, for some reason it needs power from USB too? I guess it was a bum Mega board, which was quickly exchanged, now all is well with just the 12V power supply. While I had the boards split I noticed a pin pushed back on the RAMPS board, it was a T0 pin, Hotend Thermistor... DOH So I pushed that pin back where it should be and soldered it in place.
On the next power-up I see "i3 READY" and I was never so happy to complete a 3 hour project!.... It was like the Gilligan's Island "three hour tour" for a while! LOL
From there things are going reasonably well I think. The bed and hotend heated up quickly to ABS temps, everything moves really smooth. I sliced and loaded the hollow_cube object and started printing. It went around for a while not spitting out anything, had me a bit worried but I figured the hotend needed to be primed. It took longer than I expected but the plastic was going in.... eventually it came out. I used "Fructis Extreme Control #5" on my bed and the plastic seems to be sticking. My kapton tape on the hotend is coming loose, the cube looks a little sloppy here and there, BUT, there's a plastic cube growing there on my first print. I think that's pretty good! Looks to be almost done and my workshop smells like a hair salon!
And here it is, my first print!
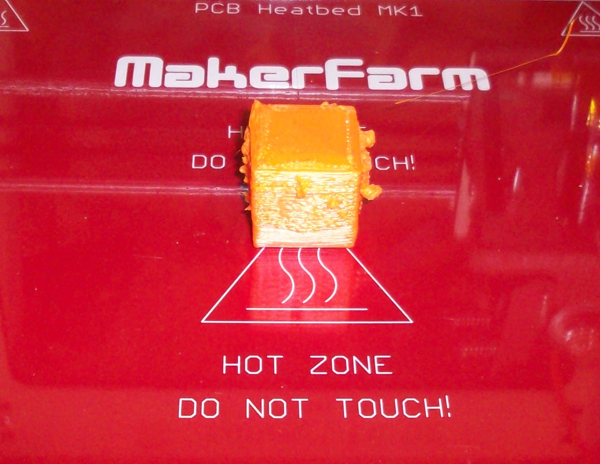
It's got some wart's hanging there in places but I think it's pretty decent for a first print! I'm gonna fix up the hotend taping and hopefully the next print will go better with the hotend properly primed....
Comments encouraged....
To say I had a rough go would be an understatement...
My assembly actually went really well until I slid the bed on out to the y-idler and they hit. The design leaves very little clearance here and a combo of a few things made them interfere. The holes for the smooth rods on that side were a bit loose letting the rods sag/vibrate, the bed design having the bearing just biting a wood slot isn't very accurate on the side with a single bearing. My bed ended up a bit low on the outer left corner (200,200). I compensated for this using thin plastic as a shim, cut a small strip, zip tied it to the smooth rod (to make it hug the rod) and then slid it down into the wood hole on the bottom side. This worked well, it pushed the rod up and made them nice and snug. I also put a stip of the plastic under the single bearing to lift it there a bit. In the end the bed looks pretty level. I asked why springs weren't used for bed adjustment I was told they had been known to rattle loose and have the bed come out of alignment. My bed looks good right now, lets hope it stays that way!
After I get the bed all set I continue to build without issue, until I get around to electronics power-up, more bad luck... I plugged in the USB and turned on my 12VDC, have MINTEMP error on screen, and the first time I unplug the USB I notice the text goes away from my LCD (but it still glows blue). At this point I realize the printer will not power up on 12VDC alone, for some reason it needs power from USB too? I guess it was a bum Mega board, which was quickly exchanged, now all is well with just the 12V power supply. While I had the boards split I noticed a pin pushed back on the RAMPS board, it was a T0 pin, Hotend Thermistor... DOH So I pushed that pin back where it should be and soldered it in place.
On the next power-up I see "i3 READY" and I was never so happy to complete a 3 hour project!.... It was like the Gilligan's Island "three hour tour" for a while! LOL
From there things are going reasonably well I think. The bed and hotend heated up quickly to ABS temps, everything moves really smooth. I sliced and loaded the hollow_cube object and started printing. It went around for a while not spitting out anything, had me a bit worried but I figured the hotend needed to be primed. It took longer than I expected but the plastic was going in.... eventually it came out. I used "Fructis Extreme Control #5" on my bed and the plastic seems to be sticking. My kapton tape on the hotend is coming loose, the cube looks a little sloppy here and there, BUT, there's a plastic cube growing there on my first print. I think that's pretty good! Looks to be almost done and my workshop smells like a hair salon!
And here it is, my first print!
It's got some wart's hanging there in places but I think it's pretty decent for a first print! I'm gonna fix up the hotend taping and hopefully the next print will go better with the hotend properly primed....
Comments encouraged....
Last edited:
Looks like things are coming along. Make sure your esteps are properly calibrated. I would mark a spot on the feed with tape, measure the distance with calipers, extrude a certain length (like 50 mm), measure the distance traveled and correct accordingly.
Are you using any retraction in your slic3r settings? Looks like you could benefit from some.
Also, adding a rim around prints is a good way to make sure that the extruder is primed properly.
Are you using any retraction in your slic3r settings? Looks like you could benefit from some.
Also, adding a rim around prints is a good way to make sure that the extruder is primed properly.
Last edited:
RalphTrimble
TVWBB Diamond Member
OK, thanks, did that, it was perfect actually. I think the cube was a bit ugly because the hotend wasn't primed with plastic so the bottom layers didn't print, and the kapton tap was slipping off and rubbing the object as it printed. I am going to try another print and see how it goes, do I dare try a HM case? Hmmm.....
EDIT: I'm pretty sure I just printed some ramen noodles! LOL
EDIT: I'm pretty sure I just printed some ramen noodles! LOL
Last edited:
RalphTrimble
TVWBB Diamond Member
I've got the latest HM case open in 123D (beta), but it wont let me print to STL file, I'm guessing this is a limitation to the beta? Do you have STL files for the case available, or could possibly help me get the file converted myself?
EDIT: Just figured out you need to sign into AutoDesk account and THEN you can print to STL file....
EDIT: Just figured out you need to sign into AutoDesk account and THEN you can print to STL file....
Last edited:
RalphTrimble
TVWBB Diamond Member
well, damn, wouldnt you know I started with the top, it just started to do the first infills.... I think I'll let it go a little since it's my first real print, then Ill switch over to the bottom.... I'm pretty happy so far with how the hairspray seems to be working to stick the plastic to the glass......
RalphTrimble
TVWBB Diamond Member
I have to repost the case file. You can start with the bottom but there were a couple issues with the previously posted top that I had to fix. Will do that tonight when I get home.
Are you talking about the square case or the one with the round ears on the corners?
RalphTrimble
TVWBB Diamond Member
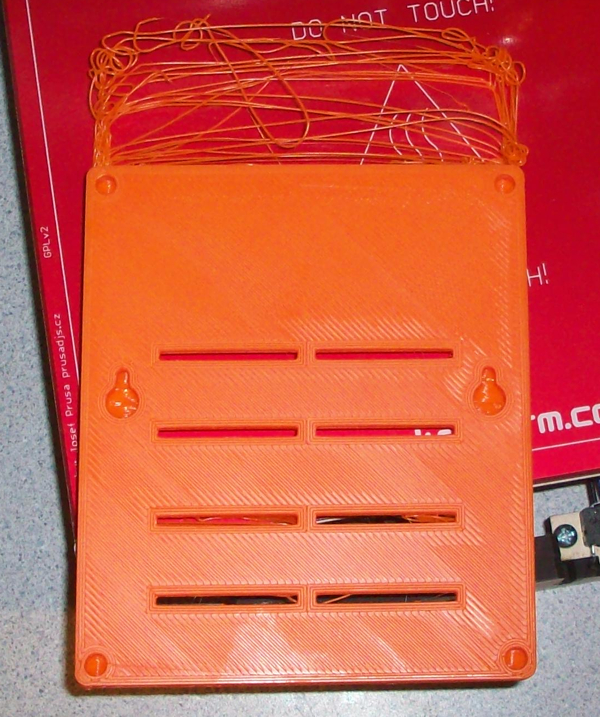
After a day of fiddling around with my assembled and working i3 I finally have a print going that looks like its gonna be a winner! I'm printing the back side of the larger square case now, on layer 7 and it's looking real good! I really like the 3D G-code view during the build, very cool! It looks like I have 1 more layer of base and then it will start building the side walls and soon enough I will have the first successful 3D print!
I'm wondering what was wrong with the top half of this design, and/or did you get the updated file posted?
Thanks a bunch to everyone who worked on the HM and the 3D case design, and helped me muddle through building this 3D printer....
I'm wondering what was wrong with the top half of this design, and/or did you get the updated file posted?
Thanks a bunch to everyone who worked on the HM and the 3D case design, and helped me muddle through building this 3D printer....
I've been away for a bit. Key west was great - if anyone is going and needs a reccommendation I can point you in yhe right direction. But back to business. Pictures! We love pics and videos of these things doing their thing.
How correct is your case dimensionaly? How accurate were you able to calibrate your x and y?
Also, the latest issue of the reprap magazine is out! Its pretty good. I'd give a link but i'm stuck on mu phone in FLL waiting on a delayed flight. Sorry for the typos.

How correct is your case dimensionaly? How accurate were you able to calibrate your x and y?
Also, the latest issue of the reprap magazine is out! Its pretty good. I'd give a link but i'm stuck on mu phone in FLL waiting on a delayed flight. Sorry for the typos.
After a day of fiddling around with my assembled and working i3 I finally have a print going that looks like its gonna be a winner! I'm printing the back side of the larger square case now, on layer 7 and it's looking real good! I really like the 3D G-code view during the build, very cool! It looks like I have 1 more layer of base and then it will start building the side walls and soon enough I will have the first successful 3D print!
I'm wondering what was wrong with the top half of this design, and/or did you get the updated file posted?
Thanks a bunch to everyone who worked on the HM and the 3D case design, and helped me muddle through building this 3D printer....
Here is my latest version:
https://docs.google.com/file/d/0B1qMo4bilbhhc1hHbXV3VWhRcEE/edit?usp=sharing
I will put it up on the frontpage of the case thread as well. I had to fix some issues with the nut traps. I have printed this case several times and it works. Though, after assembling this case a number of times, I have decided to make another version that maintains the square shape but goes back to the previous idea of top fed screws with nut traps placed underneath the case. The current nut traps are very finicky to assemble and allow the case to shift laterally with a little force. I'll print one of the new ones tonight and will post the pic tomorrow.
Welcome back Matt, hope you enjoyed your vacation.
RalphTrimble
TVWBB Diamond Member
The print of the back was looking really great but I stepped out of the room for the first time in a couple hours and when I came back the print had skipped on the y-axis. The motor had moved but I am pretty sure the bed hit the Y-end stop again and caused it. The print WAS looking real good up until that point, it wasnt many layers from being done... damn!
I had managed to get the bed level and printing nice and even too, but zero clearance situation on the bed at the y-idler is unacceptable. I'm gonna pull the bed off and figure out another way to mount he bed so I get at least a mm or 2 clearance there. I dont want to shave the end stop cause the smooth rod holes are pretty close to the edge.
I was hoping I had it nailed, but....

PS How long does it take you guys to print a back side?
I had managed to get the bed level and printing nice and even too, but zero clearance situation on the bed at the y-idler is unacceptable. I'm gonna pull the bed off and figure out another way to mount he bed so I get at least a mm or 2 clearance there. I dont want to shave the end stop cause the smooth rod holes are pretty close to the edge.
I was hoping I had it nailed, but....
PS How long does it take you guys to print a back side?