You are using an out of date browser. It may not display this or other websites correctly.
You should upgrade or use an alternative browser.
You should upgrade or use an alternative browser.
General 3D Printing Thread
- Thread starter Bryan Mayland
- Start date
Glad to hear it man! I just took out my aluminum bed tonight and went back to the PCB+Glass. Golly, I forgot how nice my printer does on a fairly even bed, even with the minor dimples. That China-cheap MK3 ALU bed was just so awful. While I was swapping it back in I replaced the 18 gauge wire with some 16 gauge I had sitting around just for good measure.
I just completed moding my RAMPS board and i'm very happy. Thanks for the suggestion. I'm sorry to hear the aluminum bed was a disapointment. It saved me some money thou. I have almost ordered that bed a few times. So thanks again. I switched my Z stop to a Hall-o sensor. I think that is my favorite upgrade so far.
Bryan Mayland
TVWBB Hall of Fame
I have Windows 8.1 and a 3D printer, but I don't know where to look to do it. I mean in my mind the way it should work would be I'd be in OpenSCAD and hit Ctrl+P and it would print but we all know that doesn't work.Have any of you guys tried the windows 8.1 printer support yet? Is it even possible? Quick browsing seems to indicate the newest marlin firmware supports it.
Bryan, what is your current list of printer upgrades to the makerfarm kit now?
- Springs for bed leveling springs on longer screws with nylon lock nuts
- Optical Z endstop photo
- Servo Z endstop not done yet
- Removed power diode to allow powering from ATX +5Vsb, ATX power on/off control
- 5V servo power
- 5V 2A nichrome wire under the heatbed to stabilize 12V line (and add 10W of heat)
- HeatBed MOSFET replaced with lower Rds(on) version
- HeatBed polyfuse replaced with standard 15A automotive fuse
- HeatBed #18 wiring replaced with #16
- Cork insulation under HeatBed
- LED on HeatBed
- 12V dome lights
- Linear bearings on Y carriage replaced with pillow block bushings (and new Y endstop trigger)
- RaspberryPi wired into serial and SPI bus running OctoPrint
Last edited:
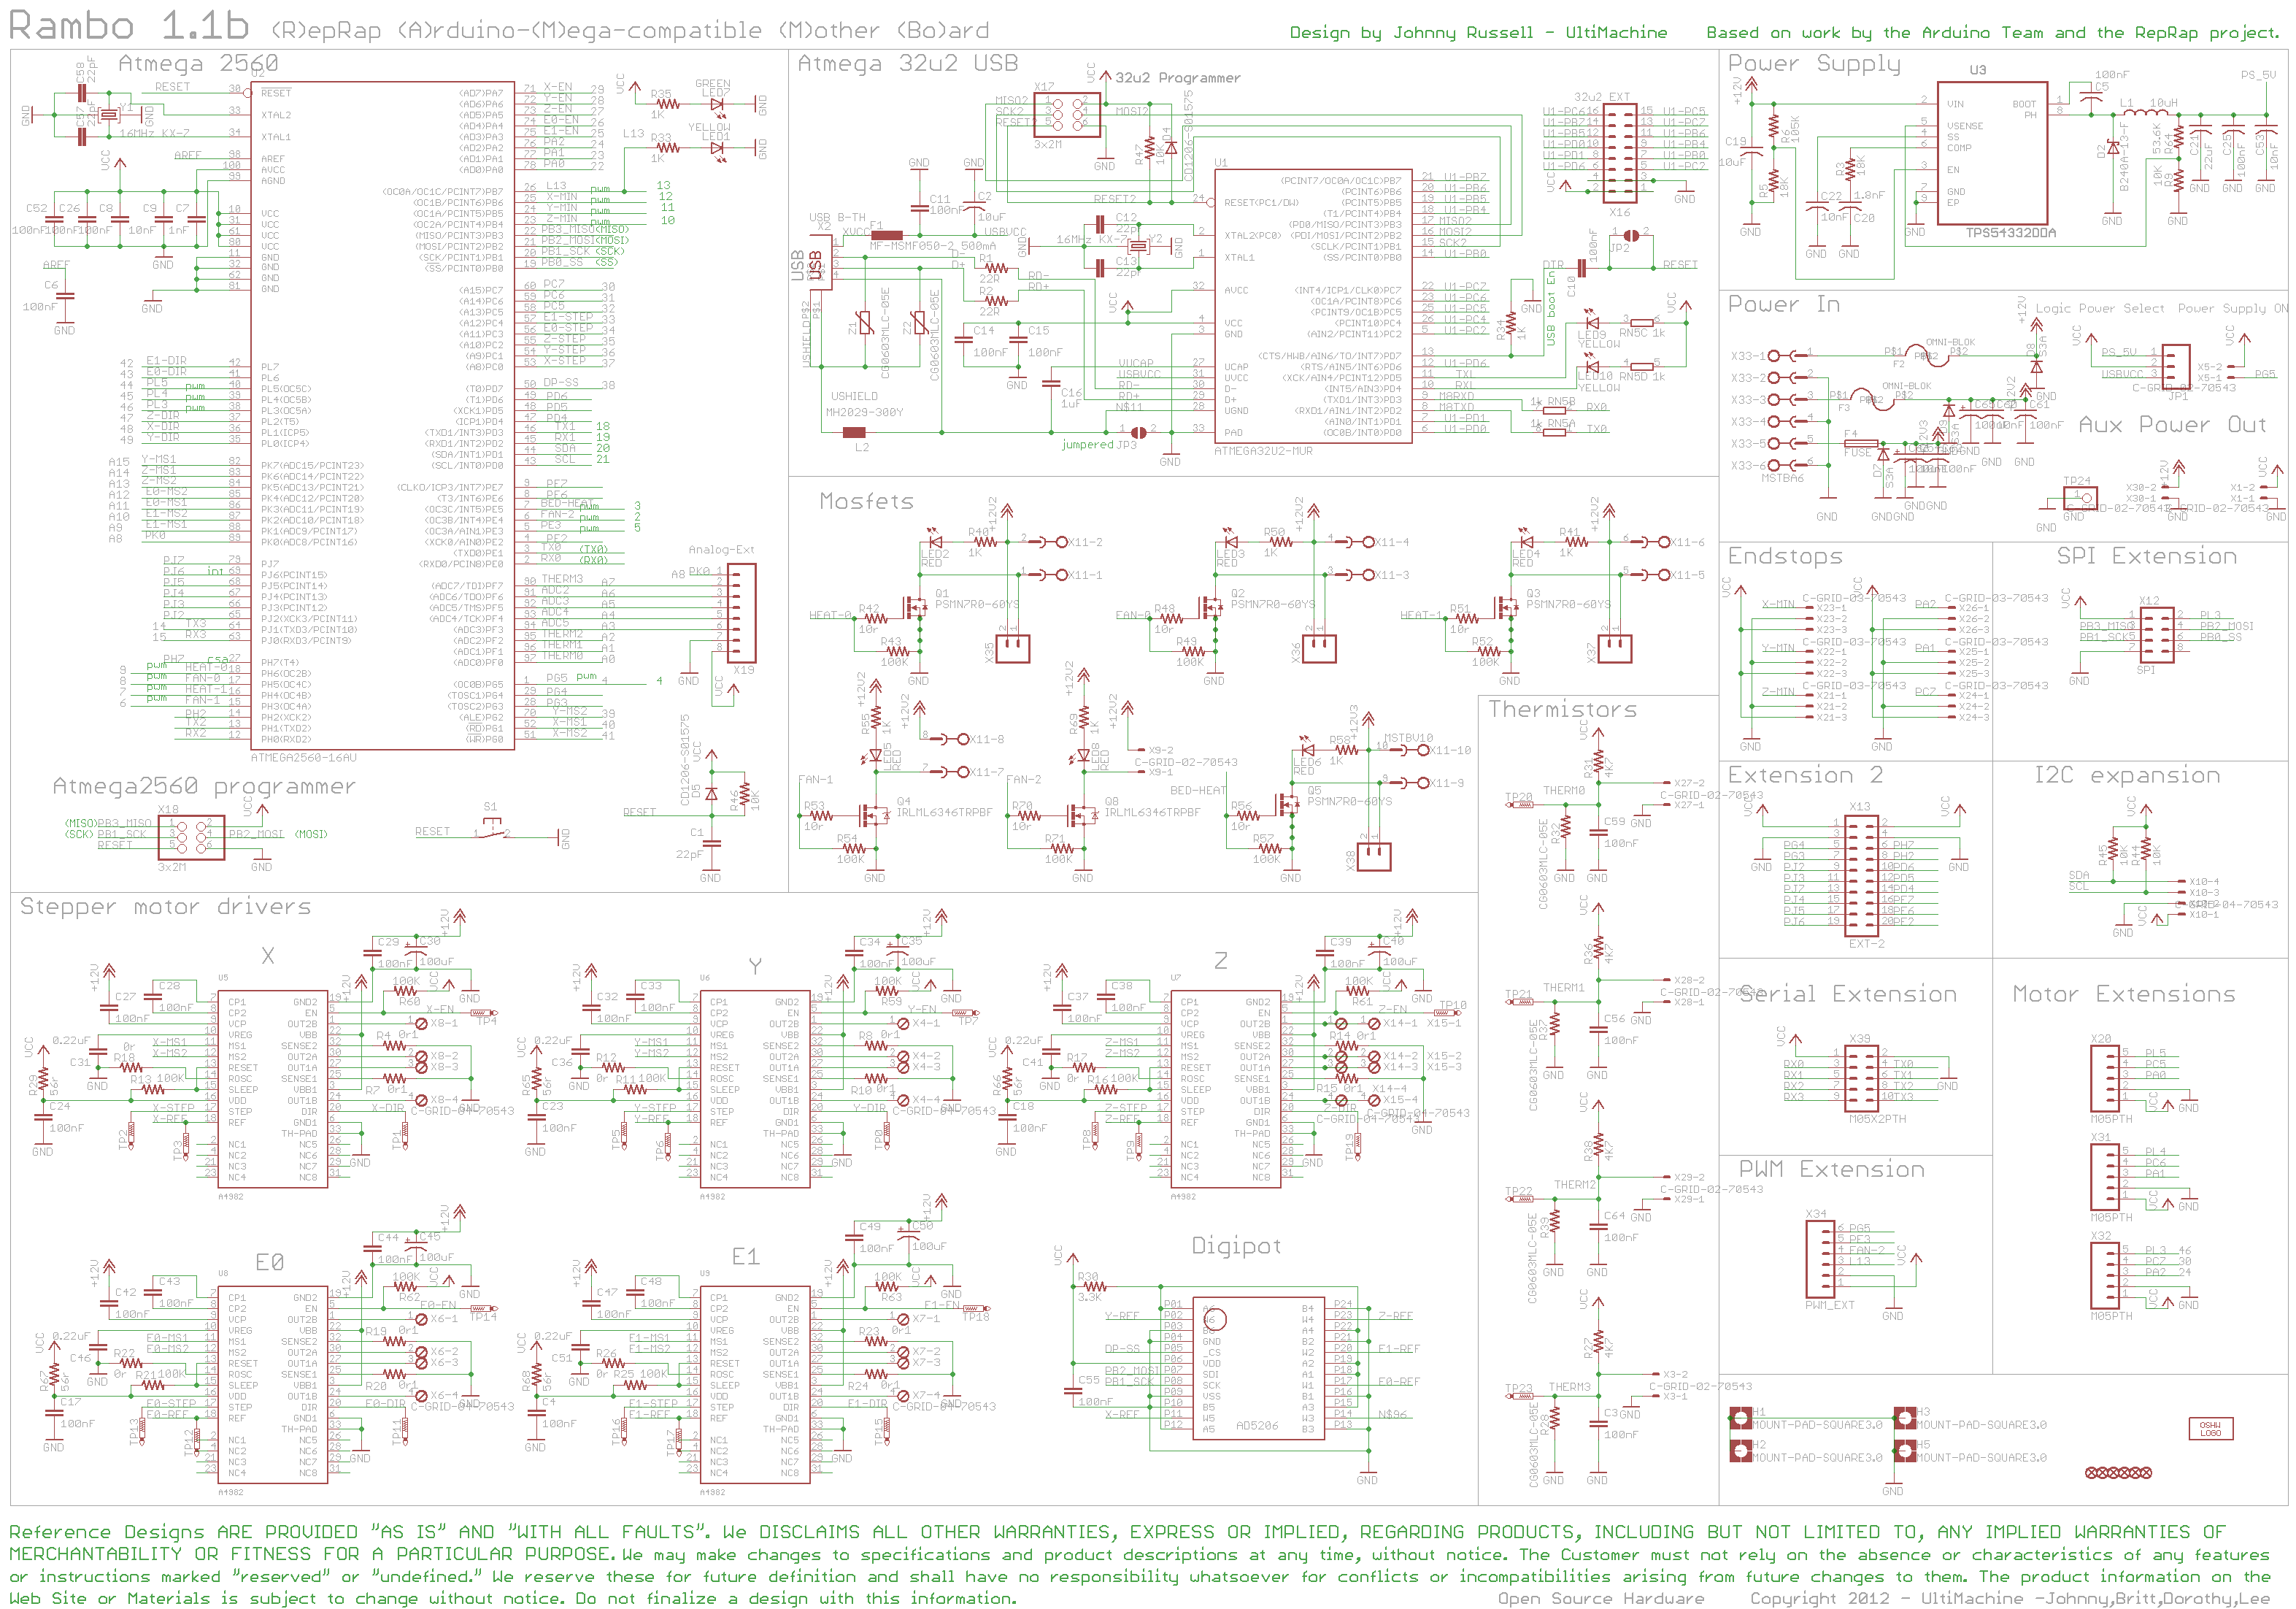
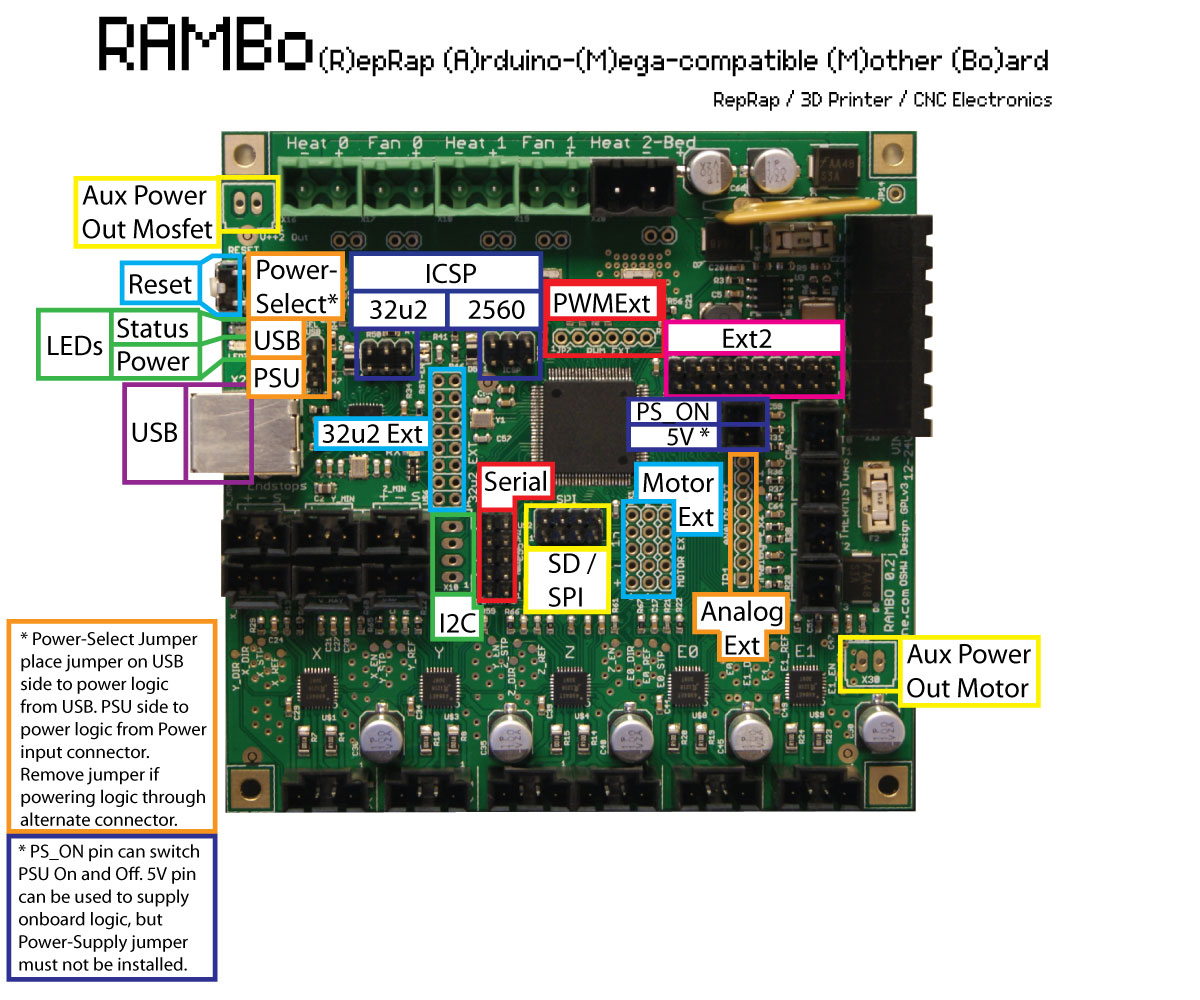
The bed-leveling features in the latest Marlin are sweet. I just have to figure out where on the RAMBO board I can attach a servo. There is a small section with empty pins labeled "motor ext". I'll have to see if I can use those...
Bryan, have you looked into all metal hotends yet? I know Matt has been experimenting for some time with Josef Prussa's and I recently took the plunge with the E3D model. I could not be any happier with the performance thus far with ABS and PLA so now I'm going to move onto some new higher temp materials.
Bryan, have you looked into all metal hotends yet? I know Matt has been experimenting for some time with Josef Prussa's and I recently took the plunge with the E3D model. I could not be any happier with the performance thus far with ABS and PLA so now I'm going to move onto some new higher temp materials.
Bryan Mayland
TVWBB Hall of Fame
Wow that's gotta be the first thing I've seen the RAMBO is lacking. Everything else about that board is a giant leap forward in design and extensibility. A quick check of the Marlin source says no servo support for that "motherboard".
I haven't looked at switching my hotend yet. I'm really pleased with the results I get from this standard J-Head model. I haven't had it block up or anything and it heats fast, doesn't require a cooling fan... what are the advantages of the all metal hotends? Other than like printing nylon and other materials. I would love to be able to reduce the amount of ooze I get while the head is traveling but something tells me that's more slicer settings than the composition of the head itself.
I haven't looked at switching my hotend yet. I'm really pleased with the results I get from this standard J-Head model. I haven't had it block up or anything and it heats fast, doesn't require a cooling fan... what are the advantages of the all metal hotends? Other than like printing nylon and other materials. I would love to be able to reduce the amount of ooze I get while the head is traveling but something tells me that's more slicer settings than the composition of the head itself.
The main advantage is using higher temp materials like Nylon but I have noticed performance upgrades with standard ABS and PLA too due to the extremely short melt zone. This also has an effect on reducing oozing because oozing is mostly a result of pressure build up in the nozzle which is increased as a function of melt zone thickness and heat creep up the hotend causing filament expansion and friction with the inner walls. The PTFE parts of most hotends don't conduct heat very well, but they also don't lose heat very well so when they get hot it's a problem. I was having issues because I would print for many hours in a heated chamber and I could not efficiently cool down my PTFE based hotend without significantly affecting the temperature at the melt zone. This would cause filament jams at times and really started to annoy me. Since switching to the metal hotend with a fan blowing over the heatsinked part, I can get the melt zone as high as 300C (that's as high as I've taken it) and can still touch the metal connecting tube and feeling just the warmth of the ambient temp. I can print pretty much indefinitely with no jams now. I have also qualitatively improved the hot end pressure too because I have been able to significantly decrease the current to my hotend stepper motor since upgrading without any missed steps. This reduces the stepper motor temp and makes things a bit happier. This becomes important in a heated chamber where you are walking a fine line between things running smoothly or jamming constantly.
Last edited:
RalphTrimble
TVWBB Diamond Member
I've been pretty happy with the standard J-head so far, except for the ooze, which I figured was perhaps an area where I may need to tweak the firmware or slic3r settings a bit..... perhaps it's just inevitable... I did have a partial clog once, which was frustrating. The filiament would make an immediate right turn when it left the hotend and curl all over the place, it was hard to believe it could turn like that on its own. I took the hotend apart and cleaned it up with a Q-Tip and acetone (while heated up a bit) and it's been printing really nice ever since, better than it did when it was new which kinda makes me wonder if there was some gunk stuck in there when I got it. I'm getting better prints right now than I ever have, the hotend is flowing nicely and the bed is nice and level....
I never did upgrade my Z endstop, I had the screw/switch endstop working nicely so I didn't see a need, but today the head dropped down below where it should sit the first time I homed it... not sure what failed, it's much colder today so perhaps something was just stiff or tight from the cold. I manually moved the z-axis a bit and hit homed out just fine after that. So I am thinking perhaps I should make the mods to the Z-endstop at this point now that I have had an issue. What parts are you guys using again? (I know it's prob. in the thread somewhere, but its 35 pages long now...)
I've given the auto bed leveling system a bit of thought and I am not sure I want to go with that or not. I'm not sure I like the idea of the Z-axis going up and down during the print of each layer. I would prefer to use the servo+switch as an aid to level the bed, and checkup on the bed position, and keep the head from moving up and down during the print by printing on a level bed in the first place.

Bryan Mayland
TVWBB Hall of Fame
Does it need to be a PWM pin? Servo pwm isn't like Arduino pwm, so the pulses are actually done in software rather than using hardware pwm. Not that it matters if you have plenty of pins.
Has anyone ever tried printing on Garolite LE instead of glass + tape/hairspray? Also known as Whale (brand) TUFLITE. I've seen some discussion about getting nylon to stick and some folks recommended using Tuflite. It looks to be like the material PCBs are made from, a fiberglass paper or cloth laminate. McMaster Carr carries it in all sorts of grades thicknesses and sizes.
Has anyone ever tried printing on Garolite LE instead of glass + tape/hairspray? Also known as Whale (brand) TUFLITE. I've seen some discussion about getting nylon to stick and some folks recommended using Tuflite. It looks to be like the material PCBs are made from, a fiberglass paper or cloth laminate. McMaster Carr carries it in all sorts of grades thicknesses and sizes.
I don't know for certain, but the RAMPS1.4 pins that are attached to servos are all PWM pins (D4, D5, D6, D11).
Better to be safe than sorry.
What thickness did you order Tom? There was some discussion a while back about garolite being very warped. I think that was pretty thick stuff though.
Better to be safe than sorry.
What thickness did you order Tom? There was some discussion a while back about garolite being very warped. I think that was pretty thick stuff though.
Bryan Mayland
TVWBB Hall of Fame


New servo Z endstops up and running. Works like a champ with the latest Marlin code from github. My bed is reasonably level but for some reason I had been having to cancel and restart my first print of the day and adjusting the Z offset a couple times to get it just right. Hopefully now this will alleviate that. One thing I don't like is that I can't seem to get Z offsets to work. It is like when it runs the autolevel it uses the compiled in Z height and throws out your offset. That means if my Z is off, I have to recompile the firmware.
With the shortened arm I get a lot better accuracy, on the order of 0.03mm or so. I also threw out my plan to have the switch parallel to the Y axis because the holder would flex while pressing down and I didn't want any of that causing error.
Last edited:
Bryan Mayland
TVWBB Hall of Fame
My camera takes great pictures but because it was created around 10 years ago, the video quality is really garbage. Up to 640x480 MJPEG with digital only zoom!
Bryan Mayland
TVWBB Hall of Fame
I didn't spray it and I didn't let it heat up all the way either. The cube I was printing itself looked to be at just the right height but part of it was also not quite adhered either. I need to change my start gcode to extrude a little and then somehow wipe the tip because that ooze that comes out while the nozzle heats up sometimes can cause havoc as well. For the record my bed in this example was 0.20mm lower on one side than the other, 0,30mm layer height.