Good day everyone!
Time for my final update on this project. I put some serious time into wrapping things up over the last several days. Once the paint process is complete and everything is dry, it's hard to not want to get everything back together as quickly as possible to admire your work and get a good look at the finished product.
I'll pick up where I left off with the painting process. I like to use Krylon High Heat Max paint since I've had good experiences with it before. But it is getting expensive at $10 a can. I used 4 cans in total, probably doing 3-4 coats on all the different parts... Although the high heat paint is pricey it's a small amount to spend for peace of mind that it will be durable and hold up for many many years. Maybe next time I'll just use the high heat on the firebox, but I think at most I'd save $20 or so to go with something else for the frame and other parts.
It was definitely a challenge to paint in the fall. I'm in Cincinnati and the fall weather can be hit or miss in terms of temperature. It was right at 60 degrees when I painted everything, but I had to wait until the late afternoon when the sun had a chance to heat everything up. The metal gets cold at night sitting in my garage. Leaving it out to sit in the sun was my only option. I think I'll invest in a small propane space heater to speed up the process in the future. At least I don't have to worry about sweat droplets ruining the fresh paint this time of year.. just have to be mindful of the wind and the leaves coming down off the trees.
View attachment 121553
View attachment 121554
After the paint was dry, I like to coat the internal channels of the box frame with fluid film. It's nearly impossible to get all the rust from the interior, and there is plenty, but Fluid Film converts the rust and will add protection for years to come against further corrosion. It's also helpful having the small holes in the frame throughout so you can shove the wand down in there and coat the interior really well.
View attachment 121556View attachment 121557
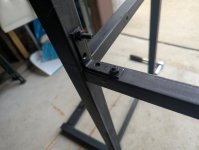
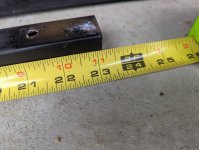
Next up was installing the threaded inserts for the new tube that I had to buy from Lowe's since the other was rusted out. Thanks to the guys who suggested those and posted the link. They worked great.
View attachment 121558
View attachment 121559
I also like to take the extra time to grease hardware to avoid those annoying metal on metal sounds when using the grill...
View attachment 121560
After Fluid Film and Grease, it's time to start the reassembly process. First thing that goes on are the wheels so I don't have to lift the frame up anymore whenever I want to move it. The casters were both in good shape so I was able to re-use those.
View attachment 121561
I left it as a rolling chassis for a few days and finished everything up yesterday. The rest of the grill goes together pretty quickly and as I said before it's hard to not finish it once you get the fire box mounted back.
I also like to always install new hardware to mount the firebox to the frame. That bolt used there always seems to be too rusted to want to re-use, and replacement hardware costs almost nothing. The trick is to buy several pieces of hardware when you're at the store so you don't have to spend 30 mins finding it the next time you do a rehab project.
View attachment 121562
I also ran into a snag when I noticed that the manifold was missing the support bracket or wire hangers like I've seen in the past. This manifold was rounded, so I think it might have had the flatter "S" bracket at some point, but was missing now. Thankfully I'm a parts hoarded and was able to steal a wire hanger from a rusted out manifold that I had. I bended it to remove it from the old manifold and then bended it into a new-ish shape to get it to work for this project. Zip ties could have worked too, but I like to use original parts whenever possible.
View attachment 121563
Installing the new flavorizer bars and grates is easy and quite satisfying - signaling the end of the project is near.
View attachment 121564
View attachment 121565
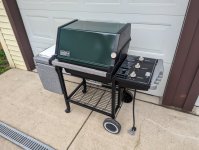
And here it is in finished form!
This is going to be a surprise for my Uncle and will be delivered to him on Saturday.
I think he is going to be quite pleased! I think it turned out great and this will certainly last him for a lifetime. I tried to go the extra mile at every turn since it's going to someone in the family.
View attachment 121566
View attachment 121567
View attachment 121568
View attachment 121569
All things considered, it wasn't the cheapest project. I'll put a breakdown of the expenses below.
The biggest opportunity for savings in the future would be to not spend so much on the original grill, especially when I will be replacing everything anyways. BUT I really love the forest green lids and think it's worth it to spend a premium to get a color you like. I know my Uncle would prefer green over black which is definitely the most common lid color I come across.
Here is the cost breakdown:
-Original grill (FB marketplace) - $100
-New 1" squre tube to replace rusted out piece - $22
-Threaded inserts for new tube - $7
-4 cans of Krylon High Heat Max paint - $44
-Igniter - $11
-Plastic hole fillers for the frame (not required, but I like to use them for protection) - $11
-Cast Iron Grates - $44
-Burners + Flavorizer Bars - $53
-Warming Rack - $22
-Drip Pan + Holder - $20
-Tank Cover - $14
-Propane tank - Free on neighborhood FB page, still had some propane left too!
-Cover - $25
Total: $373 (+ ~12 hours of labor of my own time)
Not bad for a grill that should last for a lifetime... Now it's time to get cooking on it! Just in time for Summer
")
Finally a bonus picture of my own grill with the new finished project. Love the color combo here. I finished mine during Covid roughly 5 years ago and still holding up great.
View attachment 121570
Let me know if I can answer any questions and thanks for reading everyone
")
-Tyler