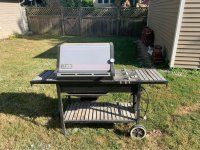
Drip Pan Rail Screws


Jeremy Burns

New member
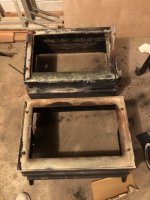
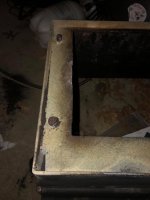
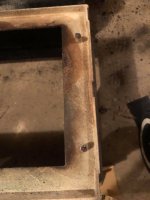
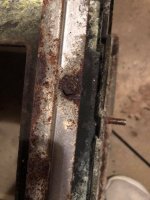
I did some searching but I could not find a solution. Unfortunately, The previous owner ran into the same problem and decided to drill the drip pan directly to the cookbook. How should I tackle removing these screws? Is this possible or should I find an alternative solution? This grill is 4 years older than me so any advice is greatly appreciated.5571F21E-C81E-4D63-8C18-A999783929A0.jpeg
 
I did some searching but I could not find a solution. Unfortunately, The previous owner ran into the same problem and decided to drill the drip pan directly to the cookbook. How should I tackle removing these screws? Is this possible or should I find an alternative solution? This grill is 4 years older than me so any advice is greatly appreciated.View attachment 15655
Hi Jeremy, Your firebox has some heavy oxidation. Give the firebox a good inspection first to make sure it's worth saving.

If you are moving forward gently heat the area with a torch and try a vice grips on the old screw. PB Blaster is good too.

In your case drilling through the firebox and using a nut and bolt might be the only practical option on that firebox
 
If the screw heads are still intact, a light to medium duty impact driver works wonders. Just take it slow and let the impact action do its job. Beyond that, you are looking at several applications of penetrating oil and possibly some applied heat. Beyond that, you are looking at drilling them out which is very tough with those small screws.
But the impact gets about 90% of the ones I remove.
 
Patience is a Virtue! I applied PB Blaster to mine twice a day for a week, wiggling it each time to see if it was loose, and it finally let go. Be Gentle! Good luck.
 
Update:

No luck getting these screws off either of my cook boxes. I am trying to decide whether to try and pick up another grill for the cook box or to drill them out and add some bolts.
 

Attachments

  • Grill 1.jpg
    Grill 1.jpg
    138.1 KB · Views: 18
  • Grill 2.jpg
    Grill 2.jpg
    107.3 KB · Views: 18
  • Grill 3.jpg
    Grill 3.jpg
    93.7 KB · Views: 17
  • Grill 4.jpg
    Grill 4.jpg
    133.6 KB · Views: 17
I have been keeping an eye on this one for a few days. It is still available and I can probably get it for next to nothing. I saw some people say this grey version is harder to come by. I still would plan to use the red top.
 

Attachments

  • Grey.jpg
    Grey.jpg
    203.5 KB · Views: 21
Yah, red is a dime a dozen. THose gray ones are 1 in 70 probably. I own one, but it is the only one I have ever owned. Compared to probably 25 or 30 red ones.

What color of stripes are on that grill. they look different than the usual red pin stripes. If you can get that grill cheap, get it.
 
I think that grill used to have a side burner. It looks like it has that "flame check" button.
 
Did you try the impact driver?
Have I seen a video of you explaining this somewhere before?
I couldn’t find a socket that would fit the screws on box with the rails. The better condition box dont even resemble a screw anymore so I don’t see the impact working with that one.
 
Have I seen a video of you explaining this somewhere before?
I couldn’t find a socket that would fit the screws on box with the rails. The better condition box dont even resemble a screw anymore so I don’t see the impact working with that one.
Be sure and thank Mr. Bruce for this and his many other contributions!

 
https://www.amazon.com/dp/B003JQJYHM/?tag=tvwb-20

Something like this works well. Get the magnetic ones. I used some cheap ones out of the company tool box once and they weren't worth the effort it took to throw them in the trash.

My impact driver doesn't have a variable torque setting but my cordless drill does.
A cordless drill does not have an impact function. It may sound like it does but that is a ratcheting function which is a huge difference. Impact drivers have hammers inside that hit the anvil and help knock things loose. Drill/Drivers use a ratchet so as not to over tighten
 
My impact driver doesn't have a variable torque setting but my cordless drill does. I don't know how someone can argue with that, but you do.

I have an Ingersoll-Rand 1/2" drive pneumatic impact in my work box, a HF Earthquake 1/2" pneumatic at home, a 3/8" Rodac butterfly impact I bought 40 years ago from a neighbor, a 12V HF electric impact in the trunk of my car for changing tires, and a cordless Ridgid impact driver as part of an 18V set I bought a few years back. The pneumatic tools I can regulate, not so the electric tools that I have. I know how they work, I've taken them apart before (the butterfly has a tendency to stick) but thanks for the reminder.

I was talking about torque, and you inferred impact because of Bruce's video that I linked. I haven't needed to use Bruce's method, but thought someone else might find it helpful.
 
Last edited:
My impact driver doesn't have a variable torque setting but my cordless drill does. I don't know how someone can argue with that, but they do.
They're 2 different tools that do 2 different jobs. A drill is NOT an "impact" tool. It does not have an impact mechanism in it. Yes you can adjust the clutch for different settings to "slip" after a certain amount of torque. An impact wrench/tool/driver all operate on the same principle. Hammers impacting an anvil inside the gear housing. So by their nature NO they don't have a torque setting other than the common sense of the operator. An impact tool will continue to impact as long as the trigger is held regardless if it runs on electric or air. My air powered 1/2" drive one will actually rip the threads off of a lug nut if I don't stop it.
A drill/driver is a totally different animal and cannot/should not be compared to an "impact" tool. They're NOT the same and NOT even comparable
 
Larry is correct: A drill/driver is not the same as an impact driver. An impact driver can have variable speed/torque but it is determined by how far you press the trigger on all the ones I have used. The harder you press the trigger, the faster and harder it will create the impact.


Back
Top