Beginner questions


GBrown

New member
I've been researching temperature control modules for my Louisiana Grill Kamado and I stumbled upon someone recommending Heatermeter. I was fascinated by the device and highly interested in the project. After a couple hours of research, I still have some beginner questions.

Right now I'm looking to get:
Questions I have still:
  • Is there anything else I will need to complete my build?
    • Plate to attach to grill? Is it best to just get a thin piece of sheet metal and cut it to size?
    • What's this Adapt-A-Damper device? I see a lot of talk about it, but it's not listed on the soldered kit page as being either included or not included (implying I don't need one???)
  • How does the soldered kit interface with the Raspberry Pi?
  • Does this device also adjust temp based on food temp? Will getting a food probe in addition to an ambient probe be beneficial?
    • Is the term "pit probe" the same as an ambient probe?
  • I don't have any soldering experience. Does the soldered kit require any additional soldering (such as soldering on the blower)?
  • Is there an expected time frame on when other case colors will become available? I think I like the grey best, so not a huge issue. More just wondering.
  • What about LCD colors? I saw more examples in the Wiki, but it looks like only black on white is the current offering.
Thanks for your time in helping me out.
 
Looks like a pretty complete list for starters. You actually need the "WH" version of the Pi zero or you need.to buy the header and solder it yourself. The Pi mounts to the heatermeter board using header. Many people also use servo operated dampers, like the adapt-a-damper in the sticky, but it is not essential.
 
as you suggested, you will need to fashion something out of sheet metal to attach the blower to your smoker. I would suggest you buy a roll of aluminum flashing (comes in rolls 6" wide) since it's easier to work with than thin steel/galvanized steel.

the blower connects to the HeaterMeter with a phone cord or ethernet cord. the fan is controlled by the center 2 wires in either the phone cord or ethernet cord. you don't necessarily need to solder the phone or ethernet cord to the blower motor leads. you can twist them together and secure them with black electrical tape. after you twist the wires but before you secure them, make sure you have the polarity correct. if it's correct the fan will run when you turn on the HeaterMeter; if you have the wrong polarity the fan won't run.
 
Looks like a pretty complete list for starters. You actually need the "WH" version of the Pi zero or you need.to buy the header and solder it yourself. The Pi mounts to the heatermeter board using header. Many people also use servo operated dampers, like the adapt-a-damper in the sticky, but it is not essential.
Thanks! That's very helpful. I see the difference now with the Pi WH coming with headers. Does it just plug into the HM where I've marked in the image below? It looks like there are more pins on the header, so I assume they are not all used??? What is the advantage of a damper? More fine-tuned air control...and thus finer temp control? Does that amount to less temp variances?

1595281077618.png

as you suggested, you will need to fashion something out of sheet metal to attach the blower to your smoker. I would suggest you buy a roll of aluminum flashing (comes in rolls 6" wide) since it's easier to work with than thin steel/galvanized steel.

the blower connects to the HeaterMeter with a phone cord or ethernet cord. the fan is controlled by the center 2 wires in either the phone cord or ethernet cord. you don't necessarily need to solder the phone or ethernet cord to the blower motor leads. you can twist them together and secure them with black electrical tape. after you twist the wires but before you secure them, make sure you have the polarity correct. if it's correct the fan will run when you turn on the HeaterMeter; if you have the wrong polarity the fan won't run.
Sounds easy enough! Thanks! The HM board itself looks like it has a phone/ethernet port already mounted. I didn't see that before. It looks like I'll need to source my own cable as well, even though it's not in the "not included" items list.
 
Ok if you have the pi zero w you will have to solder a header to it but the pi zero wh has the header already on it and everything will just plug in. Now on your heater meter you have the thermal-couple version and will need a thermal couple for the grate temp. Here is a web site that has a lot of info:
https://github.com/CapnBry/HeaterMeter/wiki Bryan also has some videos on assembly and software installation that makes it easier to assembly and get working. Here is the video
I'm not computor savy so hope these works
 
Forgot to answer another of your questions The heater meter is used to control the temp of the Kamado not the food. If your smoking ribs (yummy) you would set the heater meter for a grate temp of say 225, the HM would either blow more air in to up the temp if it starts to fall, and stop blowing if the temp climbs to maintain 225. The damper feature will try to control the temp by opening and closing a damper similar to you moving the vents manually. The HM will give you the option to monitor up to 3 hunks of meat, and will send a alarm when meat gets close to temp you want.It will also send alarms for high and low grate temp. I wouldn't worry about the lcd color you'll spend most of your time adjusting it on line.
 
Forgot to answer another of your questions The heater meter is used to control the temp of the Kamado not the food. If your smoking ribs (yummy) you would set the heater meter for a grate temp of say 225, the HM would either blow more air in to up the temp if it starts to fall, and stop blowing if the temp climbs to maintain 225. The damper feature will try to control the temp by opening and closing a damper similar to you moving the vents manually. The HM will give you the option to monitor up to 3 hunks of meat, and will send a alarm when meat gets close to temp you want.It will also send alarms for high and low grate temp. I wouldn't worry about the lcd color you'll spend most of your time adjusting it on line.
Thanks for the info. That video was helpful. So the meat probes are just to get info of when your meat is done or needs to be flipped. That makes sense. Is a thermocouple "pit" probe required for temp control? Or can a thermistor probe be used for that as well? I.E. can you point the device to a certain probe port for the temp control?
 
A pit probe is required for temperature control, but it doesn't have to be the thermocouple. HeaterMeter will use the first non-disabled probe as the control probe, so if you want to control it with the first thermistor food probe then you can just disable the thermocouple in the webui and it will run on Food1. If you have no intention of ever using a thermocouple, I can solder the 4.3 with 4x thermistors and refund the price difference of ~$15. Just make a note of that if you order.

I only keep one LCD color in stock and it has been the black on white now for a couple of years. The color gallery is mostly for people who want to buy their own parts from Mouser and are looking for a custom look. I cycled through those different colors just to get an idea of what was available and what looked the best in outdoor conditions. The black on yellow-green (the standard color you think of when you think of an LCD) was a close second just for being a little cheaper, but the white backlight version is LED so it pulls less power and therefore the backlight dimming should theoretically create less noise in the measurement system.

The case color selection is a little limited now due to a run on 3D printer filament being hard to come by. When people went into quarantine they started printing face shields and other virus-related trinkets, and I think also spent more time 3D printing fun stuff while they were in isolation. It became really hard to find filament at all. It is starting to come back but I still can't get some of the colors and I am looking at alternatives in new colors and new manufacturers.

I'm not sure we've covered all your question but let me know if I missed any from your original post.
Thanks Bryan. Great info from everyone here. I think I'd still opt for a thermocouple port for future flexibility and just disable it in the webui. If I need more than three food probes at any time, I can pull out my Weber Connect.

The color options availability makes sense. Was more of a curiosity than a request.
 
Hey @Bryan Mayland

I got my cart built and I'm curious what the best method to pay is to where you gain the most profit. I.E. which service takes the least cut of the order? Image of my cart below just in case I'm missing something glaring, someone can give it a once over. Figured I go ahead with the Adapt-A-Damper. If anything, it will be a nice talking point while grilling. :D

I'll be sourcing the probes, ethernet cable, Micro SD Card, and Pi Zero WH from elsewhere.

1595352321732.png
 
I got my cart built and I'm curious what the best method to pay is to where you gain the most profit. I.E. which service takes the least cut of the order? Image of my cart below just in case I'm missing something glaring, someone can give it a once over. Figured I go ahead with the Adapt-A-Damper. If anything, it will be a nice talking point while grilling. :D
Oh that is awesome of you to ask! Paypal, ShopPay, and the regular checkout process (also shopify) charge identical fees currently so it comes down to whichever is more convenient for you. I think google pay is on the list as well but I'm not sure it even works because I've never seen an order come through with it.... or now I am wondering if that money goes somewhere else and I've got a giant treasure chest of money somewhere I've never collected?
 
Gbrown keep us up dated on your progress Take a little fiddling to get your settings right this site will help you with that. Byran if you find that treasure chest you can retire
 
Gbrown keep us up dated on your progress Take a little fiddling to get your settings right this site will help you with that. Byran if you find that treasure chest you can retire
Oh yea, I plan to be back for the software side of things. Haha! Got my Pi in today. probes tomorrow, and HM should be here Monday.
 
Okay, got it all put together! I have a few questions remaining as far as hardware goes:

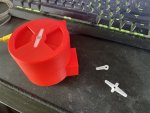
  • The Adapt-a-Damper came with three white pieces, and it was obvious to only use one of them. Is there a secret to the other two, or are they not used in a "standard" setup and for other alternative setups? (see pic below)
  • Is the Adapt-a-Damper suppose to lock or latch together in some fashion? Or does it just all slide together? As I have it right now, what I believe are the "top case" and the "bottom case box" just slide on and are free to slide off. Is this intended? Or is there a method to securing them in place that I'm not catching?
IMG_5687.jpg

As far as functionality, all seems to be working well. I have the software up and running, connected to Wi-Fi with the damper and fan controlled. Still need to make my attachment to the kamado, which I still need the parts for. Then I can start doing some proper temp testing.

Thanks!
 
Last edited:
The other two white servo "Horns" are just extras. They always come in a servo package to give you options. They are not needed.
The two halves indeed just press fit together. If printed correctly, they should be fairly tight.
 
The other two white servo "Horns" are just extras. They always come in a servo package to give you options. They are not needed.
The two halves indeed just press fit together. If printed correctly, they should be fairly tight.
Thanks for confirming. I have no fear that it will slide off unless pulled off. So it is tight enough. I ordered it from the HM store, so I'm confident it was printed correctly.

I wonder if the design could be changed to where the box the threaded adapter attaches to could be split between the top and bottom case, and then the adapter sort of locks them together because it would be sliding over both halves. I have no experience in 3D printing, so I'm not sure if that's possible. Probably already been thought of.
 
I wonder if the design could be changed to where the box the threaded adapter attaches to could be split between the top and bottom case, and then the adapter sort of locks them together because it would be sliding over both halves. I have no experience in 3D printing, so I'm not sure if that's possible. Probably already been thought of.

That's a great idea for this design. This is the main reason, however, that I created a version where the top and bottom thread together. This is for the MG90S servo version, and still need to update the SG90 version as such.
 
GBrown when adjusting the damper servo you want to listen to the servo if you try to over drive (rotate) it you can burn it out. Listen to it if you hear a buzzing sound you have to change your settings. This might take a few tries to get it right. I use an rd3 that snaps together and is pretty tight going together and stays together ok . Good luck with hooking up to the Kamado it takes a little head scratching but not hard . Keep us posted. Maybe that could be a good topic " Rube Goldberg Kamado Attatchments" pics
 
GBrown when adjusting the damper servo you want to listen to the servo if you try to over drive (rotate) it you can burn it out. Listen to it if you hear a buzzing sound you have to change your settings. This might take a few tries to get it right. I use an rd3 that snaps together and is pretty tight going together and stays together ok . Good luck with hooking up to the Kamado it takes a little head scratching but not hard . Keep us posted. Maybe that could be a good topic " Rube Goldberg Kamado Attatchments" pics
I made sure to have it at 0% or 100% when setting the damper. Here is some of the testing of the damper (and fan) I did.


(video is poor quality on purpose.)


Back
Top