A Tale of Two Silver B's: Chapter Two - "The Block Party Grill"


Val Deale

TVWBB Fan
So after I finished Jim's Silver B, I used the money he paid me to simply buy a fully restored Genesis 1000 Redhead renovated by Michael Johnston who lives about 2 and a half hours from me in PA. A few months earlier my dream grill was the Silver B I bought for $35. But as I learned more, I wanted a deep box and loved how the early Weber Redheads looked with the retractable wood tables. Here are a couple of photos of Michael's work before we move on to the Silver B.

IMG_20250723_202337.jpg

20250720_175638.jpg
So onto to Silver B - Every year on the Sunday before Labor Day we have a neighborhood block party. This year was the 22nd year of the event. Ground zero is my front yard where we have a couple of kegs, a band and of course grills for barbecuing!

I thought I would take my $35 B, restore it for the party and roll it on out for the big event.

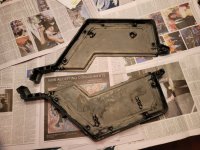
This Silver B was not in as good shape as Jim's grill in Chapter One. It had a badly frozen cookbox bolt, some frame rust and lots of deep baked on crud in the cookbox and endcaps. Here are some before shots.

20250713_152041.jpg

20250713_155725.jpg

20250719_162102.jpg

20250713_162350.jpg

I decided to try and take out the frozen cookbox bolt first. I used the punch technique over and over with large hammers and different punches and it just wouldn't budge. I finally had to drill it out. Man that was hard. But finally after going from a small cobalt bit to larger ones it came out.

The manifold bolts were so frozen I just left them in place. I really wanted to pull them but functionally they were good so I left them in place. In the back of my mind it was a block party grill that wasn't going to be in the "Weber Hall of Frame" but I did the best with the time I had.

20250803_174244.jpg

I used an angle grinder on this cookbox with a new head. Although I like the nylon reinforced bristles, you end up wearing the head out quickly compared to a wire brush.
20250803_214444.jpg

I now use small wire brushes for the nooks and crannies.

20250809_104154.jpg

I now wear a full face respirator per recommendations from the forum group. I'm really happy with this one I got on Amazon for $23.

20250809_180331.jpg

I also bought this Mikita palm sander and suction rig on FB Marketplace for $50 to help with sanding down frame rust.

20250809_180338.jpg

20250809_180346.jpg
This hole in the cookbox bolt area was a bummer but I had seen worse. From a structural standpoint I think it would be OK for once a year use I just went with it for final assembly.

H

20250811_154750.jpg

Here is the start of frame painting. It was the first time I had painted a frame. I started upside down per @Bruce 's video.

I have to take a break now for dinner. Afterwards I'll share photos of the final work.
 
Nice work but I'm confused. You're mentioning Silver B but the grill in question here is a 1000. And I thought you bought a restored gill? Orr are these photos from the one you're doing for someone else :D
 
Nice work but I'm confused. You're mentioning Silver B but the grill in question here is a 1000. And I thought you bought a restored gill? Orr are these photos from the one you're doing for someone else :D
Sorry for the confusion. The Genesis 1000 I purchased restored after I worked on the first Silver B. This thread from now on will be about the second Silver B I worked on.
 
Here are some more frame shots and the cookbox painting on the second Silver B - the "Block Party Grill"

20250812_104431.jpg
Here is the troubled area sanded down at the cookbox-to-frame bolt area:
20250809_180346.jpg

20250812_104616.jpg

20250812_104623.jpg
And then painted. I used "Rustoleum Rust Reformer" as a first coat and then High Heat Rustoleum for the rest of the frame.

20250811_154744.jpg
I decided with the leftover high heat quart of paint I had from the first Silver B endcaps that I would roll paint the cookbox on this one.

20250812_104828.jpg

IMG_20250812_121036.jpg
As you can see above, I masked the frozen manifold bolts I decided to leave in place.IMG_20250812_120802.jpg

As with the first B, I decided to pull the endcaps off. I think it's the easiest way to clean the lid and endcaps. Unfortunately I was a little too aggressive with my razor scraper on the inside of the lid and left scratches. Next grill I plan to rotate to clean razor blades more frequently and apply force at a shallower angle for scaping.
20250813_105554.jpg
Although I find the scraper on the left easier to hold, the cheaper traditional one I now prefer. This is because you can scrape at a shallower angle which I believe is easier on the porcelain. Also, I will exchange blades to new blades more often. I chipped a blade on this project which I am sure led to scratches on the lid interior.

IMG_20250812_121152.jpg
Another shot of the cookbox after roll painting.
20250813_133352.jpg
20250813_153730.jpg

On this project I did not have the opportunity to media blast the endcaps. I wire brushed them and later went in with a wire brush Dremel tool for the real tight areas. This kind of work though really pulverizes those small Dremel brushes.

If you look at the two photos above of the endcaps, I did an experiment and put them in the dishwasher after wire brushing. I put them on a long cycle. I thought at worse it would de-grease better and maybe even clean them a bit more. I was not happy with the results. It left a dark patina (photo below the lighter endcaps) and did no do much additional cleaning. I ended up wire brushing them again to get back the interior shine.

In general, I now like standard brass wire cups and wheels on a drill. These you can get at Home Depot. I do use a 6" brass wire wheel on an angle grinder for some areas but you really need to be careful and definitely wear thick leather gloves! I bought these for $19 at HD:

Screenshot_20250913_224412_Samsung Internet.jpg
One of The forum members suggested them, I think it was Josh.

20250816_212204.jpg

I decided to spray paint the endcaps a flat black. Above is after the second coat. I think I ended up putting four coats on the endcaps. I used the same Amazon boxes after masking the undersides to support the endcaps while spraying.
20250816_213619.jpg
Lid assembly

20250816_214310.jpg

20250816_214709.jpg

20250816_215207.jpg

On this Silver B, after taking off the handle I noticed it was cracked

20250806_190823.jpg

I decided to fabricate a wood handle rather than trying to repair or replace the stock Silver B handle. I bought a piece of poplar from Home Depot and used a drill press and router bit to round the edges. I then put several coats of tung oil on it to help preserve the wood.
 

Attachments

  • 20250813_153730.jpg
    20250813_153730.jpg
    202.8 KB · Views: 1
Here is a photo of the wood handle before installation.
20250816_220553.jpg

20250813_100054.jpg

I decided to paint the wheels on this one. I used a gloss spray that I had on hand.
20250816_215821.jpg

And here is the finished emblem.

20250814_222526.jpg
For the emblem I stopped at I think either 100 or 220 grit. I thought it added more shine then going to a finer sandpaper. The last one I went to 640 I think. But the Weber badge usually looks great no matter what techniques you throw at it.
20250817_095840.jpg

Starting to assemble.

20250816_105703.jpg

I decided for the Block Party Grill to use existing burners from the first Silver B. They seemed to be in OK shape so I clamped them into a "V" channel in a saw horse and hit them with a 6" wire brush on an angle grinder. I then flushed them with water and allowed them to dry overnight.

20250817_190857.jpg

Here's a burner test - all systems go for reassembling!
20250810_170619.jpg
However, I noticed a wheel had jammed and I really wanted not to buy new wheels but I wanted to make sure it could roll on the street for the block party. I decided to take a chance and drill a hole through the caster and inject WD-40 and then try and unsieze it. Fortunately it worked!
20250810_172014.jpg

20250810_171216.jpg20250817_185846.jpg
Starting to come together.
 
Looks fantastic! Great work!

For finishing the wood you might want to look into marine spar varnish - a varnish is an oil, usually tung or linseed oil, with resins (tree sap) dissolved in at high temperatures in an oxygen free environment. Marine varnishes have a higher oil to resin content than regular varnishes, so they can expand and contract with the ship and not move and not crack. The flexibility also aids in waterproofing. The spar refers to the horizontal section of a sailing ship that's subject to the worst conditions. The ultimate spar varnish is Epifanes, but it's stupid expensive. Rust-Oleum has one that's $20/quart and I found it pretty good.

It takes a lot of coats, and a recoat after like a year, but then you should be set. I'm not 100% sure how it will fare with the heat.

That's just my $0.02
 
And here are the shots of the completed Block Party Grill!

IMG_20250817_202058.jpg

20250817_190316.jpg
I like how the wood handle turned out. The light color looks nice against the black. I know it's not original but then again...it's a block party grill!
20250819_133619.jpg

I used new SS grates on the Block Party Grill that I took off the Genesis 1000 I bought from Michael Johnston (see begining of thread). On the Genesis 1000 deep box, I decided to go with cast iron. Maybe someday I'll try SS on the Redhead. I hear most of the experts prefer SS grates.

I did go with new SS 16 guage flavor bars, new aftermarket igniter and new Weber wheel whitewalls. Those were the only parts beside the wood handle I purchased for this one.

20250828_170051.jpg
Oh and one more item I bought from a tip from Michael - a Weber propane tank skirt for $11 on Amazon. I should have bought two or three! They really dress up these grills!
20250828_143757.jpg

20250828_170617.jpg

20250828_170657.jpg

IMG_9204.jpeg
It was a Weber sweep at the block party!

IMG_9213.jpeg
Here is the final shot of me and my neighborhood friend John grilling up some tasty hamburgers and dogs at the event. Several grillers commented on how well the Silver B cooked so I was very pleased. These old Webers were well engineered, well thought out and built to last a long time! Our block party has been going on for 22 years - about the same time when this Silver B was built at the Weber factory. I hope to have it go for many more Labor Day parties in the years ahead!
 
Looks fantastic! Great work!

For finishing the wood you might want to look into marine spar varnish - a varnish is an oil, usually tung or linseed oil, with resins (tree sap) dissolved in at high temperatures in an oxygen free environment. Marine varnishes have a higher oil to resin content than regular varnishes, so they can expand and contract with the ship and not move and not crack. The flexibility also aids in waterproofing. The spar refers to the horizontal section of a sailing ship that's subject to the worst conditions. The ultimate spar varnish is Epifanes, but it's stupid expensive. Rust-Oleum has one that's $20/quart and I found it pretty good.

It takes a lot of coats, and a recoat after like a year, but then you should be set. I'm not 100% sure how it will fare with the heat.

That's just my $0.02
Thanks Sam! I think I'm going to try it. I have heard some good things about spar varnish.
 
That one came out looking good too Val. I have to wonder what you've been cooking on all these years since it sounds like you've only recently discovered Weber grills? My only nitpick is going to be about that rusted out cross member, I don't think I could have restored that grill without either repairing it or finding another frame.
 
That one came out looking good too Val. I have to wonder what you've been cooking on all these years since it sounds like you've only recently discovered Weber grills? My only nitpick is going to be about that rusted out cross member, I don't think I could have restored that grill without either repairing it or finding another frame.
Thanks Steve, for about twenty years we cooked on a grill bought at Costco in 2003. It was a Sure Heat Sonoma and one of last of the US made ss grills sold at Costco. I liked the grill but it was on its 5th set of burners and multiple flavor plates and some of the parts seemed too difficult to fix. We decided to curb it and to save money from buying a new grill I started looking for used ones and that's how I found that first Silver A. Even with everything running right I don't think the Sonoma cooked as nicely as any of the old Webers I've used.

As for the frame on the second block party grill, I agree with you and have since acquired a salvaged Silver frame strut that could fix that cookbox rusted frame span. Since I was running out of time for the party and wasn't giving away or selling the grill I went with the frame as-is and just sanded and painted. I plan to go back for that repair later on but can't decided whether to use the star bolt method or learn how to weld. I'm leaning on learning how to weld but the equipment seems expensive.
Steve - do you do welding for steel repairs? Do you know anyone who does? I've seen some somewhat reasonable machines on Amazon but I don't know anything about how to go about learning. It seems the Weber channel steel frames are not that thick and could be easy to repair by welding. Thanks
 
Steve - do you do welding for steel repairs? Do you know anyone who does? I've seen some somewhat reasonable machines on Amazon but I don't know anything about how to go about learning. It seems the Weber channel steel frames are not that thick and could be easy to repair by welding. Thanks
I restored a nice Genesis 1000 grill last summer that had a broken frame tab. I was able to find someone to weld that back on through a friend of a friend. I wish I knew how to weld because I've thrown away too many frames with rust damage to count.
 
I restored a nice Genesis 1000 grill last summer that had a broken frame tab. I was able to find someone to weld that back on through a friend of a friend. I wish I knew how to weld because I've thrown away too many frames with rust damage to count.
Thanks Steve. I've started reading about it. Although square tubing does not seem too complicated to weld with simple equipment, it does take practice and is definitely a skill that you would want to work on a lot of scrap first. I think I may ask around and see if I can find someone close to help me. I have two or three other grill frames that possibly need repair. I really like the idea of welding because I think it's closer to the original and stronger than a square tubing insert approach.


Back
Top