2004? Genesis Silver C. First time restore


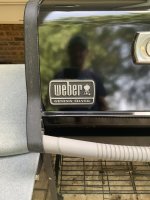
To restore the logo, yes you have to take it off. It's held on with two push on fasteners, they are like washers that fit very snugly on the posts. I have used the smallest spade head screw driver I have, and also have had to get under there with a razor blade, but then get a screwdriver under it (you'll break your razor blade if you pry with it). Then you remove the logo, clean it good and dry it out completely, paint the whole thing black, and finally wet sand it by putting a piece of wet sandpaper on a table and rub the logo back and forth on it. The sanding part will take a little longer than you think it should in order to get it looking pristine, but it's worth the effort. Then you can stick the logo back on with the same fasteners, or you can use high temp RTV. The RTV method works fine, and you can still pry it off again if you need to.
 
Your logo might have a 7/16 inch speed nut holding it on. If so, a socket or wrench can be used. If you have push nuts you need to gently pry them up with a putty knife. Ace should have push nut replacements.

Other folks know a lot more about logo restoration and modification and will point you in the right direction
 
Igniter swapped. Box said it does not fit Silver C after 2003. But it fits mine. Weird. It was close. But it fits. And functions.
 

Attachments

  • 574D88B5-87EA-4F79-8191-25867FDEFD37.jpeg
    574D88B5-87EA-4F79-8191-25867FDEFD37.jpeg
    184.2 KB · Views: 15
I’m not as experienced as most others here, having only done 4 grills, but I have never removed the logo to restore it. I use a lot of painters tape around it, and then either spray it or brush the high heat pain on it. Then I sand. Comes out great.
 
Rob, you can get the igniters on amazon for under $10.
Yep, take the logo off the lid. If the black paint is still intact, just clean it up as best you can, the spray paint it with High Heat black. Then simply sand the face off. It will look brand new.

IMG_0002.JPG
 
That is a serious cooking for the family machine. I love the father/son angle. From your kid's point of view, the grill is older than he is. Purchasing it from your neighbor makes the whole endeavor extra special.
 
That is a serious cooking for the family machine. I love the father/son angle. From your kid's point of view, the grill is older than he is. Purchasing it from your neighbor makes the whole endeavor extra special.
Unfortunately. As I have poured over this thing it is nearly mint! I don’t need to paint any of the cook box. Or take it out of the frame. I may replace the burners and if I do that will be his job. Everything else has just been de cobwebbing and APC and scrubbing. If we replace the burners. I will prob get him to help scrape the inside down a bit more. But overall it’s at about 90% of good to go. Will share some pics after my bottom rack arrives tomorrow.
 
Sorry, this got stuck and wasn’t posted earlier:

I know some people spray some high heat into a disposable cup. I have never had any issue with Testors red model paint myself. I think most of us use a small artist tyoe brush to put on the paint.
 
Here is the progress so far. Replaced the Flavo bars. Cleaned the grates. Cleaned around the burners and scrubbed the grease catch. Painted and sanded the logo. Cleaned all the tables with APC and Scotch brite. Gave the lid a car wash. Replaced the bottom rusted tray with the OEM rack. Replaced igniter. Added a little cover for the propane tank. Only thing left is hanging rack in the lid is rusty. And possibly replacing the burners. Although they are not damaged or rusted out.

Cheers! Thanks for the inspiration.
 

Attachments

  • 96477822-A77D-4F18-862F-81F16FFC355B.jpeg
    96477822-A77D-4F18-862F-81F16FFC355B.jpeg
    175.3 KB · Views: 16
  • 1E6BADF5-48BE-40DB-869D-8D21B352AF65.jpeg
    1E6BADF5-48BE-40DB-869D-8D21B352AF65.jpeg
    186.5 KB · Views: 15
  • A8998606-58F6-419E-B4F3-9690B6074421.jpeg
    A8998606-58F6-419E-B4F3-9690B6074421.jpeg
    173.6 KB · Views: 13
  • 25C2DD56-7D26-46D9-AA17-FA5DE9B46F0C.jpeg
    25C2DD56-7D26-46D9-AA17-FA5DE9B46F0C.jpeg
    169.5 KB · Views: 12
  • 2BCC4E97-4805-4B96-8A86-57FE66952D4B.jpeg
    2BCC4E97-4805-4B96-8A86-57FE66952D4B.jpeg
    143.8 KB · Views: 13
  • FC6FB4C7-B65B-4790-8F0B-7C9E2C9CE70C.jpeg
    FC6FB4C7-B65B-4790-8F0B-7C9E2C9CE70C.jpeg
    174.5 KB · Views: 14
  • 496D6709-E6D1-44D6-AA42-223177068A16.jpeg
    496D6709-E6D1-44D6-AA42-223177068A16.jpeg
    187.5 KB · Views: 14
  • 8157496E-DF39-4B3A-BA13-EE504241988E.jpeg
    8157496E-DF39-4B3A-BA13-EE504241988E.jpeg
    193 KB · Views: 16
Looks Great Rob! You fit right in with the crowd on here. Time to start on the next one. 😆
Yikes. I know right. I am the most excited that I found that bottom rack on eBay and got it for the price I did. His new listings do not offer free shipping on stuff this size. Lol. Just need to fire it up now.


Back
Top