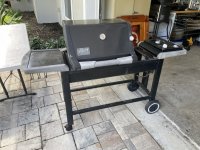
I grabbed a 2000-2001 Weber genesis gold for 50$. Decided to restore it first time I work with one of these. They are pretty simple build and easy to work with. I’m not the best at keeping track at before and after pictures I had to diassasemble it a bit so here’s the best before picture I have.
You are using an out of date browser. It may not display this or other websites correctly.
You should upgrade or use an alternative browser.
You should upgrade or use an alternative browser.
2000-2001 genesis gold restore
- Thread starter Leandro P
- Start date
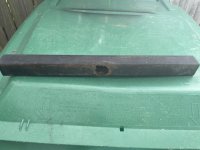
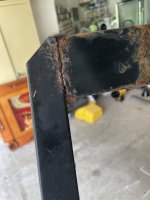
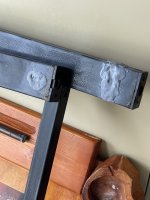
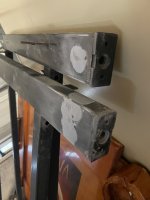
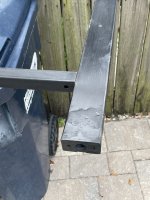
Once I disassembled it all realized there was a couple of bad rust spots.
1.The typical bar that connects to the cook box.
2. the legs close to the caster inserts.
3. Also one of the L brackets that are unique to this style grill.
1.The typical bar that connects to the cook box.
2. the legs close to the caster inserts.
3. Also one of the L brackets that are unique to this style grill.
Attachments
-
 507E344B-E374-46E8-9F16-A7AE6E79A21C.jpeg143.1 KB · Views: 21
 -
 A9809C65-FB15-4DD4-897E-1C94B4E640A6.jpeg142.5 KB · Views: 22
 -
 6033543B-9D3B-4505-9BFE-AA6BDEDD5E90.jpeg128 KB · Views: 21
 -
 0B9179CC-E1FC-4A8C-82E2-78469B96491F.jpeg88.4 KB · Views: 21
 -
 C0F26502-95B8-4DD9-BA29-A7008F4EE28A.jpeg117 KB · Views: 22
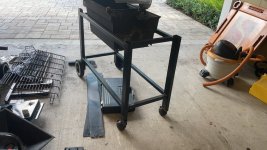
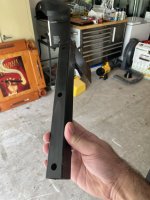
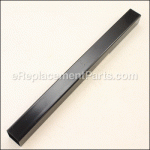
Interesting I found out that for these style grills you can buy a replacement for the bar that connects to the cook box.
this saved me a lot of work and also it’s an easy install because how the frame works it mounts with one bolt on each side. So this solved 1 of the 3 rusted parts.
 www.ereplacementparts.com
this saved me a lot of work and also it’s an easy install because how the frame works it mounts with one bolt on each side. So this solved 1 of the 3 rusted parts.
Frame Connector 97231 - OEM Weber - eReplacementParts.com
Buy the official Weber Frame Connector 97231 replacement - Use our model diagrams, repair help, and video tutorials to help get the job done.
www.ereplacementparts.com
Attachments
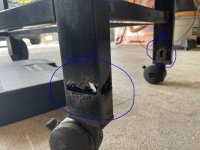
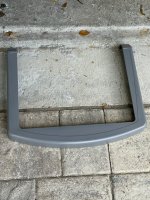
The other two I decided to work with jb weld and jb weld steelstik. The steelstik worked good enough on the legs and the jbweld i used to strengthen the weld of the l bracket that was starting to brake.
Attachments
Bruce
TVWBB 2-Star Olympian
I am not sure that will be a very long term fix on those legs. The rust is still in there and it had already eaten a good amount of the original metal away. That JB Weld and Steelstick is acting more as a patch and filler than a replacement for the rusted away steel. And if you didn't treat that rusted stuff inside and out with a good rust encapsulation, it will continue to rust to the point of failure. That grill isn't a lost cause but it is in pretty rough shape. I give you a lot of credit for taking it on and I hope it all comes out great in the end because those are pretty cool grills. If you have to replace the burners or flavorizer bars, I think they may an odd sort and hard to find. You may have to have some other ones modified to fit that grill.
So i decided to paint them not sure how long this will last but hey worth a shot. And the color was perfect.
Attachments

Bruce
TVWBB 2-Star Olympian
Try coating them with a good vinyl protectant. I use Aerospace 303 as it has good UV protection, but you could use armor all or something like that.
Update:
Well, I see the vinyl protectant isn't an option any longer. Paint will probably work for a while, but I would expect it to chip and scratch. Keep us posted on how it turns out.
Update:
Well, I see the vinyl protectant isn't an option any longer. Paint will probably work for a while, but I would expect it to chip and scratch. Keep us posted on how it turns out.
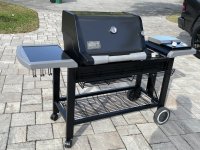
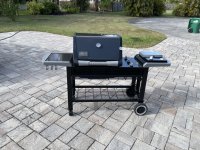
The rest was the usual painting treating rust etc and assembling. Don’t know why the original owner made a whole on the lid and installed an extra thermometer but oh well. I think she’s looking good.
Attachments
Yea I know it may be eventually completely rust but I slowed it as much as I could. I’ll find another grill by the time that happensI am not sure that will be a very long term fix on those legs. The rust is still in there and it had already eaten a good amount of the original metal away. That JB Weld and Steelstick is acting more as a patch and filler than a replacement for the rusted away steel. And if you didn't treat that rusted stuff inside and out with a good rust encapsulation, it will continue to rust to the point of failure. That grill isn't a lost cause but it is in pretty rough shape. I give you a lot of credit for taking it on and I hope it all comes out great in the end because those are pretty cool grills. If you have to replace the burners or flavorizer bars, I think they may an odd sort and hard to find. You may have to have some other ones modified to fit that grill.
")
Bruce
TVWBB 2-Star Olympian
I have see where they have put that extra thermometer in the middle of the lid. I don't know why. Neither of them are very accurate any way. But, maybe the one on the right stopped working or he just felt that being in the middle would make it more accurate. It is amazing what some people do to their nice Weber grills.
Jon Tofte
TVWBB 1-Star Olympian
Try coating them with a good vinyl protectant. I use Aerospace 303 as it has good UV protection, but you could use armor all or something like that.
Update:
Well, I see the vinyl protectant isn't an option any longer. Paint will probably work for a while, but I would expect it to chip and scratch. Keep us posted on how it turns out.
That's probably true about paint chipping. On the other hand, this seems to be a weak spot on this model, so occasional re-painting may be all that can be done to keep it looking as nice as Leandro has done.
I was going to do this but it was so dirty looking didn’t want to seal In the dirt. The good thing is it’s just the trim not the actual table.Try coating them with a good vinyl protectant. I use Aerospace 303 as it has good UV protection, but you could use armor all or something like that.
Update:
Well, I see the vinyl protectant isn't an option any longer. Paint will probably work for a while, but I would expect it to chip and scratch. Keep us posted on how it turns out.
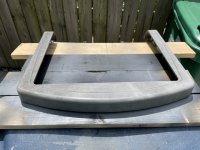
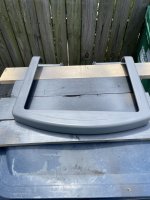
Yea thought bought that but these trims are huge.They other option is to dye them, but that is a much more involved process.
For the stained tables.......they are just like headlights on cars. When u restore a headlight on a car you basically sand off the old clear coat or the top layer of plastic then polish to a shine. With these tables when they get stained you have nothing to loose. First get out the coarse steel wool and try several times scrubbing with Simple Green.....if that doesnt work...which it will ") ...then use sand paper and gently sand the top layer off til the stain is gone. Once u have a uniform look across the board treat it with 303 aerospace and call it a win.
...then use sand paper and gently sand the top layer off til the stain is gone. Once u have a uniform look across the board treat it with 303 aerospace and call it a win.
...then use sand paper and gently sand the top layer off til the stain is gone. Once u have a uniform look across the board treat it with 303 aerospace and call it a win.Yea I’ll try that next time.For the stained tables.......they are just like headlights on cars. When u restore a headlight on a car you basically sand off the old clear coat or the top layer of plastic then polish to a shine. With these tables when they get stained you have nothing to loose. First get out the coarse steel wool and try several times scrubbing with Simple Green.....if that doesnt work...which it will
I did sand them but stains had penetrated deep. I know I didn’t do it how most of you would have but, Given the circumstance I think it came out pretty nice. And atleast it’ll be used for few more years. I’ll report how it turns out if it works. The good thing is even if it scratches the paint is almost identical to the original so it’ll blend.
Joe Anshien
TVWBB Honor Circle
Really nice but you have to do that emblem as it looks so out of sorts. Just take it off, paint it black with some high heat paint and sand the silver part to come out like new. I usually don't do this my self, but many people here have posted about it.The rest was the usual painting treating rust etc and assembling. Don’t know why the original owner made a whole on the lid and installed an extra thermometer but oh well. I think she’s looking good.
Oh I am with you regarding painting them....thats the fun of the hobby....You can literally do whatever u wanna do. In the end they always look great and we always learn a few new tricks. I break the rules all the time...sometimes I win...and sometimes I lose but I just shake it off and move on to the next.