JeremyMSmith
New member
Oh man! I couldn’t wait any longer to give everyone an update on my Competition BBQ Box! In October of 2015 I posted this thread looking for input for a functional shelf or kitchen for BBQ competitions. Thanks to my fellow TVWBB gurus: Len Dennis, Terry Mo, and timothy, they were able to provide me some valuable insight! After snooping around on YouTube I was drawn to the trifold design chuck box that opened from the front, like the one seen on Lance’s Woodshop Channel called, “Camping Box Part 2“ video. After seeing everything stowed away neatly in his chuck box, my original thought of pvc pipes and peg board shelving seemed clunky and too frail.
Fast forward to late January, and the first phase of construction began. I started by creating a list of items I wanted to keep in my BBQ Box. I wanted to be able to fit my extra wide griddle, perhaps a spot for a pot or pan, a warming plate, various Rubbermaid bottles, my knives, and of course a coffee percolator. I used my 6 ft. folding table as a reference for the overall size. I’m a pretty visual person, so I built a prototype from cardboard. I’m glad I did this first, as you can see its initial size provided zero working space! Where’s my cutting board going to fit on the table!? Eventually I had to come to grips that my initial design was too large. Not only was there no working space but I remembered my initial goal for the box to not weigh a ton!

With the side boxes open, my box sprawled the entire length of my 6 ft. table. Yikes! I really liked the height, so I pared down the width of the middle and side boxes.
Phase 2 began in late February. I decided to go ½ inch sanded plywood for the middle and side boxes and ¼ inch for the shelving. I felt like the box wouldn’t be sturdy enough if I used anything less than ½ inch, and felt ¾ inch would have added too much weight to the frame. So, like any wood project, I bought about 30% more wood than I needed!
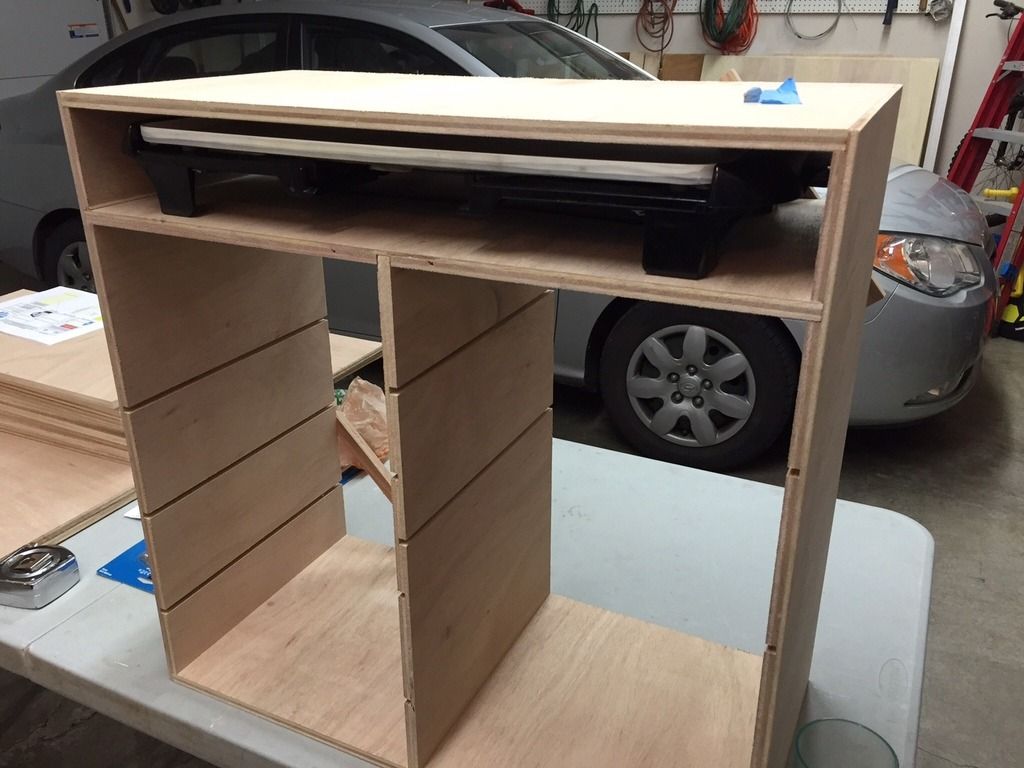
With the help of my Competition BQQ teammate Curtis, we were able to rough cut the middle box at 24 x 24 inches, but when we added the rabbit joints is pushed the final dimension to 24 ¼ inches wide by 23 ¾ tall. Again, the reason for this size was so I could fit my griddle, which was ~23 ½ inches wide. Initially, I had the design of the middle box to hold the griddle down low, but ended up moving that up after deciding to reduce the overall size of the middle box. Also, the ½ partition down the middle provided made the middle box rock solid! Notice the ¼ inch dado cuts for the shelving are staggered on the sides for the middle support!
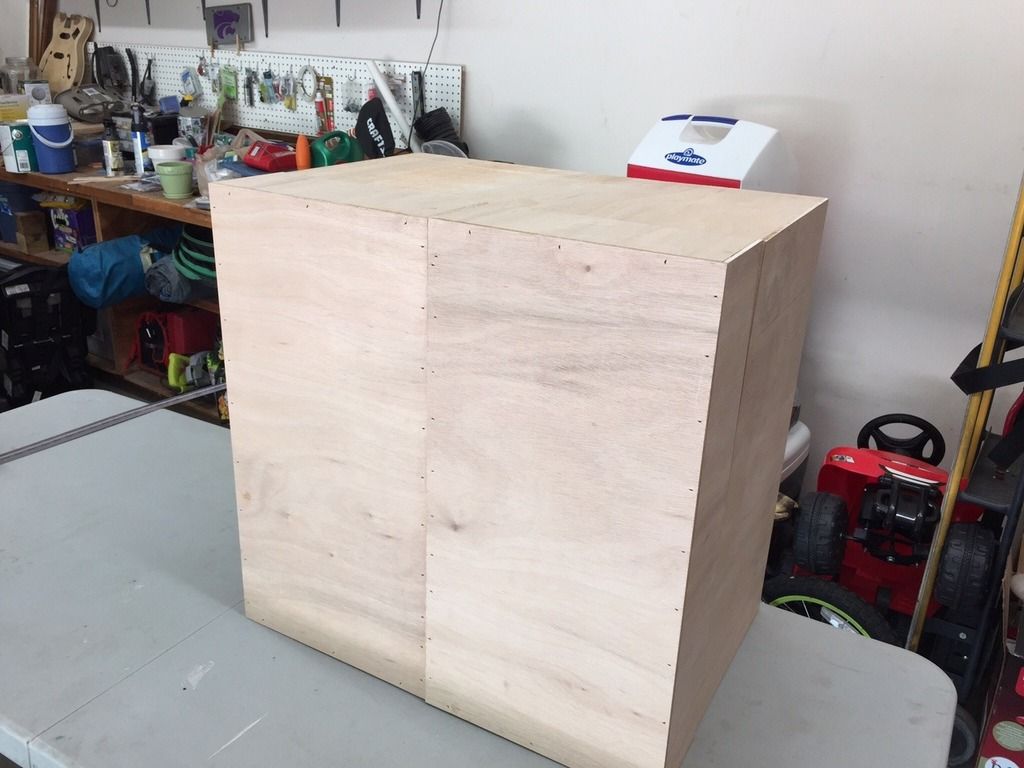
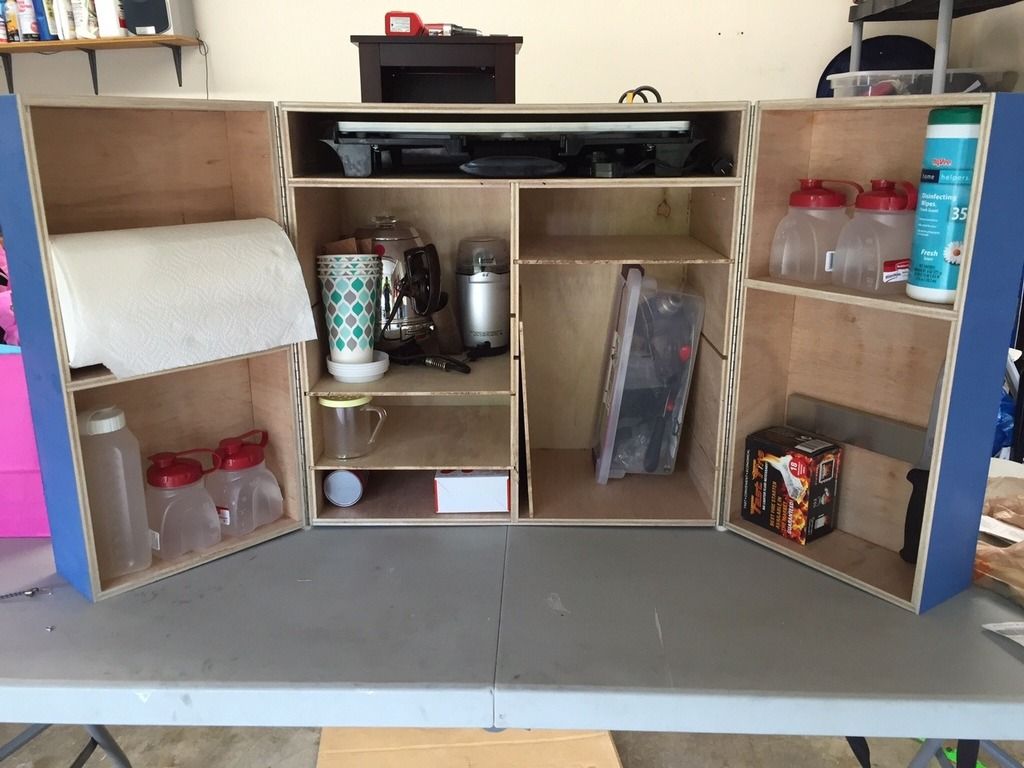
At this point, it was mid-March and I was full steam ahead! Next came the sides, we cut the sides using same rabbit joint, then cut the backs last. Each box is identical and ~4 inches deep. The main reason I went with 4 inches, is because that accommodates most Rubbermaid pint and quart bottles!
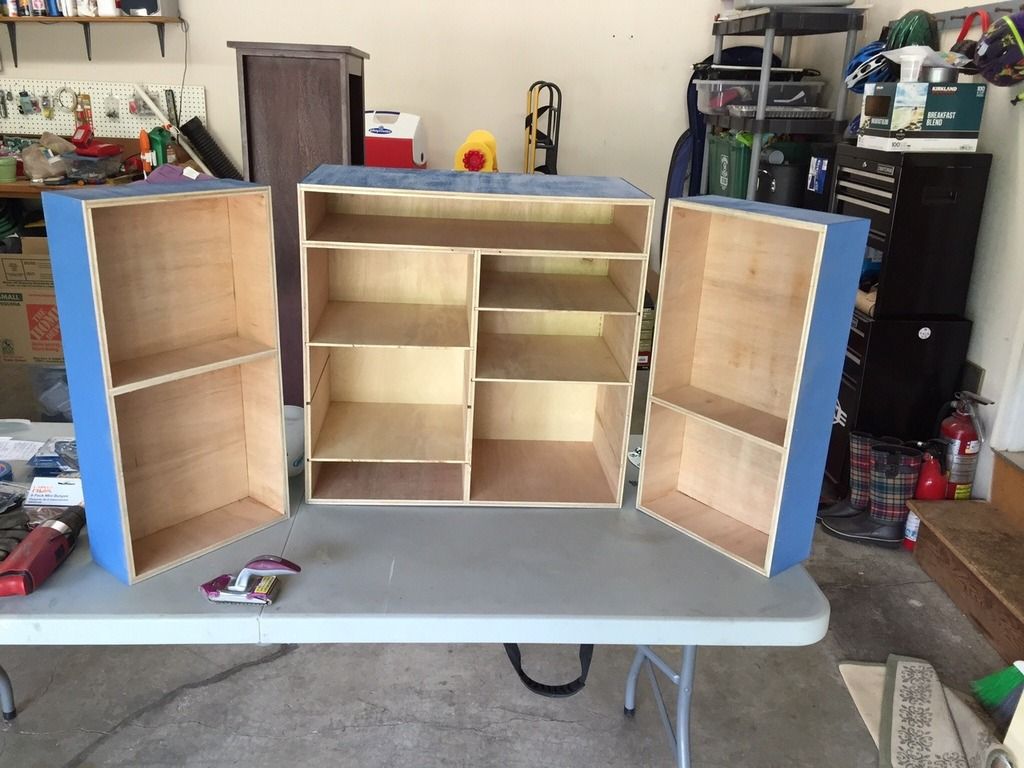
Phase 3 was paint and assemble! Notice the light blue color. That’s my team color for the KC Meat Sweats, a.k.a. Meat Sweat Blue!")
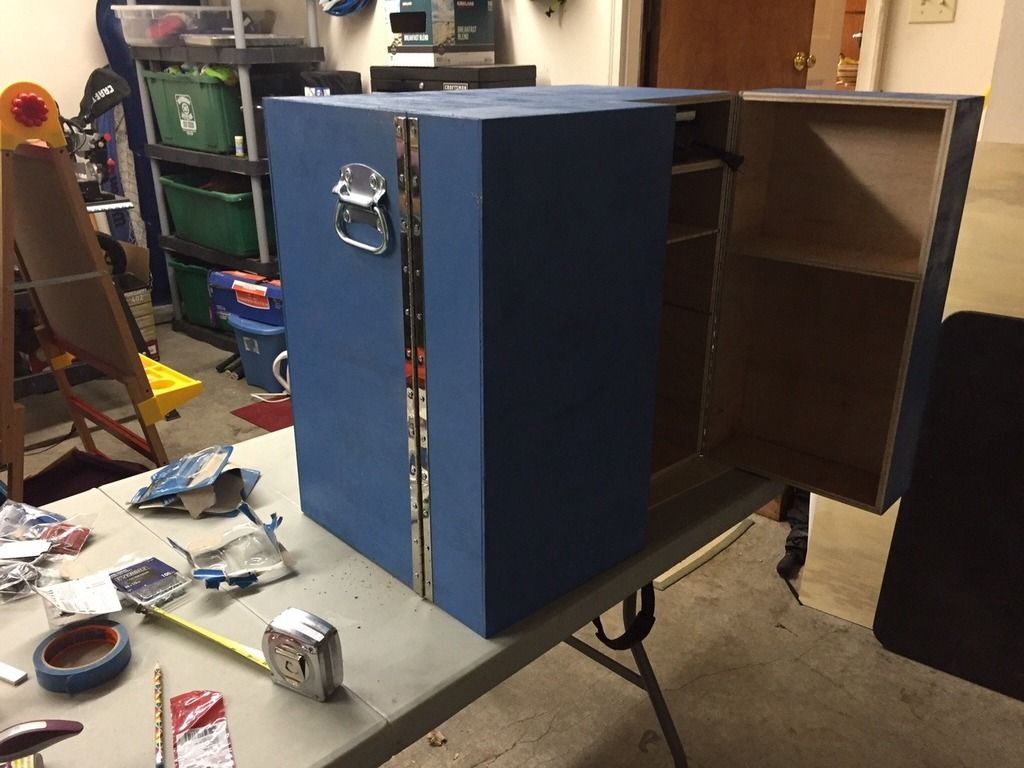
The final Phase was installing the piano hinges, handles and front latch! I used a 4 inch chest handle, and mounted it higher around the higher ½ inch joint that supports my griddle.
Here's the most recent pic! i have since put 3/8 eye screws with 10 inch bungees on the sides to hold the Rubbermaid containers.
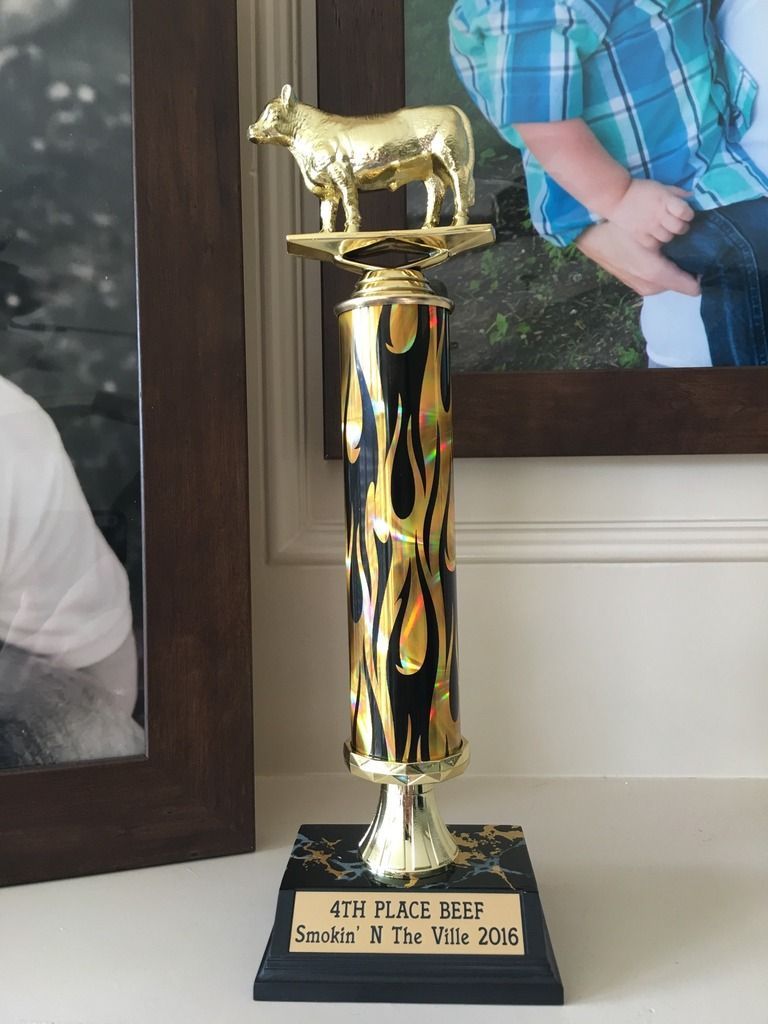
So, I got to try out a few weeks ago the KCBS Smokin’ in the Ville BBQ Competition! It was totally awesome! Made pancakes that morning and my team got a call for brisket!
4th Place Brisket!
Thanks again for everyone who provided input and helped me construct!
Cheers!
Jeremy
Fast forward to late January, and the first phase of construction began. I started by creating a list of items I wanted to keep in my BBQ Box. I wanted to be able to fit my extra wide griddle, perhaps a spot for a pot or pan, a warming plate, various Rubbermaid bottles, my knives, and of course a coffee percolator. I used my 6 ft. folding table as a reference for the overall size. I’m a pretty visual person, so I built a prototype from cardboard. I’m glad I did this first, as you can see its initial size provided zero working space! Where’s my cutting board going to fit on the table!? Eventually I had to come to grips that my initial design was too large. Not only was there no working space but I remembered my initial goal for the box to not weigh a ton!

With the side boxes open, my box sprawled the entire length of my 6 ft. table. Yikes! I really liked the height, so I pared down the width of the middle and side boxes.
Phase 2 began in late February. I decided to go ½ inch sanded plywood for the middle and side boxes and ¼ inch for the shelving. I felt like the box wouldn’t be sturdy enough if I used anything less than ½ inch, and felt ¾ inch would have added too much weight to the frame. So, like any wood project, I bought about 30% more wood than I needed!
With the help of my Competition BQQ teammate Curtis, we were able to rough cut the middle box at 24 x 24 inches, but when we added the rabbit joints is pushed the final dimension to 24 ¼ inches wide by 23 ¾ tall. Again, the reason for this size was so I could fit my griddle, which was ~23 ½ inches wide. Initially, I had the design of the middle box to hold the griddle down low, but ended up moving that up after deciding to reduce the overall size of the middle box. Also, the ½ partition down the middle provided made the middle box rock solid! Notice the ¼ inch dado cuts for the shelving are staggered on the sides for the middle support!

At this point, it was mid-March and I was full steam ahead! Next came the sides, we cut the sides using same rabbit joint, then cut the backs last. Each box is identical and ~4 inches deep. The main reason I went with 4 inches, is because that accommodates most Rubbermaid pint and quart bottles!

Phase 3 was paint and assemble! Notice the light blue color. That’s my team color for the KC Meat Sweats, a.k.a. Meat Sweat Blue!

The final Phase was installing the piano hinges, handles and front latch! I used a 4 inch chest handle, and mounted it higher around the higher ½ inch joint that supports my griddle.

Here's the most recent pic! i have since put 3/8 eye screws with 10 inch bungees on the sides to hold the Rubbermaid containers.

So, I got to try out a few weeks ago the KCBS Smokin’ in the Ville BBQ Competition! It was totally awesome! Made pancakes that morning and my team got a call for brisket!
4th Place Brisket!

Thanks again for everyone who provided input and helped me construct!
Cheers!
Jeremy
")