What a score today!


Milk, butter and sugar are other ingredients that can be used to promote browning. Store-bought pizza crust could be par-baked and could be self-rising which requires a specific temp to achieve success. You will have much more control over your pies when you roll your own using a yeasted crust.
 
I am sure of that Ed. I know the box's instructions noted 450 degrees. IIRC my stone was right about 800 when I did this Za, so perhaps it would have been a little better had I dialed it back a bit and let it go a hair longer
But, as noted this was all learning experience for us. Neither of us ever even cooked a pizza with a stone before, let alone in a hell fire oven like this.
I've been using an oven stone for years. And I'm contemplating getting a quarter inch sheet of mild steel plate.
 
OK tonight will be our "acid test". Wife and I just got done making the Neapolitan dough recipe measuring right to the gram from the Solo Stove owners manual recipe list as noted here. It's now currently proofing and rising in the oven on the "proofing setting" for 2 hours.
I've made a nice uncooked sauce with some fresh tomatoes from our "garden" and some certified canned San Marzano tomatoes. basically shopped everything up with some fresh garlic, some fresh basilico, a little dried oregano, salt and black pepper and some dried chili flakes (maybe 1/2 tsp). We have more fresh basilico, fresh mozzarella, and a brick of regular mozzarella. For my Za I also have some chopped pancetta to go on there.
Wish me luck. it's a first for us
And the remainder of our 5lbs of 00 flour is now sealed in vacuum bags in 1000 gr lots :D

Lean and light, the Neapolitan style rewards those who plan ahead. With several hours– and sometimes days– to proof, this dough takes on complex flavors when given the chance. The super-thin crust chars in signature leopard-print patterns and reveals a tender texture with every bite.
Ingredients
Preparation

In a bowl, combine water and salt. Mix until salt is completely dissolved.
  1. Add flour to the water mixture in small amounts, mixing between each addition.
  2. Keep adding flour until you have achieved a thin batter-like consistency.
  3. Add the yeast to your ‘batter’ and mix well.
  4. Continue adding flour to the batter, constantly mixing, until all of the flour has been added. It should have a more dough-like consistency now.
  5. Once all the flour has been added, remove the dough from the bowl and knead on a countertop.
  6. Knead the dough until it is uniform in texture and consistency.
  7. Once the dough is uniform, place in a large, clean mixing bowl and cover tightly. Let it rest for 2 hours.
  8. After resting the dough, remove the dough from the mixing bowl and equally portion it into 7 balls weighing 210-225g each.
  9. Place each dough ball in its own airtight container, cover, and let rest at room temperature (65ºF) for 24 hours.
  10. The dough should have doubled in size and is ready to be stretched into a pizza.
  11. To flatten the dough by hand, first flour your workspace. Start to stretch the dough from the center and push outwards in each direction. If there are air bubbles, work them toward the outer edge.
  12. Avoid using a rolling pin to flatten Neapolitan dough, as it may lose its airy texture.
  13. Transfer the stretched dough to a dusted pizza peel before adding sauce or toppings.
 
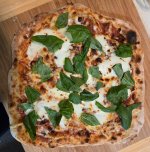
So this is the Margherita. I forgot to take photos of the one with pancetta. They turned out quite delicious good chewy crust, a nice crisp and texture. I think I used a but too much pancetta on mine but then you can't have too much porky goodness :D
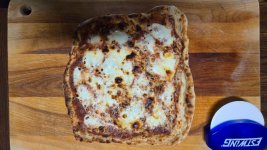
Honestly my only "gripe" with how things worked is the flour used on the peel tends to blacken and it's a little meh. Also I think we could have used just a touch more "rise" on the dough. Maybe a touch more yeast? Actually this was the one with pancetta
Overall? No complaints really
20251116_174952.jpg
 

Attachments

  • 20251116_174952.jpg
    20251116_174952.jpg
    138.8 KB · Views: 2
Last edited:
That looks delicious. I wish I had the time/patience for dough. I have many times looked at the pizza oven accessory for my kettle. But I dont think cooking frozen pizza can justify it :D
 
Actually the biggest "hurdle" was the learning of what to use. The big KitchenAid did all the heavy lifting, quickly and quietly. But, it's obvious by looking at this I have a lot to learn in how to shape the dough ball properly by hand.
My wife was pretty shocked at how little yeast the recipe called for (only .5 gram to 1000 grams flour).
 
The amount of yeast has to do with the timing of the countertop rise. In colder areas like yours, you might consider upping the yeast for more rise faster. On the other end of things, besides flavoring, the salt retards yeast growth and also affects the hydration. For that reason, many people add the salt last, in between steps 4 and 5 of your process. You could reserve a small amount of water to dissolve the salt in if you add it in later, after the yeast gets started. You could also cut the salt back a little for a faster rise. If you are using those little packets, one of those is 0.75g yeast...you could try using the whole packet and see where that gets you. There's plenty of room for experimentation to get the dough that works for you.
 
I did use the "proofing" setting on my oven so it held it at 95 deg. Everything was actually quite good. We just thought perhaps a tiny bit more "lift" in the dough might have been nice is all


Back
Top