Weber kettle restoration


PeterSims

TVWBB Member
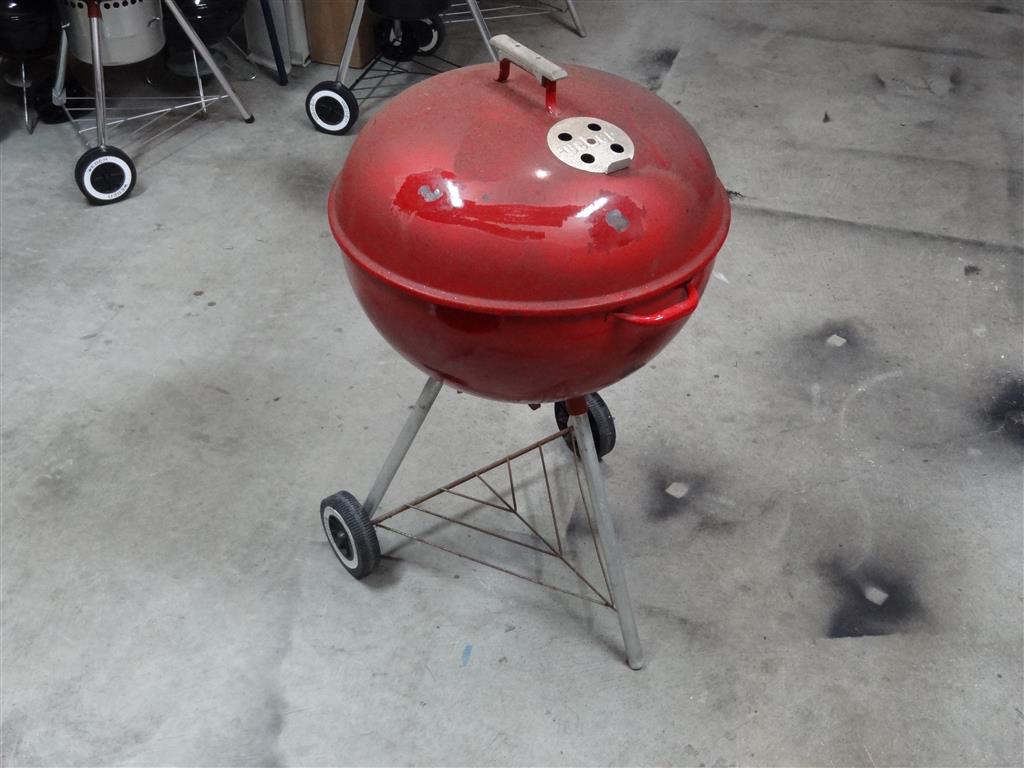
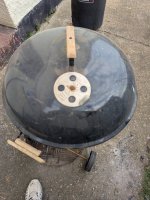
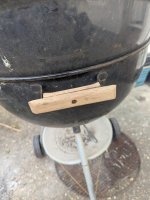
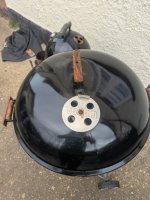
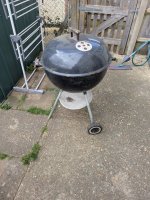
Hi all. So I'm in the UK. I found this I believe quite old webber kettle for free. Now it's in a poor way but I'm hopping I can bring it back to life some what . Could do with some help and ideas hopefully just a lot of elbow grease and some TLC can bring new life into it.

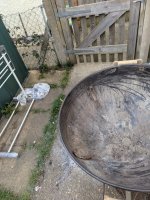
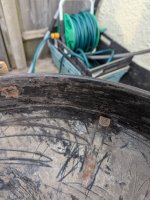
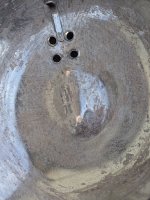
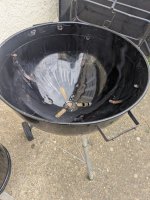
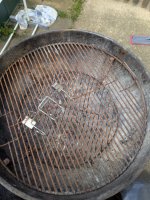
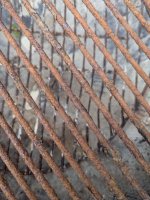
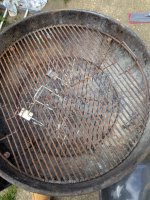
Take a look at the pic for you think I can save the grate especially the cooking grate . It's very rusted or would it be safe to just replace it .
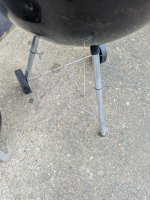
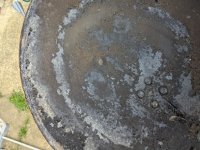
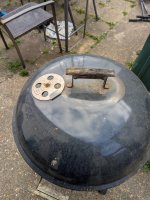
As for the out side shell I'm thinking tap out the dents and possibly re spray it and varnish the wooden handles

Any advice or tips would be appreciated.
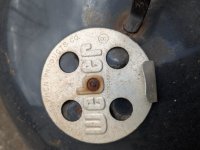
Or am I wasting my time and it's fit for the bin. Also any idea on the age be appreciated
 

Attachments

  • PXL_20250316_142720692.jpg
    PXL_20250316_142720692.jpg
    267.1 KB · Views: 29
  • PXL_20250316_142733381.jpg
    PXL_20250316_142733381.jpg
    259.6 KB · Views: 30
  • PXL_20250316_142710926.jpg
    PXL_20250316_142710926.jpg
    172.4 KB · Views: 30
  • PXL_20250316_142708005.jpg
    PXL_20250316_142708005.jpg
    291.4 KB · Views: 30
  • PXL_20250316_142650429.jpg
    PXL_20250316_142650429.jpg
    289.9 KB · Views: 35
  • PXL_20250316_142640231.jpg
    PXL_20250316_142640231.jpg
    134.1 KB · Views: 35
  • PXL_20250316_142633533.jpg
    PXL_20250316_142633533.jpg
    181.5 KB · Views: 32
N code so 1991. It still has a lot of life left. Buy a new cooking grate and sand and oil the handles.
You have the utensil rack .
 
Yes I do have the utensils rack. Ok not as old as I thought.
I did think that not sure I'd get the grate safe enough to eat from
 
The utensils rack tho has caused some rust to the lid I believe we're it's been left in contact with it. If I sand it back and paint I think it will be ok
 
I wouldnt paint ( but that's just me ) I would hit the rusty spots with a scotch brite pad and oil .
The wheel looks in great shape. It still has all of the whitewall and the black push nut.
How's the ash sweeper, all three fins working?
 
No I don't have fins I've found them online tho.
Ok I'll look into that then. I've never taken on a project like this before
 
You can soak the grates overnight in Vinegar/baking soda to remove rust. The charcoal grate is likely OK. The cooking grate will probably be pitted after rust is removed but seasoning could probably make it usable. But I'm with Timothy, just replace the cooking grate. A hinged cooking grate is a nice upgrade. If the One-Touch fins/ash sweep are not there, you'll need to replace it. I think there are some 3rd party brands that even make stainless steel versions.

The bowl and lid are coated in resilient porcelain, essentially glass, which is harder than steel but more brittle. Careful when popping out dents because that could crack the porcelain. You can scrape the insides of bowl and lid with a razor blade to get it pretty close to new. You can use Fine Steel Wool with soapy water to remove rust and clean up porcelain surfaces. After removing rust spots on porcelain parts on bowl/lid, I've had good success using Testor's enamel model paint to cover up small blemishes. I wouldn't paint the whole bowl and lid because the porcelain surfaces are too smooth for paint to really adhere... the paint would likely flake off over time and look worse.
 
Take a look at this on the WKC site. Good info there on kettles.
 
Thank you . I'm going to buy some bits during the week and get craking at the weekend. Any idea on ratio of vinegar and bicarbonate of soda. Can I use soda crystals
 
Anthony’s link above is a good one. Sorry, I’m not familiar with soda crystals. I’m not too precise as far as ratio of vinegar to baking soda, but its probably 4:1. I usually pour enough Distilled White Vinegar to submerge Weber part and then add a couple cups of baking soda or more. I look for a strong initial bubbling reaction. Someone here may chime in on more precise ratio. You can add as many rusted grates or other parts as you can fit in a batch. Let parts soak overnight. You can knock off stubborn chunks with a wire brush or steel wool.

X-Mas Wreath Container.jpg

For container, you can find a cardboard box about the right size (or make something) and place a plastic trash bag inside to hold liquid. I used a cardboard box that some Weber replacement 22" grates were shipped in that I lined with plastic but now I’ve evolved to use a plastic Christmas Wreath storage container alone.

I've also seen some folks take a different tact by making a paste they put directly on part and wrap part in a plastic trash bag.

When you are done, clean parts with soap / water. Once dry, I usually spray on cooking oil and let it season over a hot fire in the kettle for 30+ minutes (I also like to do that on new grates and any expose metal inside the lid/bowl like thermometer probe or screw heads).

After that, I let normal act of grilling of food continually season grates. During normal use, I usually just quickly scrape big chunks from grill grate, then few swipes of a brush, close the lid/all vents and let the fire burn off residual foods as the grill cools down. I don’t need to clean with vinegar/baking soda for years unless I see rust.
 
Hi Pete.
Once you've cleaned up the lid & bowl, new ash-sweeps, new cooking grate etc. Get rid of that manky charcoal grate! It will detract from all the other good work you've done. [Buy stainless steel grates. There's plenty of choice on Amazon].
Rust spots? Feather the spots with wire wool, buy a wee pot of high-temp engine paint [gloss] from Halfords for touching up, or a high temp clear lacquer if you want to keep the rat-look, [my preference as the grill is telling you its journey].
Remove the wood handle, give it a light rub with the wire wool to remove any flaky stuff, then a few coats of Ronseal clear yacht varnish. [Keep that 1991 patina].
A nice little project for a lazy Sunday. Then you'll have yourself a cracking little cooker for the summer......and beyond!
 
Last edited:
Hi thank you all.
So I'm just over 2 hours of elbow grease into it . I'm very happy so far with the results . I've got most of the flaky carbon off the lid and the bottom bowl was surprisingly light on carbon just around the top below were the grate sits.
Can't believe how good the handles look I can even just about see the webber writing on one. It is very brittle tho I did brake a bit off of one of them . I have chopping board oil was thinking of using that but I could go for varnish.
There is some dents in the lid can't work out if there supposed to be there or it has come from the utensils rack. As for the ash wings I'm not sure yet if I can remove the bolt as rusted on but I've not spent time on it yet .
Wire wool is on order and a degreaser.
 
Can't believe how good the handles look I can even just about see the webber writing on one. It is very brittle tho I did brake a bit off of one of them . I have chopping board oil was thinking of using that but I could go for varnish.
If they are dried out try soaking them in boiled linseed oil ( if you can remove them )
 
Tbh I thought I had posted pics
 

Attachments

  • PXL_20250319_164220787.jpg
    PXL_20250319_164220787.jpg
    208.5 KB · Views: 6
  • PXL_20250319_164148882.jpg
    PXL_20250319_164148882.jpg
    251.5 KB · Views: 5
  • PXL_20250319_164142765.jpg
    PXL_20250319_164142765.jpg
    181.5 KB · Views: 5
  • PXL_20250319_164132890.jpg
    PXL_20250319_164132890.jpg
    144.3 KB · Views: 5
  • PXL_20250319_164123428.jpg
    PXL_20250319_164123428.jpg
    246.9 KB · Views: 6
  • PXL_20250319_164119889.jpg
    PXL_20250319_164119889.jpg
    218.7 KB · Views: 5
So it's all cleaned up . I'm very happy with the results. I know some people get these show room ready . But I've saved this from the dump and a total cost of £40 for new grates top and bottom and the ash sweepers absolute bargain. They come Thursday.
 

Attachments

  • PXL_20250322_124843084.jpg
    PXL_20250322_124843084.jpg
    137.5 KB · Views: 15
  • PXL_20250322_123852201.jpg
    PXL_20250322_123852201.jpg
    233.4 KB · Views: 15
  • PXL_20250322_124832219.jpg
    PXL_20250322_124832219.jpg
    134.3 KB · Views: 15
  • PXL_20250322_125610885.jpg
    PXL_20250322_125610885.jpg
    211.9 KB · Views: 15
  • PXL_20250322_123849297.jpg
    PXL_20250322_123849297.jpg
    289.3 KB · Views: 15


Back
Top