Chris Binny
TVWBB Fan
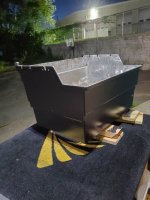
Update: Sorry it's been so long, but actually finished this thing about 10 days ago. It got to the point where i was almost there but couldn't motivate to get over the hump.
So of the remaining steps...
1. Frame
Frame was fun. Ordered this extra long tubing brush from SupplyHouse. My main problem was spider nest pods on the interior of EVERYTHING. This cleaned it up the best it could and took out bulk rust, then I hit with the eastwood goop. Eastwood is very thin and will spill out everywhere, but the tube applicator is great. Looking back, it almost seems easier to build a new one by welding tube together. Either tube aluminum or tube stainless. I'm not afraid of buying a welder and I kind of want to learn. This was a lot of effort and the frame still isn't a bulletproof material (no additional material cost though).

2.. Wood.
Getting and cutting the wood was not that bad. Finishing is the hard part. Used the OSMO oil that i saw on here and stuff is tough to work with. Very thick and be sure you only do thin coats, otherwise you'll be scraping it off like beeswax. Wood was 1x4 sapele (related to mahogany) ripped to 1 9/16" (caliper dimension on the original slats).

3. Shelves
Old Z-bars had the coating flaking off as a whole sheet with rust underneath pitting pretty bad. Only way to fix would be to remove, flap disc, passivate, bondo, paint. Still saving the parts and may do that when i get to the skyline next. Otherwise, it's RCP Dave to the rescue. He had run out of stock, but after a few weeks, the new z-bars came in, 20 gauge grain finish stainless. After that, clamp, drill, screw. Used 4 quarters for spacing on the side narrow shelves. Used a 5/16 nut tipped sideways for the lower. New 316 pan head screws all around. Also used a centering bit left over from doing door hinges, this wood is hard so accurate holes help.


4. Stainless
RCP all around and subsequent burn off


5. We done.
It's so nice I don't want to cook on it. Using the 'on its last legs' spirit 700 i have next to it for now.

Punchlist/Lessons learned:
1. The handle is original, early on i sanded it and just clear urethaned it not realizing my slats would be a different darker species. I should but probably wont ever take care of this.
a. the grill out handle light likely has its permanent home.
2. Sandblast is the way to go. I didn't remove all the old original coating on the aluminum and i can see ridges and flap disc marks. Will use a roller on the paint next time instead of the rattle cans.
3. Greasing the old valves is a must.
4. The bleach solution suggestion on the plastic stuff works great.
5. In the process of standardizing regulators and fittings. It's really cheap and easy to get all your grills on the acme nut and 3/8" flare. I'm not sure how to tell if a regulator is bad, but a 20 year old stiff hose can't be good.
6. Went with socket button head screws for the handle bolts, not OEM looking, but I like it for doing stainless.
a. Will black oxide finish on 18-8 stainless discolor? Not sure what that finish means on a stainless bolt. https://www.boltdepot.com/Socket_button_head_Stainless_steel_18-8_black_oxide_finish.aspx
7. Final step is to find a guy to fabricate the drip pan. Luckily have some life left in the original one.
8. This would have been a great youtube series.
So thanks for all the tips, whether I read them passively or were answered directly. This forum is great, these grills are great.
So of the remaining steps...
1. Frame
Frame was fun. Ordered this extra long tubing brush from SupplyHouse. My main problem was spider nest pods on the interior of EVERYTHING. This cleaned it up the best it could and took out bulk rust, then I hit with the eastwood goop. Eastwood is very thin and will spill out everywhere, but the tube applicator is great. Looking back, it almost seems easier to build a new one by welding tube together. Either tube aluminum or tube stainless. I'm not afraid of buying a welder and I kind of want to learn. This was a lot of effort and the frame still isn't a bulletproof material (no additional material cost though).
2.. Wood.
Getting and cutting the wood was not that bad. Finishing is the hard part. Used the OSMO oil that i saw on here and stuff is tough to work with. Very thick and be sure you only do thin coats, otherwise you'll be scraping it off like beeswax. Wood was 1x4 sapele (related to mahogany) ripped to 1 9/16" (caliper dimension on the original slats).
3. Shelves
Old Z-bars had the coating flaking off as a whole sheet with rust underneath pitting pretty bad. Only way to fix would be to remove, flap disc, passivate, bondo, paint. Still saving the parts and may do that when i get to the skyline next. Otherwise, it's RCP Dave to the rescue. He had run out of stock, but after a few weeks, the new z-bars came in, 20 gauge grain finish stainless. After that, clamp, drill, screw. Used 4 quarters for spacing on the side narrow shelves. Used a 5/16 nut tipped sideways for the lower. New 316 pan head screws all around. Also used a centering bit left over from doing door hinges, this wood is hard so accurate holes help.
4. Stainless
RCP all around and subsequent burn off
5. We done.
It's so nice I don't want to cook on it. Using the 'on its last legs' spirit 700 i have next to it for now.
Punchlist/Lessons learned:
1. The handle is original, early on i sanded it and just clear urethaned it not realizing my slats would be a different darker species. I should but probably wont ever take care of this.
a. the grill out handle light likely has its permanent home.
2. Sandblast is the way to go. I didn't remove all the old original coating on the aluminum and i can see ridges and flap disc marks. Will use a roller on the paint next time instead of the rattle cans.
3. Greasing the old valves is a must.
4. The bleach solution suggestion on the plastic stuff works great.
5. In the process of standardizing regulators and fittings. It's really cheap and easy to get all your grills on the acme nut and 3/8" flare. I'm not sure how to tell if a regulator is bad, but a 20 year old stiff hose can't be good.
6. Went with socket button head screws for the handle bolts, not OEM looking, but I like it for doing stainless.
a. Will black oxide finish on 18-8 stainless discolor? Not sure what that finish means on a stainless bolt. https://www.boltdepot.com/Socket_button_head_Stainless_steel_18-8_black_oxide_finish.aspx
7. Final step is to find a guy to fabricate the drip pan. Luckily have some life left in the original one.
8. This would have been a great youtube series.
So thanks for all the tips, whether I read them passively or were answered directly. This forum is great, these grills are great.

") .
.