Version 2 of my homebrew controller


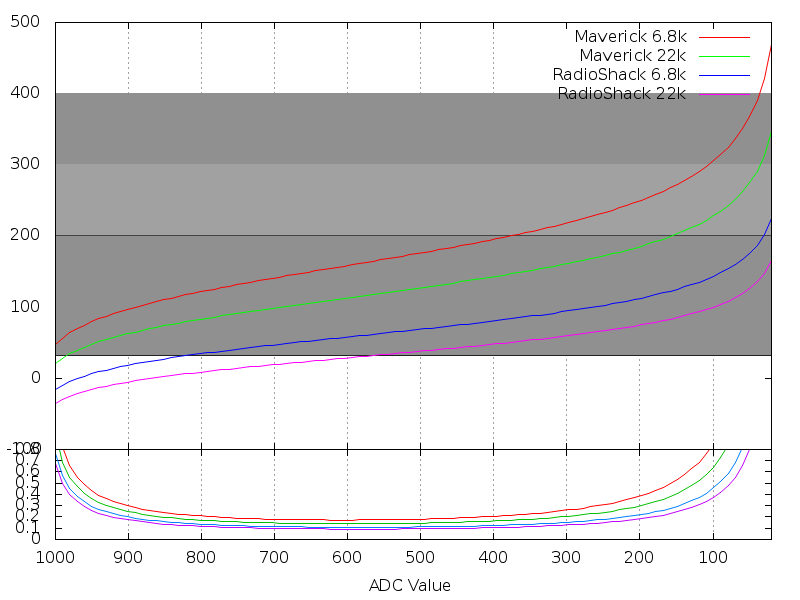
You'll need a resistor as well, because the reading is done by forming a voltage divider between a fixed resistor and the thermistor. We all probably used 22k ohm resistors based off of Bob's design, but I've some some math on what values might be better given our application.

steinhart.png

To read this graph, for example let's assume a maverick probe with a 22kohm resistor. At 200 degrees, we look at the top graph and see the arduino analogRead() will return about 160, and follow that straight down to the bottom graph and see the precision of the read is about 0.3F. If I had used a 6.8k ohm, the precision at that temperature would be about 0.2F.

I could be wrong about that though.
 
Oh man, that's a pretty easy design! I'm going to take a crack at it. I already have a dremmel and a propane torch so I just need to pick up some cutoff wheels and brazing rods.

Regarding a blast gate, I've actually done something similar with my cardboard mockup. It seems that a lot of air can still be drafted through the fan while it isn't in operation. I've placed a piece of cardboard over the exit hole with a piece of tape for a hinge. It works pretty well and didn't catch fire despite being flapped open into the fire box. I tried doing one inside the tunnel but it kept getting stuck in the down position in the tunnel due to the fact that my cut wasn't very precise and it would get wedged.

That mount is great and I can't wait to see what you come up with next!
 
HeaterMeter r36
Here's rev 36 of my software. The complete changelog is below but here's the high points:
-- Added manual fan mode, select it from the menus then use up and down from the "home" screen to change the percentage
-- Added reset config menu option
-- Removed the fan pwm member. I initially added this to have more fine-grained control at low fan levels but this has been replaced with...
-- Long PWM. For fan speeds below 10%, the controller will use a 10 second pulse width and leave the fan on for % seconds of that 10 second period.
-- Fix bug preventing PID params from getting set from URLs
-- Fans turned off if in automatic mode and no pit probe detected
-- Faster static content serving, up to 1.5KB/s, faster on older systems that don't do TCP/IP delayed ack
-- Fixed bug where adjusting the setpoint might trigger lid detect

If you have already run this, you'll need to reset your configuration because the constants assume the old PWM vs Percent-based fan control. Ed you can edit the default config directly rather than doing the Pid[PIDP]/2, just edit DEFAULT_CONFIG in heatermeter.pde.

Changelog

------------------------------------------------------------------------
r36 | bmayland | 2010-10-18 19:20:09 -0400 (Mon, 18 Oct 2010) | 7 lines

Added Manual Fan Mode
-- GrillPid::setFanSpeed() sets the fan into manual mode
-- GrillPid::setSetPoint() sets the fan into auto mode
-- GrillPid::getManualFanMode() returns the current value
Added menuBooleanEdit helper
Added "Reset Config?" and "Manual Mode?" to menu system
setpoint url now will take a negative number to indicate manual fan mode (eg -100 = 100% manual fan)
------------------------------------------------------------------------
r35 | bmayland | 2010-10-18 11:22:12 -0400 (Mon, 18 Oct 2010) | 2 lines

FIXED: Setting the SetPoint to a higher value, more than LidOffset, would trigger lid detect mode.
GrillPid::SetPoint is now accessed via getter/setter
------------------------------------------------------------------------
r34 | bmayland | 2010-10-18 11:11:52 -0400 (Mon, 18 Oct 2010) | 1 line

Reduced Kd to 5.0f
------------------------------------------------------------------------
r33 | bmayland | 2010-10-12 15:20:32 -0400 (Tue, 12 Oct 2010) | 2 lines

A little cleanup of #inlcudes
Make APP_WISERVER almost take out all networking code if not defined
------------------------------------------------------------------------
r32 | bmayland | 2010-09-17 18:40:02 -0400 (Fri, 17 Sep 2010) | 3 lines

Remove extra wep_keys, since only the first is used anyway
Serial set to 115200
Remove saving temps to the dataflash log for now
------------------------------------------------------------------------
r31 | bmayland | 2010-09-17 08:47:57 -0400 (Fri, 17 Sep 2010) | 3 lines

Reduce pidErrorSum decay range to -1.0, because with the new PID bias I don't think this kludge is even needed any more
Increase default Kd to 10.0f, the D term seems to be the most useful in that as soon as the temperature starts to move, you probably want to stop/start the fan to prevent over/undershoot.
Reduce default LidOpenOffset to 15F, might even consider 10F
------------------------------------------------------------------------
r30 | bmayland | 2010-09-16 20:06:13 -0400 (Thu, 16 Sep 2010) | 1 line

Turn the fans off when there's no pit probe detected
------------------------------------------------------------------------
r29 | bmayland | 2010-09-16 19:42:08 -0400 (Thu, 16 Sep 2010) | 1 line

Add "long PWM". For fan speeds (F) under 10%, run the fan at 10% for F seconds out of every 10. This should prevent fan stalls while attempting to run low voltages.
------------------------------------------------------------------------
r28 | bmayland | 2010-09-16 19:40:40 -0400 (Thu, 16 Sep 2010) | 3 lines

Rename flash_file to flash_file_t
Update flashfiles for new index.html
Modify flash file send code to do some jiggery pokery with the UIP stack to not send the entire file every call. 3x speedup for an 11k file, more for larger files.
------------------------------------------------------------------------
r27 | bmayland | 2010-09-16 18:40:13 -0400 (Thu, 16 Sep 2010) | 1 line

Fix bug preventing setting of PID parameters, PID_ORDER wasn't PROGMEM
------------------------------------------------------------------------
r26 | bmayland | 2010-09-15 13:26:23 -0400 (Wed, 15 Sep 2010) | 1 line

Because all classes are statically allocated, they come from the BSS and therefore the constructors don't need to initialize 0-values. Saves a little PROGMEM
------------------------------------------------------------------------
r25 | bmayland | 2010-09-15 13:25:18 -0400 (Wed, 15 Sep 2010) | 1 line

CSV now outputs seconds remaining in LidResumeCooldown instead of 0/100
 
I really appreciate your tips on the construction aspect. I don't have a clue about building things, so it definitely helps.

Something I think I picked up on from your description of the vent positions, are you leaving the bottom vent open at all? I keep mine as shut flush against the fan mount. My thinking is I want the thing to be pretty much airtight, with just enough of the top vent open to prevent the blower from not being able to overcome the static pressure of a sealed grill. I have like a 1-3 degree overshoot on the initial ramp up (after leaving the top off completely until the temperature reaches about 180F). The normal operation keeps things within under 2 degrees either side, with a rare strangeness of up to 5 degrees once an hour or so.

As you suggested, I've tried changing my PID params to { 5.0f, 2.5f, 0.002f, 4.0f }, (halving the P, lowering D to 4). The fan speed seems a lot smoother now but the results are about the same, I think actually a bit closer. Ooh, I just change the setpoint to 250 and it has stayed within 0.3 degrees for 30 minutes. Nice!
I think I'll stick with your updated values.
 
I haven't had a chance to look at the PDF file, I'll check it out tomorrow. It certainly is odd that my temps are so relatively stable with my original code compared to yours. I tried originally measuring the temperature at the grill level and also noticed that they vary a lot more. I decided to go with sticking the probe in the dome because it was more stable. If you look at that last cook I did there's a line from a probe that has was at grill level. Starts out about 20F lower and at one point goes about 25F high then drops down again later (over the 15h cook).

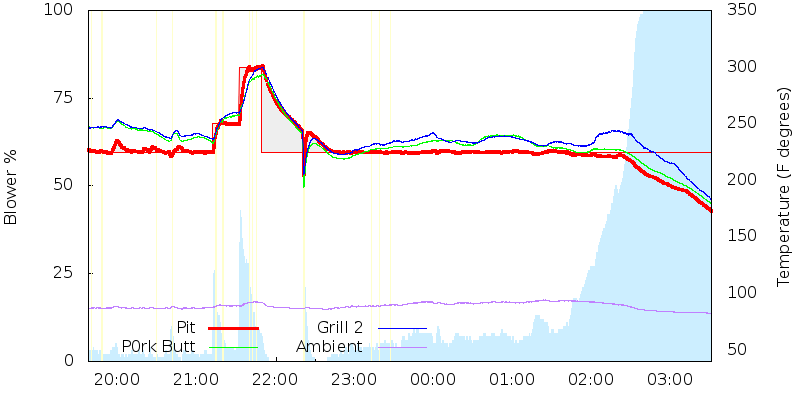
Here's a run of tonight's test (still ongoing). Both the green and the blue probes are at grill level. The strange first hump is me messing with the manual control, the zigzag at 20:45 is when I locked in your PID params so I assume there was a little settling in. Bumped it up to 250F for a while, then 300F, then back down to 225F. Just going to let it run all night until the 2lbs of charcoal I loaded up burn out.
test-20101018.png


I'm having a lot of fun with this project too! Any ideas how the PID parameter editor should work? I don't know if you've tried the probe name editor but it extremely cumbersome. All I can think is make the float editor the same except it just rolls through 0-9 and the decimal place. Ideas are welcome!

EDIT: Oh and yes I do use the Arduino IDE, despite it being a little suboptimal as an IDE. It builds and uploads fine though!
 
Originally posted by Ed Pinnell:
John Mangan has suggested moving the platform to an Atmel MCU with more I/O and other capabilities, and John Frank has suggested a rotary encoder for an input device...I'd be interested in hearing your thoughts on these ideas.

Ed, I actually proposed moving to the Arduino Mega. The beauty in doing this is that 99% of the code will remain exactly the same. You just need to tweak the input and output pins.

The Mega would give us a boat load of room for experimentation (128KB vs. 16KB).

Note: Arduino also just came out with a newer version of the Mega, called Mega 2560. It has TWICE the memory as the original Mega, but at $64.95 a pop, I think it's overkill for this project. You can find the older Arduino Mega for $50 at Sparkfun (and also on Amazon).
 
Ed and Bryan,

I just have to say...you guys BOTH are doing an amazing job on this project! Bryan, your code is some of the best that I've used on the Arduino to date. You're certainly making it easy for us to follow in your steps. And Ed, that fan mount is awesome! Between the two of you I love hearing the back and forth technical discussion on PID control and other aspects of the project. While I'm not commenting constantly, I look forward to every post as this is a great learning experience!

Seeing the fun that the two of you are having is making me reconsider my plans for Rev1 of my own controller. I may scratch my initial plans for a new and improved controller (which I already started on the code and hardware, but oh well). I think I'm going to build the same version you guys have. This way we'll have three of us working to improve the same design.

Cheers and keep up the great work!

- John
 
Originally posted by Ed Pinnell:
I'm still running around town trying to find a freakin' thermistor!
I've had that thermistor in my parts box for the past 12 years, but I'm shocked that Radio Shack has stopped carrying it. If just want to find another 10k ohm thermistor that has a datasheet, I can calculate the Steinhart-Hart coefficients for you. Alternatively, the ambient sensor isn't all that useful, considering it is inside and the heat from the MOSFET, CPU, and Arduino regulator warm it up to not be accurate other than a ballpark estimate.

I've got a slightly modified version of heatermeter that finishes removing the network code if you comment out a single line. Let me know when you figure out how to do it yourself and I'll post how I did it. I don't want to spoil your fun. Brings the program size down to 12,558.

My test system is actually a separate Arduino that I've built on a PCB. The parts are just so **** cheap, I think I bought the whole thing for $10. The most expensive part are the pin headers and things like the DC barrel jack. That just blows my mind. I've flashed that one with the Optiboot bootloader that is standard on the new Arduino Unos, and you get another 1.2k of storage on it. I don't think I'm really running out of room on the current platform. If I were to switch, I'd just buy a 12V wireless router, put DD-WRT on it, then solder the Arduino onto the router itself, interfacing with the serial lines on the router. You can find the ASUS ones for $25 on sale and with that you get a built in good web server (that can handle more than one request at a time), tons of RAM, flash storage, maybe some USB ports if you want them, and a case you can mount it all in. The front LEDs can also be repurposed. With the router handling all the network and logging, there's tons of space left on the ATMega328. For HeaterMeter v3, I'll just use one of the commercial PCB manufacturers, like BatchPCB. $15/board + $10 setup isn't too bad.

Debugging is sometimes a challenge. If I really get stumped on something I just use the serial port to debug it. More printf()s! If something locks up, I use what we call at work "Binary Space Partition Error Localization", which is a fancy made-up term for putting a printf in, and if nothing is printed, clearly the error is before the print.

The graphs I make using gnuplot on a linux machine on my home network. I have a script polling the web server and writing to a log file every 10 seconds. The full procedure is listed in another thread here.
 
Originally posted by Ed Pinnell:
Did you see what Bryan just did? That bit about the wireless router? Those routers are dirt cheap, even brand new they are much less than a WiShield.

I don't know if that was just a throw-away remark or if he was serious, but if he is serious he just turned the heat up a couple of notches on this project. Interfacing an Arduino with a wireless router? Now that is an interesting prospect...

Yes, and I totally agree. That would be a fantastic project for not just this, but many uses. If Bryan takes the lead on that one once again with the code, I would definitely be on board. I have two WRT54G routers at home running dd-wrt (one acts as a wireless repeater so I can get wireless all over the house and out in to the yard). Dd-wrt is a fantastic piece of software.
 
Oh I'm totally serious about the wireless router idea. I bricked a router a year or so ago and bought an FTDI cable to solder it to the router to get to the boot loader. It occurred to me that if the Arduino can spit serial, and the router has a ton of RAM and relatively massive storage that is expandable. I was actually whining, questioning why a WiShield was like $70 shipped "yet you can buy a whole router with ethernet ports and power supply and wireless for $10... wait a minute!"

The key would be to find one that uses a 12V power supply, so you can run the fan off of the same brick, and also has an onboard serial header. The serial is 3.3V TTL, but that shouldn't be hard to get around using a level shifter.
 
You're too kind! The secret here is that I'm actually just doing everything for myself and it just so happens to be things you want too.

But yes, that's exactly what I was talking about with the WRT54G, except I'd try to get the Arduino and MAX232 mounted inside the case. The hardware is the easy part, adding the software and web pages to the router might be a little challenging considering I haven't even built DD-WRT in years.

Oops forgot this:
HeaterMeter r38
This is just r36 with some of the code moved around so there's just a HEATERMETER_NETWORKING define at the top to remove all the net stuff.
 
oops started new thread by mistake

Posted October 20, 2010 12:04 PM
I compiled a list of digikey parts from bryan's parts list.
note qty's are for 2 or minimum purchase.
can someone proof-read list please.


Index Quantity Part Number Description Customer Reference Backorder Quantity Unit Price Extended Price
USD USD
1 2 603-1117-ND BLOWER DC 12V 60X25 3200RPM 0 13.16 $26.32
2 10 BC2444-ND THERMISTOR NTC K 3% RADIAL 0 0.436 $4.36
3 10 1N4001FSCT-ND DIODE GEN PURPOSE 50V 1A DO41 0 0.207 $2.07
4 2 IRF510PBF-ND MOSFET N-CH 100V 5.6A TO-220AB 0 1.61 $3.22
5 5 296-1647-5-ND IC 8-BIT SHIFT REGISTER 14-DIP 0 0.75 $3.75
6 10 P5149-ND CAP 22UF 25V ALUM LYTIC RADIAL 0 0.075 $0.75
7 10 P22.0KCACT-ND RES METAL FILM 22.0K OHM 1/4W 1% 0 0.171 $1.71
8 10 P6.8BACT-ND RES 6.8 OHM CARBON FILM 1/4W 5% 0 0.09 $0.90
9 15 P1.00KCACT-ND RES METAL FILM 1.00K OHM 1/4W 1% 0 0.15 $2.25
10 5 490-3008-ND TRIM POT CERM 10KOHM 12TRN TOP 0 1.81 $9.05
11 10 P390CACT-ND RES METAL FILM 390 OHM 1/4W 1% 0 0.15 $1.50
12 10 P680CACT-ND RES METAL FILM 680 OHM 1/4W 1% 0 0.15 $1.50
13 10 P2.20KCACT-ND RES METAL FILM 2.20K OHM 1/4W 1% 0 0.15 $1.50
14 10 P4.70KCACT-ND RES METAL FILM 4.70K OHM 1/4W 1% 0 0.15 $1.50
15 3 V2018-ND PC BOARD .1"SP 3X3.5 SINGLE SIDE 0 5.75 $17.25
Subtotal $77.63
Shipping unknown
Estimated Sales Tax unknown
Total unknown
 
Originally posted by gerry m.:
oops started new thread by mistake

Posted October 20, 2010 12:04 PM
I compiled a list of digikey parts from bryan's parts list.
note qty's are for 2 or minimum purchase.
can someone proof-read list please.


Index Quantity Part Number Description Customer Reference Backorder Quantity Unit Price Extended Price
USD USD
1 2 603-1117-ND BLOWER DC 12V 60X25 3200RPM 0 13.16 $26.32
2 10 BC2444-ND THERMISTOR NTC K 3% RADIAL 0 0.436 $4.36
3 10 1N4001FSCT-ND DIODE GEN PURPOSE 50V 1A DO41 0 0.207 $2.07
4 2 IRF510PBF-ND MOSFET N-CH 100V 5.6A TO-220AB 0 1.61 $3.22
5 5 296-1647-5-ND IC 8-BIT SHIFT REGISTER 14-DIP 0 0.75 $3.75
6 10 P5149-ND CAP 22UF 25V ALUM LYTIC RADIAL 0 0.075 $0.75
7 10 P22.0KCACT-ND RES METAL FILM 22.0K OHM 1/4W 1% 0 0.171 $1.71
8 10 P6.8BACT-ND RES 6.8 OHM CARBON FILM 1/4W 5% 0 0.09 $0.90
9 15 P1.00KCACT-ND RES METAL FILM 1.00K OHM 1/4W 1% 0 0.15 $2.25
10 5 490-3008-ND TRIM POT CERM 10KOHM 12TRN TOP 0 1.81 $9.05
11 10 P390CACT-ND RES METAL FILM 390 OHM 1/4W 1% 0 0.15 $1.50
12 10 P680CACT-ND RES METAL FILM 680 OHM 1/4W 1% 0 0.15 $1.50
13 10 P2.20KCACT-ND RES METAL FILM 2.20K OHM 1/4W 1% 0 0.15 $1.50
14 10 P4.70KCACT-ND RES METAL FILM 4.70K OHM 1/4W 1% 0 0.15 $1.50
15 3 V2018-ND PC BOARD .1"SP 3X3.5 SINGLE SIDE 0 5.75 $17.25
Subtotal $77.63
Shipping unknown
Estimated Sales Tax unknown
Total unknown

Wow, thanks Gerry! I had this on my list of things to do as well.
 
I compiled a list of digikey parts from bryan's parts list.
note qty's are for 2 or minimum purchase.
can someone proof-read list please.
I didn't check the part numbers but the part are ok with the following changes:
-- You're missing the 1N914 signalling diode for the shift register latch
-- We originally used IRF510 MOSFETS but the proper part is an IRL510 MOSFET. The IRF is a 10v gate and the IRL is 5v.

Not that it saves a lot of money but the only 1% tolerance resistors you need are for the 22k ones. The rest you can get by with 5% carbon film resistors. Saves about, what, $2.40?

Finally, that perfboard you've got is continuous bus (all the holes on each row are connected). Don't know if that is intentional and you are going to cut the traces yourself.
 
Originally posted by D Jennings:
My question, is this something the average guy could build and get working, with so-so soldering skills?

I think that is the goal of compiling all this information into a stand-alone "Instructable" when we're done. Right now we're still in the development stages.
 
I'm still working on the software, and will probably build at least one more version on the current platform (my Dad is a BGE owner as well and wants one).

I've also looked into using Zigbee home automation wireless controllers. They're not much cheaper than the WiFi shield at ~$30 per connection, and require you to have a base station somewhere to exchange data from. I might just use the modules I bought for another project though.

I am interested in the router-based project, but it is a ways off for me.
 
Originally posted by Ed Pinnell:
Is this project pretty much a done deal?

I still have to get mine built before I can consider it a done deal. Lol.

I'm going to try to do most of the building this weekend (no promises). I then need to spend considerable time documenting the whole thing to roll it up into the Instructable. I want to save everyone the headaches that you guys have had to go through with all the debugging and troubleshooting along the way. I also want it nicely documented for future reference for myself! It would be a pain to have to sift through the 11 pages of comments here again. We have a books worth of valuable information here! Lol.
 
The max fan speed is easy enough to do, I'll add that.

The probe thing should be hiding probes that aren't in use. The only exception is the Ambient probe, because the code expects at least one probe to be plugged in at all times. See how I sort of cheated on the software there? Design the hardware in such a way that it masks the software flaw! I suppose I can hide that one too if it isn't detected. Is that what you're talking about? Does it just say Ambient 0F all the time?
 
Originally posted by Bryan Mayland:
The max fan speed is easy enough to do, I'll add that.

Bryan,

Since you're going to be in there editing the code, can you add some comments around the section that needs to be changed to adjust min and max speeds? I can see this being one of those fine-tune areas that will need to be changed depending on the smoker.

I apologize if it's already commented. I don't have the code handy and wanted to catch you before you begin making the changes.


Back
Top