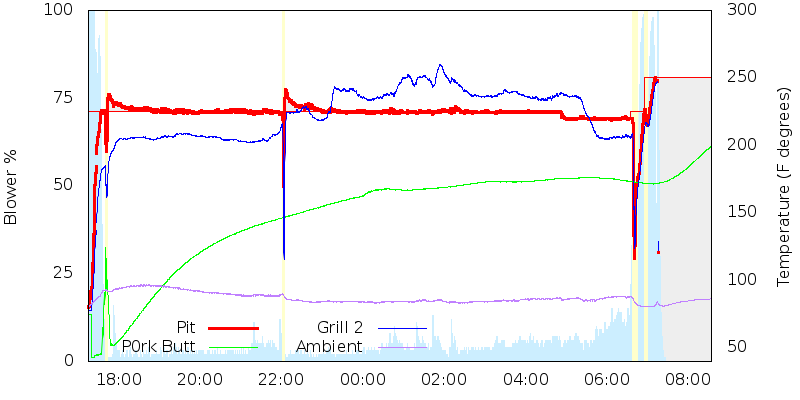
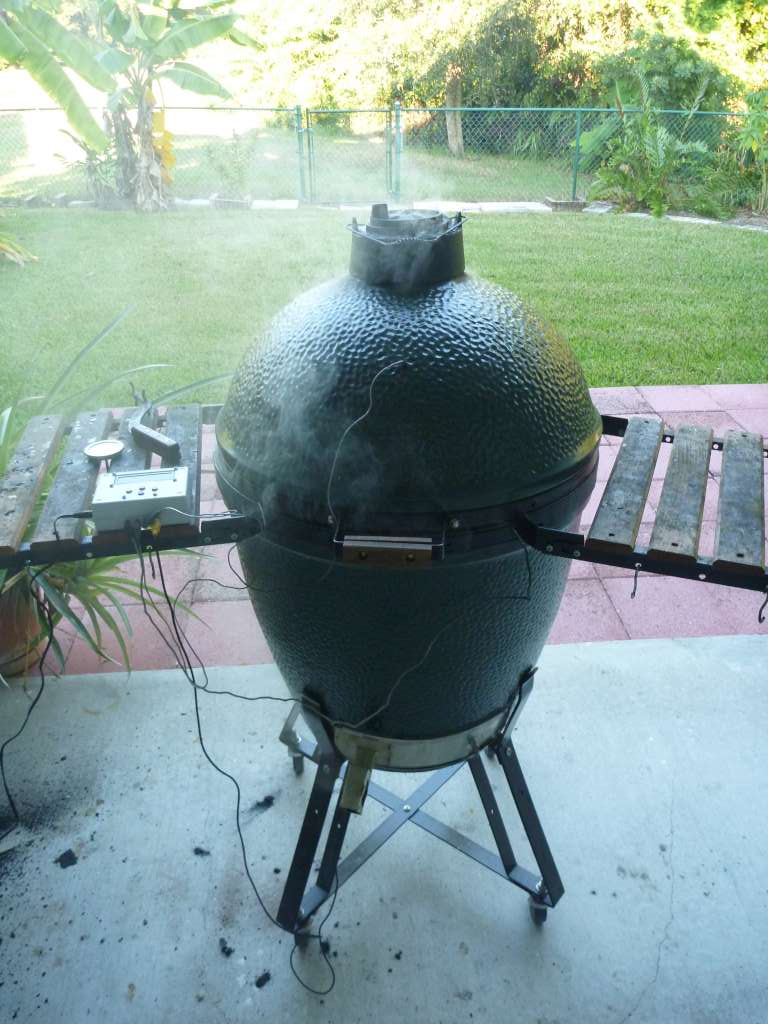
Version 2 of my homebrew controller


Originally posted by Bryan Mayland:
Oh and while we're got everyone's attention, what are some other ideas we can implement? Let's Blue Sky(tm) and Think Outside the Box(tm). Ideally, what features are we missing?

-- Temperature ramp down. Set the temperature you want your meat at and as it approaches it, the set point ramps down so they converge. Based on what we know about the cooking process and the plateaus along the way, I think this can be done with a long moving average. This will also tell you when your food will be done, but unfortunately only after it passes the 180F mark. I wonder if there is a way to provide an estimate of cooking time based on the temperature rise time from 40F to 160F.

-- Alerts. The whole system is lacking a decent alert system. Alert me that my fire is out of fuel, alert me the food is almost ready. Twitter is not exactly ideal. E-mail may be an option but that's not much better.

What else?

You guys are getting close to requiring a programmable (script driven) controller. Adding these features is usually much easier than providing the user interface to set all of the parameters.

One feature I want to try was having the pit temperature be some minimum (eg 50 degrees) warmer than the food sensor reading. If you started out with a pit temperature of 180, once the food reading reached 130, the set point would start raising to maintain the 50 degree difference. Don't know if it would make any difference.

Curt
 
Originally posted by Curt Timmerman:
You guys are getting close to requiring a programmable (script driven) controller. Adding these features is usually much easier than providing the user interface to set all of the parameters.

One feature I want to try was having the pit temperature be some minimum (eg 50 degrees) warmer than the food sensor reading. If you started out with a pit temperature of 180, once the food reading reached 130, the set point would start raising to maintain the 50 degree difference. Don't know if it would make any difference.

Curt
Bryan already programmed the structure for a pretty decent menu system using the basic 4 "d-pad" style buttons. I'm sure much if not all we want to do can be handled through that. If not, we can make some of the more advanced features only available if you have WiFi or direct network connection to give the Controller web page.

- John
 
Originally posted by john frank:
- reflow oven mode

- rotary encoder support panasonic encoder with switch

John,

I don't know about others, but the focus of my build is going to be around smoking food, not re-flow soldering. There are a lot of toaster hacks out there for doing exactly that. Toasters already have a temperature controller built in.

Also, I'm not sure what you want us to consider for a feature with the encoder switch.

- John
 
this project is 99% of the work involved with building a reflow oven. substitute the fan with a relay and the same hardware is now multiple use.

one rotary encoder to drive the menu vs 5 buttons... whats not to get?
-sj
 
Originally posted by john frank:
this project is 99% of the work involved with building a reflow oven. substitute the fan with a relay and the same hardware is now multiple use.

one rotary encoder to drive the menu vs 5 buttons... whats not to get?
-sj

I agree that it's similar, and the entire project could be re-purposed when it's done to create a reflow oven.

I just think there are too many other things to worry about when it comes to reflow soldering such as the various temperature zones (preheat, thermal soak, reflow, and cooling). These should be pretty controlled slopes in temperature and I don't think our code is going to be that precise (because it doesn't need to be for cooking food). Who knows though, that could be another project that immediately follows this one.

I agree that having a reflow oven would be nice.

- John
 
Originally posted by Ed Pinnell:
I got my parts from DigiKey and breadboarded the controller today. I ended up using a 3.3v display from Sparkfun and made a couple of very minor changes to the schematic to get it to work. I have another older 5v LCD display that is not backlit that I have used for prototyping in the past and I had to ground the Read/Write (RW) pin for it to work, so if you use a different LCD than specified that pin may need to be grounded. Myke Predko shows it as being grounded on his 2-wire LCD schematic as well. It didn't make any difference either way on the newer SparkFun LCD, though.

A phenomenal job, Bryan! If our paths ever cross I'm buying!

If I get the blower mount done tomorrow we might get to try it out on some spares Sunday...

Very cool! Another person doing the build. Post some pics Ed! I find it amazing that you just got your parts yesterday and you already have it up and running!
 
Originally posted by Bryan Mayland:
John: The fan I used can operate over the range of 6-12V, so it is variable speed, but with the MOSFET + Capacitor PWM, I get a terribly non-linear response:

With the 10uF cap, the fan makes a lot of noise and supposedly this reduces the life of the fan considerably. The voltage isn't smooth either. If you watch on the oscilloscope, 9V is actually 0V, then a jump up to 12V, which drops to about 3V, and starts heading back to 12V, until the PWM cuts off and there's a spike to 22V. It would be much better to have something that regulated the power (because if you switch out the fan, the curves will be completely different).

Bryan,

Do you think it would be detrimental to have just 3 speeds to control the fan? Low-Med-High.

I think you already said this, but because it's a brushless fan, it has circuitry onboard that may be fighting the PWM control (and I'm sure this is why you've been trying to use a MOSFET rather than a TIP120 transistor for control).

It would be super easy to build a circuit (using 1 Arduino control pin) and trigger 3 preset low-med-high fan speeds. The difficulty in making it variable speed makes me wonder if that is really necessary.

On a related note, this "open source" PWM Driver board controls up to 3 devices with a very simple circuit (using TIP120's). http://reprap.org/wiki/PWM_Driver_1_1
 
Originally posted by Ed Pinnell:
My first impression:

Having worked in the injection molding industry for a number of years, I can tell you that I need to play with the PID to get it set right for my equipment. Therefore, my first request would be for more comments in the C/C++ code for bonehead code dummies like me! Second to that would be an AutoTune feature to bring this project to the masses. Or not. Arduino is all about making the sucker work with what you have, isn't it?

Other than that, it's awesome! Many, many thanks, Mr. Mayland.

Ed,

Are you having any problems controlling the blower speed like Bryan was? Did you use the same circuit he used?

Very nice job, and yes, thank you Bryan for doing the bulk of the grunt work for us in this new revision!

John
 
Originally posted by Ed Pinnell:
Yes, I used the same MOSFET circuitry. The problem as I see it is that the BGE is very well insulated, or more so than a metal Que, so it does not take much air to raise the pit temperature.

Again, I relate this to my experience with injection molding machines, where there are several heater bands controlling the heat on the "barrel". The heater band(s) heating the mass of the barrel heat up very slowly while the heater band on the nozzle gets up to temp very quickly, so the proportional part of the PID needs to be adjusted accordingly, with the integral part adjusting for overshoot. The derivative component fine tunes the process. I have a service manual that explains this concept very well.

I have worked with pressure pump and temperature controller PIDs. There is no one-size-fits-all PID setting...that is why all modern controllers have an autotune feature.

We did a cook last night where I wanted to maintain a 360 deg. temp at the grill. I had to completely choke off the vent to keep it from overshooting, but it worked great at that setting, keeping the temp within a few degrees.

Yea, that's one advantage we would have if we went with a fan that supported PWM vs. regulating the voltage. As I understand it (and I may be wrong), PWM allows you to maintain full torque on the motor, even at slow speeds.

Very glad to hear it's working out well for you though.

Another thought on this whole project, for $18 more, we could use an Arduino Mega. It's dropping in price because the new UNO version just came out. The mega allows 54 Digital I/O pins (14 are PWM output), 16 Analog input pins, and 128KB of memory. The Duemilanove which we've been using has 14 Digital I/O pins (6 PWM), 6 Analog Input, and only 16KB of memory. I may have to use the mega to handle all the features I'm planning. It also works with the WiShield 2.0.
 
Originally posted by Ed Pinnell:
John, the heater band temperature controllers that I just talked about acted upon a solid state relay. It just turned the heater bands off and on, without modulation. By watching the temperature change versus how long the fans were on would work as well as PWM, I think...turn the fan on for a few, turn it off, watch and see if the temp starts to go up...

I'm gonna tinker with the part of Bryan's code that says:

FanSpeed = _fanSpeedPwm * 100 / 255;

and reduce that by half to see what happens on a low and slow today. Either that, or put in a delay loop to give the BGE a chance to respond...

Ahh..OK. I thought you were saying that because the BGE is so well sealed, the fan is having trouble spinning at low speeds (not enough torque). I assume you guys still leave a top vent open though, correct?

It's a small world. I'm very familiar with what you're talking about with injection molding machines. I used to work with them too (BOY molding machines).
 
Having worked in the injection molding industry for a number of years, I can tell you that I need to play with the PID to get it set right for my equipment. Therefore, my first request would be for more comments in the C/C++ code for bonehead code dummies like me! Second to that would be an AutoTune feature to bring this project to the masses.
I would love to be able to get the PID to AutoTune. I just have no idea how to do it. I still sit there and jockey with my constants throughout my cooks. Heck I even do "test burns" to play with them even more.

I'm not even sure how to manually tune the loop. I picked arbitrary values out of the air:
B = Percentage at which my fan turns on
P = ~5% fan speed for each degree of error
I = A small number to account for fuel slowly running out. Probably should be lower than it is, maybe by an order of magnitude
D = I went to a large number and then decreased it until the controller no longer undershot too badly.

I still have oscillations, with a period of about 140 seconds, with a swing of +/1.5 degrees. I'm not sure how to deal with that. I mean if you look at the equation in grillpid.cpp, it assumes that any setpoint requires the same bias (PIDB), which is wrong because 225F might require a 2% bias and 400F would require more like a 50% bias.

Anyway, my current parameters are B=11.0f, P=14.0f, I=0.002f, D=5.0f.

Can you tell me a little more about your fan holder there? Is it just a tunnel with flaps that affix it to the mounting plate? How does it hold the fan? How does one cut a square hole in a piece of metal?
 
control = Pid[PIDB] + Pid[PIDP] * (error + _pidErrorSum - (Pid[PIDD] * (currentTemp - averageTemp)));
Actually you can modify the PID parameters without recompiling at all. I don't have a way to edit it from the menu system, but you can do it from the web server... which I just realized you might not have. The URLs are
http://heatermeter/set?pidb=X
http://heatermeter/set?pidp=X
http://heatermeter/set?pidi=X
http://heatermeter/set?pidd=X

Where X is the floating point value. I also have a Big Green Egg.
grill-20101016.jpg

butt-20101017.png


In order for the heatermeter to work at all for me, the vent at the top needs to be set appropriately. For 225F, I baaaaaarely open the top. When I say barely, not even all the holes are actually open because on my vent some of them start to open before the others. The widest opening probably wouldn't even allow a round toothpick to fit through it. The fan will pressurize the BGE and blow air out of the vent anyway (the seal isn't airtight), as well as from around the vent cap, and through the lid seal.
 
Oh and more more thing! The version I use now already implements a minimum fan speed, and the manual control is in but the menu to control it isn't yet. I'll see if I can get it all done today.
 
I am following your projects with interest because I am working on a similar project for an electric smoker. It is being developed on a Mega2560 with an ethernet shield.

What pit/food temperature sensors do you think work best with the Arduino for this application?

ArdDev.jpeg


Keep up the good work,
Curt
 
Originally posted by Bryan Mayland:
In order for the heatermeter to work at all for me, the vent at the top needs to be set appropriately. For 225F, I baaaaaarely open the top. When I say barely, not even all the holes are actually open because on my vent some of them start to open before the others. The widest opening probably wouldn't even allow a round toothpick to fit through it. The fan will pressurize the BGE and blow air out of the vent anyway (the seal isn't airtight), as well as from around the vent cap, and through the lid seal.

Bryan,

Have you tried starting with fewer lit coals? I had this same problem with my WSM using the minion method for long cooks.

It wasn't until I realized that I should only light 10 or 15 coals total before I was able to maintain constant low-temp cooks (215 - 225F). I leave my top vent wide open the entire time.

I find that if I don't do that and I use wood to smoke the food, the smoke becomes overpowering.

- John
 
Originally posted by Curt Timmerman:
I am following your projects with interest because I am working on a similar project for an electric smoker. It is being developed on a Mega2560 with an ethernet shield.

What pit/food temperature sensors do you think work best with the Arduino for this application?

ArdDev.jpeg


Keep up the good work,
Curt

Curt, the probes we're using are from the Maverick ET-73 thermometer. Among other places, you can get them here: http://www.bbqequipmentstore.c...bes-ET-73-Probes.htm
 
Originally posted by John Mangan:
the probes we're using are from the Maverick ET-73 thermometer.

Thanks for the quick response. Does this probe interface directly with the Arduino? Any other hardware required?

Curt


Back
Top