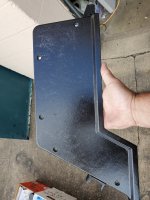
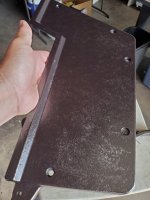
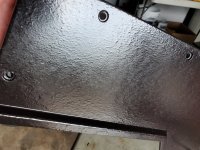
Tried the Krylon roll on stuff tonight...here are my quick thoughts


JimV

TVWBB All-Star
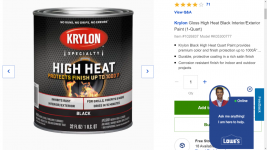
Ok I think I paid $14 for a quart at Lowes. I read many reviews so I was ready for a strong smell.......watery mix........and super fast set up time.

So I was all set up with 2 bare metal end caps and a prepped cook box. Since I wasnt familiar w this product I started on the back of the cook box using a 3/8" nap roller of the no shed variety.

I started to rapidly apply to the cook box and realized its not that big of a deal.....I kept moving and got the box coated very quickly. The only thing I noticed was that my high quality roller started to shed because the paint was drying so fast that it was pulling on the roller. On my first try I wasnt able to control the texture like I do with the Rustoleum stuff.

Then I applied to the bare metal end caps.....yikes I had too much on the roller and had a mess on my hands......I tried to thin it out but then my damn roller started shedding....time was running out quickly and I just had to stop with a kinda wavy way too heavy first coat.....( learning curve ) On the second end cap I had less paint on the roller and just hit it quick and stopped. It came out perfectly but one coat will not cover bare metal. On the can it says re coat within 4 hours or after 72 hours. I am opting for after 72 hours.

When I return I hope hope hope that end cap number 1's wavy heavy coat laid down a bit. Either way I will apply the second coat with a foam roller and try to get a nice lookin end result.

So far it looks darker and shinier than the Rustoleum. That said if the Rustoleum didnt have this brown tint to it....I would choose the Rustoleum over the Krylon just because it is easier to work with. But neither cover in one coat.....and brown is not an option......so Krylon until the can is empty....
 
Yup as I had said before this stuff dries fast and trying to go over a mistake again is near fatal just leave it until it dries. You really need to stir the crap out of it the next time you use it as the pigment settles to the bottom even if it only sits a few days. Stating the obvious do not use this product in direct sun find a shady area. I have only used it with a brush for touch up on control panels and large grease trays.
 
I did stir the crap out of it so all good there.......wasnt in the sun so good there......my biggest mistake was to not use a foam roller..........and that I loaded up the roller too much for an end cap and there was no time to roll off the extra paint. The cook box turned out perfect because I had all that space to roll the product away......the second end cap is perfect.......but the one heavy end cap...well....we shall see when it is all dry. I am ready now to use this product....but u definitely need a trial run.
 
Thanks for the information guys, I to wanted to give this paint a try. I will be buying the quart also. Will the quart be enough to finish one Genesis Silver C Grill. Firebox and Lid side panels only. How many coats will 1 quart do? I hope you post pics of your results JimV I was wondering how glossy it was, because a member pointed out from this pic the title says Gloss and Description says Satin.


Krylon Black High Heat Paint Quart.png
 
Last edited:
Things to remember.....you must prep the cook box and end caps properly for gokd results. Paint chips will show through so decide hkw much that will bother you......u can strip the parts back to bare metal or just live with it looking great but not perfect. The end caps must look as good as u can get them. So use a foam roller......work fast.....just apply the first coat knowing it wont cover bare metal.....but put on a thin coat.......then a second coat. Two coats will cover. I qt can prob do 5 grills.......
 
I'd like to see some pictures ..... I have an extra 1000 I'm probably going to do a half-hab on and I'd like to see the results. Then after the half-hab on the 1000, I will try to use every last bit of information I have to re-restore the 2000 while running the 1000 so I will be taking my sweet time.
 
I'm actually interested in seeing the process, but I guess you don't want to show them until they are beautiful haha!
 
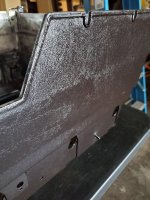
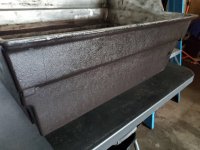
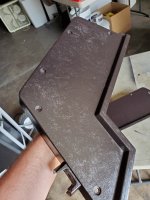
Ok.....this is to help others with this product......Dont be confused....I am showing pics of both end caps...one is way too heavy and wavy and the other is ok. Again I had way too much paint on my roller for an end cap and no time to roll it away...the second end cap I learned and just put a light first coat on. You can also see the cook box......this shiny rich black does not mask imperfections very well.....it has good color and gloss....doesnt hide anything on the first coat. I am really hoping I can clean things up a bit on the second coat. 20210627_155119.jpg20210627_155132.jpg
 
2 more pics of end caps.......ya see the edges and corners make it tricky.....I went too heavy obviously

20210627_155000.jpg20210627_154945.jpg
 
So remember that is just one coat with a 3/8" nap roller. I will apply second coat with a foam roller and hope for some uniform coverage.
 
Thanks Jim. I will be waiting for your second coat review before I buy a can of this to try. I appreciate you being the one to test this for all of us.
 
Learn by my mistake.......light coats applied quickly and you have maybe 25 seconds to roll the roller around before it becomes very tacky. I wanted texture so I used a 3/8" nap roller.....but for this product a foam roller might be the way to go.
 
My only concern about the foam roller is if you stripped your end caps to bare metal......sometimes whatever u used to strip the end caps leaves scratches behind. We often use the 3" wire brush cup on a grinder or even a 4"......the 3" will leave scratches and the 4" will take forever to strip the end caps. I used a special paint stripping pad that worked great but def left scratches that I need to hide or mask. The nap roller will in fact mask light scratches.....I am not sure a foam roller will. I know along time a go I did the same process and then used the spray High Heat Ultra and it did not mask or hide the light scratches at all. Gloss paint shows everything!!!! So 2 more points for Rustoleum because its a satin finish.....a brown - ish satin finish :( ........Rustoleum is by far an easier product to use and work with......if your grill is anything but black I would give the nod to the Rustoleum....but it does not look good with a black hood and brown end caps .. red hood.....blue hood....green hood......not a problem.
 
My only concern about the foam roller is if you stripped your end caps to bare metal......sometimes whatever u used to strip the end caps leaves scratches behind. We often use the 3" wire brush cup on a grinder or even a 4"......the 3" will leave scratches and the 4" will take forever to strip the end caps. I used a special paint stripping pad that worked great but def left scratches that I need to hide or mask. The nap roller will in fact mask light scratches.....I am not sure a foam roller will. I know along time a go I did the same process and then used the spray High Heat Ultra and it did not mask or hide the light scratches at all. Gloss paint shows everything!!!! So 2 more points for Rustoleum because its a satin finish.....a brown - ish satin finish :( ........Rustoleum is by far an easier product to use and work with......if your grill is anything but black I would give the nod to the Rustoleum....but it does not look good with a black hood and brown end caps .. red hood.....blue hood....green hood......not a problem.
I realize this is not a question for a flip grill, but let's say one where time and effort are of no consequence: my daily.

What say one used the brownish paint with a textured roller, then once dry sprayed a coat or two of black on top? Would the brownish stuff give me the texture, and then the black stuff give me the color? I want it all! Also, has anybody tried applying texture with other methods, like a plastic bag blot approach similar to how some plasterers work? This is probably not a good way to do grills, or at least it wouldn't leave a texture like the Weber factory texture which was most likely sprayed on. Wouldn't it be great to know exactly how they did the finish?

I have two gas grills right now, one is a beat up old 1000 that is not at all restored, and the other is my 2000, which might become a 3000 again so I can dye with acetone flameballs outside (kind of another story) because I do have the side burner. I'm thinking about using the 1000 as a guinea pig to explore stuff like paint on the firebox and frame repair stuff. It is also a really good source of parts for the 2000, except for the frame. In any event, I am thinking maybe I strip the end caps on the 1000 and paint them first, so I can get the texture and color techniques down. I'm always at least twice as good at stuff the second time I do it than the first. So I'll have a practice run with these products on the grill I'm not planning to keep.

This is all weeks away at least, but it is definitely in the near future, so thanks again for showing us these products! I'm really interested in what kind of texture you can get with different kinds of rollers.


Back
Top