Josh Dekubber
TVWBB Hall of Fame
I definitely want to use Sappy Walnut on my next build.
I don't blame you, that's very pretty wood. You have to make a matching handle too.I definitely want to use Sappy Walnut on my next build.
Absolutely. I still have to get that figured outI don't blame you, that's very pretty wood. You have to make a matching handle too.
As long as you have a router table you should be good.Absolutely. I still have to get that figured out
Practice makes perfect.Seems technical. There is the routering but then it also has a flat spot inside the routering. I could practice on some cheap wood. It's always good to do as much as you can yourself. Trying is the best way to learn.

They are, but you should have seen the first few my buddy and I made. They weren't pretty, plus we didn't have an original to work from. We had to use a plastic durawood handle and pictures of originals to figure it out.Steve those look perfect!!!
Well I can tell that you guys are true Craftsman because those turned out fantastic!They are, but you should have seen the first few my buddy and I made. They weren't pretty, plus we didn't have an original to work from. We had to use a plastic durawood handle and pictures of originals to figure it out.
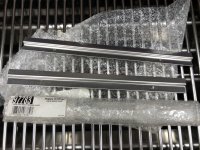
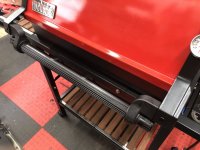
Thanks, we make pretty decent slats too.Well I can tell that you guys are true Craftsman because those turned out fantastic!
As a matter of fact, YES I DO!!!!She is going to be top notch, no doubt about that. You don't happen to have a NOS 40968012 waiting in the wings too?
I had a feeling....As a matter of fact, YES I DO!!!!
Truth be known…I actually have 2. Not sure where I’ll use the other one just yet.I had a feeling....
I probably wouldn't waste either one of them on a grill I was going to sell unless you can find someone who is really willing to pay up for the privilege. In fact, I have sold a couple restored grills that I pulled parts off of that were too nice for the money I was going to get for them, "derestoring" it to fit the market so to speak. I did it before advertising them for sale of course.Truth be known…I actually have 2. Not sure where I’ll use the other one just yet.