ThermoWorks Billows Adaptor w/BBQ Guru Fan Adaptor for WSM or Kettle


John K BBQ

TVWBB All-Star
Before I bought my Billows, I was a big fan and user of the now discontinued BBQ Guru Party Q. Thermoworks says that the billows will work just find if you just plug it in to one of the WSM vent holes but the last time I did that it really didn't work that well. I got an uneven burn in the charcoal ring, and couldn't maintain temps. Other forum members have suggested a "dog bowl" adaptor that covers the entire vent dial, but I never could quite understand that set up.

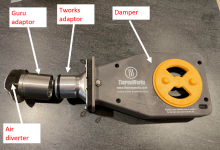
So, I measured the inside of the guru fan adaptor, and asked T-works to give me the mating dimension of their nozzle and it seemed like it would fit so I bought it. Today's fit trial was a success. If the weather cooperates, I'll do a cook this weekend and let everyone know how it works. Here's a photo of the "fit trial" on my kitchen counter. Note, the guru adaptor is mostly for use on the WSM. I can work in a Weber Kettle too, but you have to put the right sized hole in the bottom of the kettle and make sure it won't interfere with the one-touch ash sweeper. The air diverter shown below directs the air towards the bottom of the bowl so it's more evenly distributed vs without the damper. I think this will work better but I won't know for sure until I give it a try.

The other benefit of this set up is that when you install the bellows to the WSM without the adaptors... the springs on the billows are kinda strong and can be a challenge to squeeze together and get into the damper hole. With this set up, just wipe the inside of the adaptor with a wet finger and insert the Tworks adaptor... super easy.
1667269295108.png
 
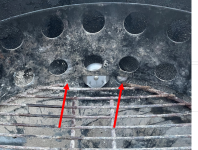
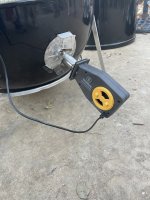
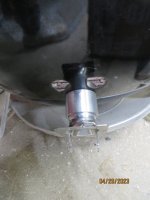
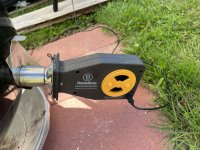
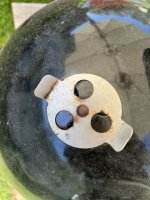
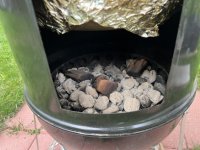
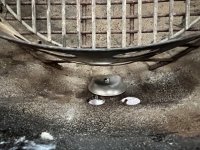
I gave this set up a try on Sunday - it worked better with the bbq guru air diverter vs the regular set up recommended by T-works. The only other mod I made that helps this work is a little notch in the charcoal grate's OD, so the air diverter can blow into the bottom of the bowl without that section of the grate interfering with the air flow. The section of the grate was removed between the red arrows in photo 1 arrows with a hacksaw. You can see the end/face of the air diverter and the phillps head screw that holds it in place below. Photo 2 shows how I installed the billows on the outside of the WSM.

I put about 14 lbs of Kingsford Original in the 22" WSM and it ran from 8 AM until 5 PM at 225 +/- 5F with no issues (it was a 75F sunny day, with no wind). I used the T-works fan restrictor on the fan intake as shown in the 2nd pic, and the WSM seemed to run best with the top damper about 1/2 open. I think the air diverter restricts the flow out of the fan quite a bit so running the top damper "barely cracked" seems to restrict flow a little too much and caused the temperature control to be a little sluggish (slow to correct temperature. I peaked thru the access door a couple of times and the burn inside the charcoal ring was very even/as expected.

Bottom line, if you want to use a Billows on a WSM, I would recommend buying the BBQ Guru adaptor and T-Works adaptor and cutting that little section out of the charcoal grate. I think it's a good adder if you're going to do some longer cooks and know you won't have time to adjust dampers manually.

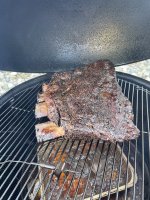
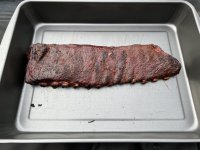
No post would be complete without something like photo 3... I will post it again seperately for those not interested in ATC

bbq guru diverter = https://bbqguru.com/storenav?ProductId=6
Tworks adaptor = https://www.thermoworks.com/billows-mounting-kit/?tw=VWB&chan=TVWBB

Photo 1

1667872114091.png

Photo 2

tworks fan install.jpg

Photo 3

ribs almost done.jpg
 
Last edited by a moderator:
I like the looks of this. I’ve been using the billows on my WSM 18.5 but it does result in a slightly uneven burn. I’ll give this a try.
 
I tried out Billows and a Smoke X2 last weekend for the first time, weather was rainy and about 45*. I just attached it like they show on the Thermoworks site and ran for 3 hours at 225* and then bumped it to 250* for 2 hours, never missed a beat. A couple of spikes after removing the lid to spray apple juice on the ribs but it settled right back to the set temp. Started with about 1/2 a ring of Kingsford Pro and a 1/2 chimney of lit coals with 3 chunks of cherry wood, I'd guess I could have gone 2 hours more if needed. Ribs tasted great. I don't know why I didn't do this a long time ago, makes it almost too easy.
 
The guru adapter, does it just located around the one vent hole and sits against the surface? One the web site is says "mounted through a daisy wheel or attached through a hole 7/8”-1-1/4” but the holes on mine are 3/4" and I can't imaging how it could reduce small enough to fit through those and still allow much air flow
 
The guru adapter, does it just located around the one vent hole and sits against the surface? One the web site is says "mounted through a daisy wheel or attached through a hole 7/8”-1-1/4” but the holes on mine are 3/4" and I can't imaging how it could reduce small enough to fit through those and still allow much air flow
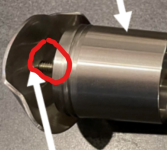
The adaptor really doesn't go "through" the daisy wheel/vent hole. The "adaptor" goes outside the vent/smoker, the diverter goes inside the vent/smoker, then you run the screw goes thru the diverter, thru the vent hole, and threads into the adaptor. When you tighten up the screw, it holds everything in place. The screw wasn't easy to see in my first post so I circled it here.

1682787959039.png
 
Thanks to John K BBQ’s great details, I added the BBQ Guru Weber adapter and TW Billows Mounting Kit. I used the Billows when I got it last summer on a pork butt cook and had some issues maintaining 225* on my 18.5” WSM. I ended up finishing without the billows, manually adjusting the vents. I used the big water pan with water.

I ordered the parts that John had in his post and cut out part of the charcoal grate with a Dremel tool with cut off wheel. I smoked a rack of St. Louis style ribs today using the Smokey Joe lid mod that I did earlier wrapped in foil without water.


I filled the charcoal basket most of the way with Kingsford Original and lit a chimney 3/4 full. Added the lit charcoal evenly over the unlit charcoal and 2 hunks of apple and 1 pecan wood. Hooked up the TW Smoke X4 and grate temp probe to channel 4. Put it all together and added the rack of ribs to the top rack.

The Billows with the adapters worked great. I opened the top vent about 1/4, maybe less. Held temp at 225* to 230* most of the 7 hours. Temps ranged 220* to 235* and did not make any adjustments all day. Very happy with the new set up.

Sauced the ribs lightly with Stubb’s Original BBQ Sauce and put on my Weber gas grill for 2 minutes on each side on medium heat. Ribs were excellent.

After finishing the cook, I looked inside and hardly any charcoal burned down and most of the wood was there. Ribs had a good smoke ring. A little puzzled. Maybe I need to add the wood before the lit charcoal. Thoughts?

FA0A6E51-5CE9-41BB-8315-84FD3BAB0DE1.jpeg440ECFBC-73AE-4422-A0E0-4139D941303B.jpeg55B8D199-3BE6-4CCD-9D79-7ED366BDA40D.jpeg09A80078-48F8-4DE3-9C20-5313E28C1298.jpeg66047E11-2906-4FFC-B5E3-F5F811401984.jpeg
 
Last edited:
How is this setup still working for you? I am going to run my first Signals/Billows smoke this weekend on my WSM 18". I am intrigued by this adapter setup.


Back
Top