Silver B Cook Box Nut and Bolt


MikeAlt

TVWBB Member
I have a genesis silver B 2003 gas grill. Original owner. I will probably not repaint.
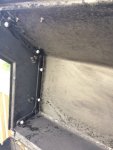
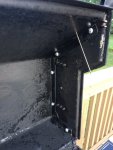
Just adding new flavorizer bars, burners. The left side bolt seems to be holding,
should I try to replace or leave it alone. It looks like there is not much of a nut left
inside the box. The grill works great. Try to repair or leave alone? Thanks
 
Really up to you. If it spins freely in the cook box I would cut it off, sand down the frame where it touches the box, use some kind of dielectric washer between the frame and box (stainless steel is great) and paint it, get a stainless bolt/nut and some never seize. apply the NS liberally to the bolt and threaded area, use another stainless washer inside the box and put the nut on the lubricated threads. Hand tighten. No need to go bonkers on it as it's only there to keep the box from sliding when you move the grill.
 
Never thought of a steel washer between the box and the frame, will paint and apply never seize.
Would you use never seize on the manifold mounting bracket nuts and bolts to the cook box?
Thanks
 
Definitely. It's good stuff and helps a lot
Thanks for your help, left side nut and bolt washer install went well no problems.
New burner replacement was a little tough, one bolt holding the manifold, but
took my time and and it came out in one piece, ss washer installed on both sides
between box and manifold bracket against the cook box. I cleaned the top lid inside. I noticed
two nuts totally destroyed disengaged one on each side. Do I need to replace right away?
The others don't look like bolts and recommendations? The bolts look like studs
they do not go through the end caps. Should I post this lid fix as a new topic?
Silver B mica owner.
 
Last edited:
Those studs are part of the end cap. The nuts are self cutting nuts. The nuts you want a 7/16" head x 1/4" shank.

https://www.amazon.com/exec/obidos/ASIN/B0041C6LYW/tvwb-20
Will the studs stay on the end cap with no problems or breakage, if I take them all off I will repaint end caps.
Painting end caps I paint outside and the inside edge? Is the gray porcelain called mica or is black mica?
What is the grey cover se edition called, Thanks
 
If I understand correctly, you have the endcaps that are essentially part of the end cap. Just remove the self cutting nuts, then remove the end caps. You DO NOT want to paint the inside of the end caps. A little over spray is OK, but I would keep it to a minimum. When the paint burns in, it will create noxious fumes which will impregnate the meat on the grill.

I think the gray porcelain is simply called MICA.
Whats the best way to remove the self cutting nuts and the best way to install them, thanks
 
Just take them off with a 7/16" socket like any other nut. If you are having trouble getting a socket on them, use a long extension to minimize the angle or try a wobble extension. If they are too corroded, then you will have to try pliers or other measures. Just be careful not to break the aluminum stud.
 
Chris Allingham: I just got an email notice that you replied to this thread and quoted me. For some reason, the post is not showing up in the thread for me.

message.jpg
 
Just take them off with a 7/16" socket like any other nut. If you are having trouble getting a socket on them, use a long extension to minimize the angle or try a wobble extension. If they are too corroded, then you will have to try pliers or other measures. Just be careful not to break the aluminum stud.
Hi Bruce 9 out of 10 ten done, any other measures for the rusted self cutting nut. Socket does
not grab. Maybe just leave in and it will burn and rust off.
 
I would carefully try an angle grinder with a cutoff wheel. If the studs on the end cap are aluminum, then you don't want to try prying them, but if they are black steel bolts, then go after them. Even crushing them with a vice grip pliers or Channel locks. But again, if they are on aluminum studs, be careful or you will break them off.

Oh, and just remember this: "If you can't fix it with a hammer, it is an electrical problem".
t0sG1c6.jpg
 
The studs look like studs, not steel bolts they don't go through the end cap. End cap has
no holes on the outside.
Thanks
 
OK, they are aluminum studs then. An angel grinder and cutoff wheel will get them off. You can try hand filing it. If you are careful, a vice grips or channel lock pliers can be used to essentially break the nut or to try to get it started coming off. That it where I would go next.
 
All ten done, 17 year old grill, first time these parts replaced.
 

Attachments

  • IMG_0071.JPG
    IMG_0071.JPG
    136.3 KB · Views: 27
  • IMG_0072.JPG
    IMG_0072.JPG
    137.4 KB · Views: 27
Good job. Have you removed the bold on the left side of the cook box that holds it to the frame? What about the drip tray rails under the cook box? Those are the really big challenge. Or are you nearing the extent of your rehab?
By the way, how did you wind up getting that last one off?

If you are done, let's get that thing fired up and cooking something. Pictures are required.
Did the nut and bolt left side, went well all good. Drip rails under cook box, rails intact holds
drip pan try no problems, so no touch for now.
Last nut on lid, liquid wrench penetrating oil, went with 1/4 drive with extension, the smaller ratchet
get better feel, preventing stud breakage.


Back
Top